
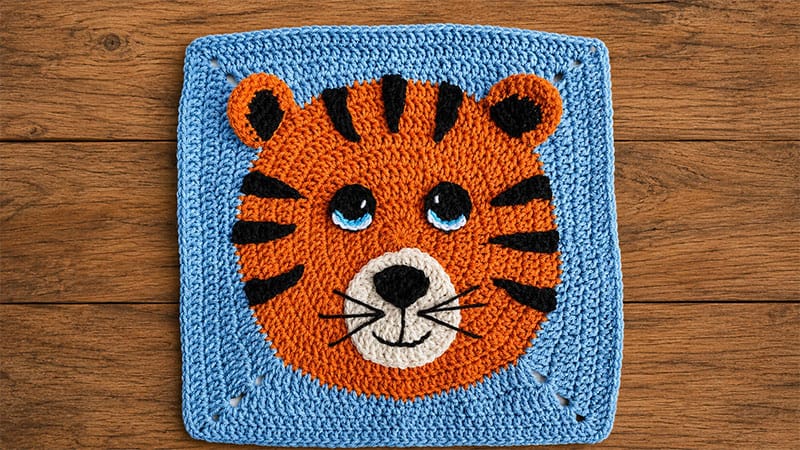
Bring a touch of the safari to your next crochet project with this adorable, large-scale tiger portrait square.
Perfect as a standalone accent pillow cover or as a bold panel for a wildlife-themed blanket, this project begins by working a classic flat circle for the face.
The circle is seamlessly transformed into a crisp square using varying stitch heights. Once the base is ready, individual facial appliques are crafted and sewn on to bring this friendly jungle cat to life.
Pattern Specifications
- Skill Level: Advanced Beginner / Intermediate
- Finished Dimensions: Approximately 14” x 14”
- Gauge: First 4 rounds of the center circle = 4” across
Materials Needed
| Item | Details |
|---|---|
| Yarn | Medium/Worsted Weight (Category 4), Acrylic • Orange: Approx. 106 yds / 2.0 oz • Green: Approx. 80 yds / 1.5 oz • Black: Approx. 26 yds / 0.5 oz • Cream: Approx. 11 yds / 0.2 oz • Blue: Approx. 1 yd |
| Hook | Size I-9 (5.5 mm) crochet hook |
| Notions | Tapestry needle, scissors, and optional stitch markers |
Abbreviations Used
- MR: Magic Ring / Adjustable Loop
- ch: Chain
- st(s): Stitch(es)
- sl st: Slip stitch
- sc: Single crochet
- hdc: Half double crochet
- dc: Double crochet
- tr: Treble crochet
- ch-sp: Chain space
- RS / WS: Right Side / Wrong Side
Pattern Note: The initial ch-3 at the start of any double crochet round is counted as your very first stitch throughout this pattern.
Step-by-Step Instructions
Part 1: The Main Tiger Face & Square Base
The Orange Face Center
Using your Orange yarn, form a magic ring.
- Round 1: Ch 3, work 11 dc into the ring. Close the ring tightly and join with a sl st to the top of the starting ch-3. (12 sts)
- Round 2: Ch 3, dc in the very first stitch. Work 2 dc into every remaining stitch around. Join with a sl st to the top of the ch-3. (24 sts)
- Round 3: Ch 3, dc in the same stitch. Dc in the next stitch, then work 2 dc in the following stitch. Repeat from * to * all the way around, ending with 1 dc in the final stitch. Join with a sl st. (36 sts)
- Round 4: Ch 3, work 2 dc in the next stitch. Dc in each of the next 2 stitches, then 2 dc in the next stitch. Repeat from * to * until 1 stitch remains. Dc in that last stitch, then join with a sl st. (48 sts)
- Round 5: Ch 3, dc in the same stitch. Dc across the next 3 stitches, then work 2 dc in the next stitch. Repeat from * to * around, ending with a dc in each of the final 3 stitches. Join with a sl st. (60 sts)
- Round 6: Ch 3, dc in the next stitch, 2 dc in the next. Dc in each of the next 4 stitches, then 2 dc in the next. Repeat from * to * until 2 stitches remain. Dc in the last 2 stitches, then join with a sl st. (72 sts)
- Round 7: Ch 3, dc in the same stitch. Dc across the next 5 stitches, then 2 dc in the next. Repeat from * to * around, ending with a dc in each of the last 5 stitches. Join with a sl st. (84 sts)
- Round 8: Ch 3, dc in the next 2 stitches, 2 dc in the next. Dc in each of the next 6 stitches, then 2 dc in the next. Repeat from * to * until 3 stitches remain. Dc in the final 3 stitches, then join with a sl st. (96 sts)
- Round 9: Ch 3, dc in the same stitch. Dc across the next 7 stitches, then 2 dc in the next. Repeat from * to * around, ending with a dc in each of the last 7 stitches. Join with a sl st. (108 sts)
Fasten off the orange yarn.
The Green Squaring Border
We will now transition the circle into a square.
- Round 10: Attach Green yarn to the first stitch. Ch 1, sc in that same stitch, sc in the next stitch. Hdc in the next 4 sts, dc in the next 4 sts, tr in the next 4 sts. In the next stitch, create a corner: (2 tr, ch 2, 2 tr). Then work tr in the next 4 sts, dc in the next 4 sts, hdc in the next 4 sts, sc in the next 2 sts, hdc in the next 4 sts, dc in the next 4 sts, tr in the next 4 sts. Repeat from * to * twice more. In the next stitch, work your final corner: (2 tr, ch 2, 2 tr). Complete the sequence with tr in the next 4 sts, dc in the next 4 sts, and hdc in the last 4 sts. Sl st to the first sc to join. (120 sts + four ch-2 corners)
- Round 11: Ch 1, sc in the same stitch, sc in the next. Hdc in the next 4 sts, dc in the next 6 sts, tr in the next 4 sts. In the corner ch-sp, work (2 tr, ch 2, 2 tr). Then tr in the next 4 sts, dc in the next 6 sts, hdc in the next 4 sts, sc in the next 2 sts, hdc in the next 4 sts, dc in the next 6 sts, tr in the next 4 sts. Repeat from * to * twice more. Work (2 tr, ch 2, 2 tr) in the last corner space, then tr in the next 4 sts, dc in the next 6 sts, and hdc in the final 4 sts. Sl st to the first sc. (136 sts + four ch-2 corners)
- Round 12 & 13: Ch 3 (counts as a dc). Dc in every stitch across until you reach the corner ch-sp, then work (2 dc, ch 2, 2 dc) directly into the space. Repeat from * to * around the entire square. Sl st to the top of the starting ch-3 to finish the round. (152 sts for Round 12; 168 sts for Round 13)
Cut your yarn and secure the ends.
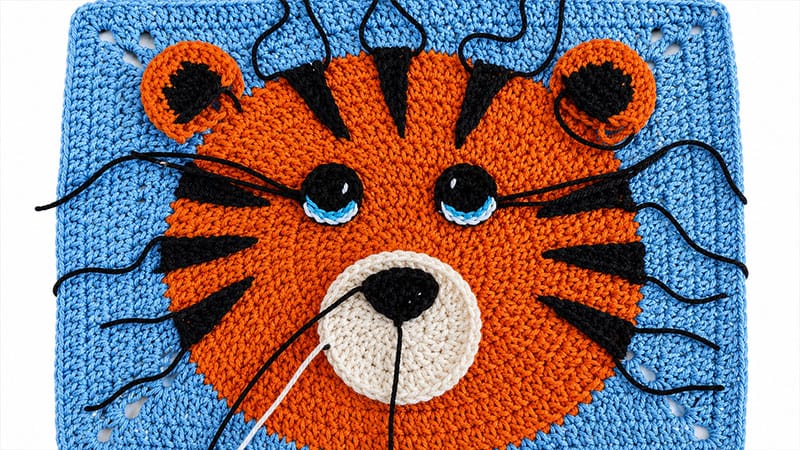
Part 2: Facial Appliques
Tiger Ears (Make 2)
- Round 1 (RS): Using Orange, create a MR. Ch 1, work 6 sc into the ring. (6 sts)
- Round 2: Work 2 sc into every stitch around. (12 sts)
- Round 3: 2 sc in the next stitch, 1 sc in the following stitch. Repeat from * to * around. (18 sts)
- Round 4: Sc in the next 3 stitches. Change to Black and sc in the next 3 stitches. Switch back to Orange and sc in the remaining 12 stitches. (18 sts)
- Round 5: Sc in the next 2 stitches. Change to Black and sc across the next 5 stitches. Switch back to Orange and sc in the final 11 stitches. (18 sts)
- Rounds 6 – 7: Repeat the stitch and color pattern established in Round 5.
- Fasten off, leaving a long tail of orange yarn to sew the ears to the base.
Muzzle
Using Cream yarn, create a MR.
- Round 1: Ch 3, work 11 dc into the loop. Pull tight and join with a sl st to the ch-3. (12 sts)
- Round 2: Ch 3, dc in the same stitch, then work 2 dc into every stitch around. Sl st to join. (24 sts)
- Round 3: Ch 3, dc in the same stitch, dc in the next. 2 dc in the next stitch, dc in the following stitch. Repeat from * to * around. Join with a sl st. (36 sts)
- Fasten off, leaving a generous tail for assembly.
Nose
Using Black yarn, ch 3.
- Row 1: Sc in the second chain from your hook, then sc in the last chain. Turn. (2 sts)
- Row 2: Ch 1, work 2 sc in the first stitch, and 2 sc in the last stitch. Turn. (4 sts)
- Row 3: Ch 1, 2 sc in the first stitch, sc across to the final stitch, 2 sc in the last stitch. Turn. (6 sts)
- Border: Safely work single crochet stitches evenly all the way around the raw perimeter of the triangular nose. Place 2 sc into each corner to keep them flat. Sl st to the first stitch to join.
- Fasten off, leaving a long yarn tail.
Eyes (Make 2)
- Round 1: Using Black, create a MR. Ch 3, work 10 dc into the ring. Pull closed and join with a sl st. (11 sts) Fasten off the black yarn, leaving a long sewing tail.
- Row 2: Attach Blue yarn to the first stitch of Round 1. Work a sl st across the next 5 stitches, then fasten off.
- Row 3: Attach White yarn to the same starting stitch of Round 1, running your hook right behind the blue stitches. Sl st across the next 5 stitches. Fasten off, keeping a long strand of white for eye details.
- Use the remaining white strand to stitch a small, bright reflection point in the center of the dark pupil.
Tiger Stripes (Make 9)
Using Black yarn, ch 8.
- Row 1: Sl st into the second chain from your hook. Sc in each of the next 2 chains, hdc in each of the next 2 chains, and finish with a dc in each of the final 2 chains.
- Fasten off, leaving a long tail for attachment.
Part 3: Assembly & Final Details
Using a tapestry needle and the long yarn tails left on your applique pieces, secure them onto the right side (RS) of your orange face circle:
- Ears: Position and sew the ears securely near the upper curved edge of the orange face, aligning them neatly with the top corners of the green square frame.
- Stripes: Arrange the 9 accent stripes symmetrically around the sides and top of the orange face, then sew them down flat.
- Eyes: Place the eyes evenly in the upper-middle section of the face and sew them down.
- Muzzle & Nose: First, sew the black triangular nose onto the upper center of the cream muzzle. Using a strand of black yarn, embroider a downward line and a classic curved smile underneath the nose. Once complete, stitch the entire muzzle assembly onto the lower center of the tiger’s face.
- Whiskers: Take a long piece of black yarn and embroider fine whisker lines extending outward from the sides of the cream muzzle.
- Finishing: Securely weave all remaining loose ends into the back of your work. Your tiger square is complete!
