
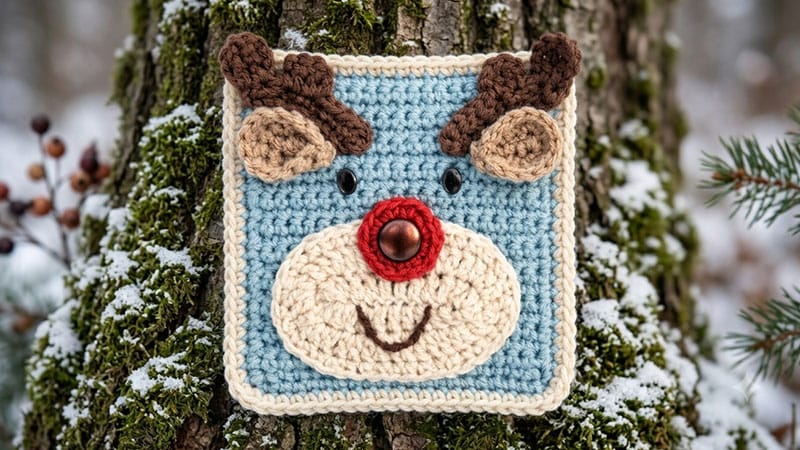
Bring some festive woodland charm to your next crochet project with this adorable Reindeer Granny Square!
Perfect for holiday blankets, festive pillows, or a whimsical tote bag, this square features a cozy, solid-textured background adorned with a layered reindeer face.
With its dimensional snout, custom antlers, and a nose that can easily be turned into Rudolph’s iconic red nose, this versatile block is a delightful project for crocheters of all skill levels.
Pattern Specifications
- Skill Level: Advanced Beginner
- Hook Size: US Size H-8 (5.0 mm) crochet hook
- Terminology: US Crochet Terms
- Finished Dimensions: Approximately $6 \times 6$ inches (depending on tension)
Materials & Yarn Colors
To make the reindeer version, you will need medium-weight (Weight 4) acrylic yarn in the following shades:
- Main Square: Medium Brown (Cafe Latte)
- Outer Border & Antlers: Dark Brown (Coffee)
- Snout: Light Tan (Buff Beige)
- Nose: Dark Brown (or Cherry Red for Rudolph)
- Notions: Two black safety eyes, tapestry needle, scissors.
Step-by-Step Instructions
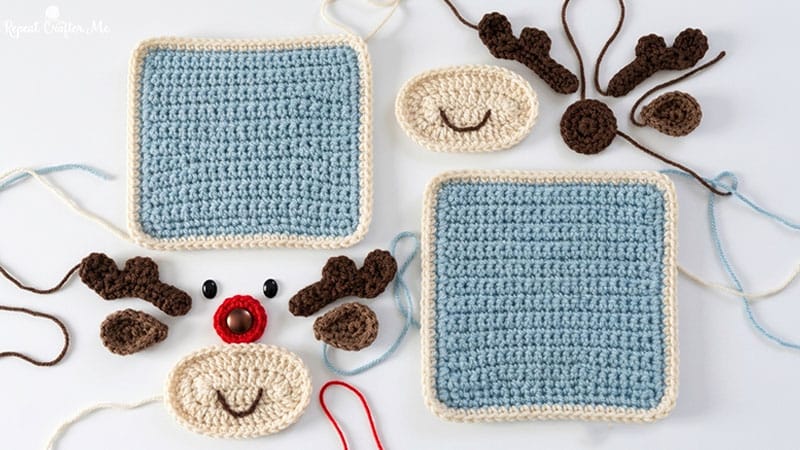
1. The Main Square Background
This square is worked in rows to create a solid fabric background, finished with a crisp, contrasting border.
- Foundation: Using your medium brown yarn, create a slip knot and chain 21.
- Row 1: Starting in the second chain from your hook, work 1 Single Crochet (SC) into each chain across. Chain 1 and turn your work. (20 SC)
- Rows 2–23: Work 1 SC into every stitch across the row. Chain 1 and turn at the end of each row.
- Squaring the Edges: At the end of Row 23, do not fasten off. Work a row of SC evenly down the three remaining raw sides of the square, placing 2 SC into each corner to help it turn smoothly.
- The Border: Join your dark brown yarn and fasten off the medium brown. Join with a slip stitch to any stitch on the edge. Work 1 SC into every stitch around all four sides of the square, placing 2 SC in each of the four corners. Fasten off and weave in your ends.
2. The Dimensional Snout
- Round 1: Using light tan yarn, chain 12. Work a Double Crochet (DC) into the 3rd chain from your hook. DC in the next 8 chains. In the very last chain, work 3 DC (this rounds the corner). Now, rotate your piece to work along the opposite side of the foundation chain: DC in each stitch across, and work 3 DC into the final stitch. Slip stitch to the first DC to join. Chain 2. (24 DC)
- Round 2: *Work 2 DC into the first stitch, then 1 DC into the next stitch.* Repeat this sequence all the way around the oval. Join with a slip stitch. (36 DC)
- Round 3: Work 1 SC into every stitch around the oval. Join the first stitch with a slip stitch. Fasten off, leaving a long tail of yarn for sewing.
- Optional: Use a tapestry needle and a scrap of dark yarn to embroider a small, happy smile onto the lower half of the snout.
3. The Antlers (Make 2)
- Row 1: Using dark brown yarn, chain 11. Work 1 SC into the second chain from the hook and into each remaining chain across. Chain 3 and turn.
- Row 2 (Creating the Points): Work a Treble Crochet (TC) into the first stitch. In the second stitch, work a TC, chain 3, and slip stitch into that same stitch to finish the first antler point. Slip stitch into the next 2 stitches. To make the smaller point, chain 2, work a DC into the next stitch, then work a DC + chain 2 and slip stitch back into the following stitch. Slip stitch into all remaining stitches to the end. Fasten off, leaving a tail for assembly.
4. The Festive Ears (Make 2)
- Row 1: Using medium brown yarn, chain 5. Work 1 SC in the second chain from the hook, 1 Half Double Crochet (HDC) in the next chain, and 1 DC into each of the last two chains. Chain 1, turn.
- Row 2: SC in the first 3 stitches, work 2 SC into the next stitch, then SC in the last 4 stitches. Chain 1, turn.
- Row 3: SC in the first 3 stitches, work 2 SC into each of the next 3 stitches (to round the ear tip), then SC in the last 3 stitches. Fasten off, leaving a long tail.
5. The Nose
- Round 1: Using dark brown (or bright red) yarn, start with a magic ring. Chain 1 and place 8 SC into the ring. Pull the ring tight and slip stitch to the first SC to join. Chain 1.
- Round 2: Work 2 SC into every stitch around. Join with a slip stitch to the first SC. (16 SC) Fasten off, leaving a long tail.
Assembly Guide
- Secure the Eyes: Before sewing anything down, press your black safety eyes into the upper-middle section of the main square background, leaving enough room below them for the snout. Secure the backings firmly.
- Attach the Snout & Nose: Center the light tan snout right below the eyes and sew it down using your yarn tail and a tapestry needle. Next, position the nose so it slightly overlaps the top center of the snout and sew it securely in place.
- Add the Ears and Antlers: Position the two antlers at the top of the head/square and stitch them down. Place the ears just below the base of each antler, angling them slightly downward for a cute, realistic look. Securely weave in all loose ends on the back of your square.
