
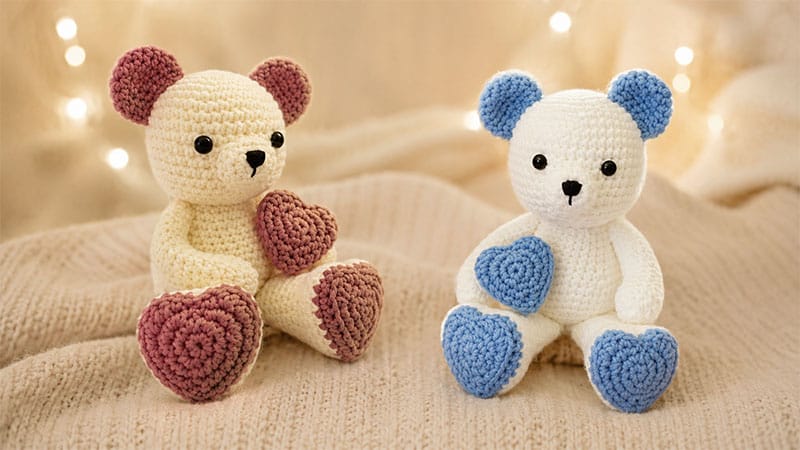
The Valentine Teddy Bear is a charming, sitting amigurumi doll measuring roughly 7 to 8 inches tall.
Its most unique feature is its heart-shaped feet, which are cleverly formed using standard crochet shaping techniques (and can be enhanced with an optional plastic mesh insert for extra crispness).
Designed by Sharon Ojala, the head and torso are crocheted as a single continuous piece, making assembly straightforward and durable.
Project Details & Materials
- Skill Level: Intermediate (due to specialized stitch placement for the hearts)
- Yarn: Worsted weight acrylic yarn in 2 contrasting colors (Main Body Color and Red/Accent Color). Less than one standard skein of each is required.
- Hook Size: 4.5 mm (or smaller if your stitches show gaps)
- Notions: Blunt yarn needle, scissors, 100% polyester fiberfill stuffing, 10mm safety eyes (or buttons/embroidery thread).
- Optional: A small piece of plastic mesh sheet to reinforce the heart feet.
Stitches & Abbreviations
- ch: chain
- st / sts: stitch/stitches
- sc: single crochet
- hdc: half double crochet
- sl st: slip stitch
- 2tog: single crochet 2 stitches together (decrease)
- BLO: back loop only
- f/o: finish off / fasten off
Pattern Note: Work in continuous rounds unless specified. Use a stitch marker to keep track of the end of each row. The number in parentheses ( ) at the end of a row indicates the total stitch count for that round.
Reading the repeats: A sequence like “1sc then 2sc in next st” means you will repeat that exact pattern all the way around to the end of the row.
Step-by-Step Crochet Instructions
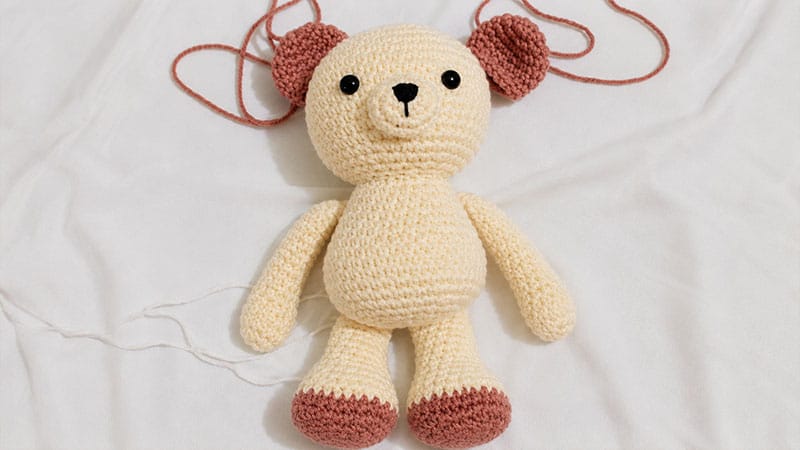
1. Head and Body (Worked from the top down)
Using your main body color:
- Row 1: Form a magic circle; work 6 sc into the ring. (6)
- Row 2: Work 2 sc into every st around. (12)
- Row 3: 1 sc, 2 sc in the next st, repeat around. (18)
- Row 4: 1 sc in each of the next 2 sts, 2 sc in the next st, repeat around. (24)
- Row 5: 1 sc in each of the next 3 sts, 2 sc in the next st, repeat around. (30)
- Row 6: 1 sc in each of the next 4 sts, 2 sc in the next st, repeat around. (36)
- Row 7: 1 sc in each of the next 5 sts, 2 sc in the next st, repeat around. (42)
- Row 8: 1 sc in each of the next 13 sts, 2 sc in the next st, repeat around. (45)
- Rows 9–16: Work 1 sc in each st around (8 rounds total). (45)
- Row 17: 1 sc in each of the next 13 sts, 2tog repeat around. (42)
- Row 18: 1 sc in each of the next 5 sts, 2tog repeat around. (36)
- Row 19: 1 sc in each of the next 4 sts, 2tog repeat around. (30)
- Row 20: 1 sc in each of the next 3 sts, 2tog repeat around. (24)
- Row 21: 1 sc in each of the next 2 sts, 2 tog, repeat around. (18)
- Row 22: 1 sc in each of the next 4 sts, 2tog repeat around. (15)
Eye Placement: If using safety eyes, install them now between Rows 12 and 13. Leave 7 unworked stitches visible between the eyes.
- Row 23: Work 2 sc in every st around. (30) Firmly stuff and shape the head.
- Rows 24–28: Work 1 sc in each st around (5 rounds total). (30)
- Row 29: 1 sc in each of the next 4 sts, 2 sc in the next st, repeat around. (36)
- Row 30: 1 sc in each of the next 5 sts, 2 sc in the next st, repeat around. (42)
- Rows 31–35: Work 1 sc in each st around (5 rounds total). (42)
- Row 36: 1 sc in each of the next 5 sts, 2tog repeat around. (36)
- Row 37: 1 sc in each of the next 4 sts, 2tog repeat around. (30)
- Row 38: 1 sc in each of the next 3 sts, 2 tog, repeat around. (24)
- Row 39: 1 sc in each of the next 2 sts, 2 tog, repeat around. (18)
- Pack stuffing firmly into the torso, making sure the neck area is solid so the head doesn’t wobble.
- Row 40: 1 sc, 2tog repeat around. (12) Add final bits of stuffing as you close.
- Row 41: 1 sc, 2tog repeat around. (8)
- Fasten off, leaving a long yarn tail. Thread the tail through the front loops of the remaining 8 stitches, pull tightly to seal the opening, secure with a knot, and hide the end inside the body.
2. Muzzle
Using your main body color:
- Row 1: Create a magic circle; work 6 sc into the ring. (6)
- Row 2: Work 2 sc into every st around. (12)
- Row 3: 1 sc in each of the next 3 sts, 2 sc in the next st, repeat around. (15)
- Row 4: Work 1 sc in each st around. (15)
- Fasten off, leaving a long assembly tail. Note: Embroider your preferred nose design onto the muzzle before attaching it to the face.
3. Ears (Make 2)
Using the red/accent color yarn:
- Row 1: Create a magic circle; work 6 sc into the ring. (6)
- Row 2: Work 2 sc into every st around. (12)
- Row 3: 1 sc, 2 sc in the next st, repeat around. (18)
- Rows 4–5: Work 1 sc in each st around (2 rounds total). (18)
- Row 6: 1 sc in each of the next 4 sts, 2tog repeat around. (15)
- Row 7: Work 1 sc in each st around. (15)
- Fasten off, leaving a long sewing tail. Do not stuff the ears; press them completely flat.
4. Arms (Make 2)
Using your main body color:
- Row 1: Create a magic circle; work 6 sc into the ring. (6)
- Row 2: Work 2 sc into every st around. (12)
- Row 3: 1 sc in each of the next 3 sts, 2 sc in the next st, repeat around. (15)
- Row 4: Work 1 sc in each st around. (15)
- Row 5: 1 sc in each of the next 3 sts, 2tog repeat around. (12)
- Row 6: Work 1 sc in each st around. (12)
- Row 7: 1 sc in each of the next 4 sts, 2tog repeat around. (10)
- Rows 8–16: Work 1 sc in each st around (9 rounds total). (10)
- Fasten off, leaving a long sewing tail. Lightly stuff the hands and lower arms. (Optional: insert a folded, twisted pipe cleaner for adjustability).
5. Heart-Shaped Legs (Make 2)
Begin with the red/accent color yarn.
- Row 1: Create a magic circle; work 6 sc into the ring. (6)
- Row 2: Work 2 sc into every st around. (12)
- Row 3: 1 sc in each of the next 3 sts, 3 sc in the next st, 2 sc in the next st, sl st into each of the next 2 sts, 2 sc in the next st, 3 sc in the next st, 1 sc in each of the last 3 sts. (18)
- Row 4: 1 sc, [1 hdc in next st, then work 1 sc into the top of that hdc and 1 sc into the base of that same hdc], 1 sc in each of the next 3 sts, 2 sc in the next st, 2 hdc in each of the next 2 sts, 1 sc, sl st into each of the next 2 sts, 1 sc, 2 hdc in each of the next 2 sts, 2 sc in the next st, 1 sc in each of the final 3 sts. (26)
- Row 5: 1 sc in each of the next 2 sts. Switching to Back Loops Only (BLO): work 1 sc in each of the remaining 24 sts. (26)
- Row 6: Working in BLO: 1 sc in the next st, change to your main body color in the next st. Switching back to working through both loops: work 1 sc in each of the final 24 sts. (26)
- Row 7: 1 sc in each of the next 11 sts, 2tog repeat across. (24)
- Row 8: 1 sc in each of the next 4 sts, 2tog repeat across. (20)
- Row 9: Work 1 sc in each st around. (20)
- Row 10: 1 sc in each of the next 3 sts, 2tog repeat across. (16)
- Row 11: 1 sc in each of the next 6 sts, 2tog repeat across. (14)
Shaping Tip: Stuff the heart foot firmly. If you want a highly defined heart, trace and cut a matching heart out of a plastic mesh sheet and slide it into the bottom of the foot before stuffing.
To sculpt the top indent of the heart even deeper, thread a separate piece of red yarn from the back of the ankle, out through the center top indent, back down through the bottom center cleavage, and tie it tight to pull the shape together.
- Rows 12–19: Work 1 sc in each st around (8 rounds total). (14)
- Stuff the leg up through Row 17. Press the top opening flat.
- To Close: Work 1 sc through both layers of the flattened edge to join them, ch 1, turn, sc across the row to seal completely, ch 1, turn, and sc across once more. Fasten off, leaving a long tail for attachment.
6. Tail
Using your main body color:
- Row 1: Create a magic circle; work 6 sc into the ring. (6)
- Row 2: Work 2 sc into every st around. (12)
- Row 3: 1 sc in each of the next 3 sts, 2 sc in the next st, repeat around. (15)
- Row 4: Work 1 sc in each st around. (15)
- Row 5: 1 sc in each of the next 3 sts, 2tog repeat around. (12)
- Fasten off, leaving a long tail for sewing.
7. Decorative Heart Pillow (Make 2 Matching Panels)
Using red/accent color yarn:
- Rows 1–4: Follow the exact instructions provided for Rows 1 through 4 of the Legs section above.
- Row 5: 1 sc in each of the next 2 sts, sl st into the next st.
- Fasten off. On the first panel, cut the yarn short. On the second panel, leave a very long tail for assembly.
Assembly of Pillow: Place the two panels with their wrong sides facing each other. Using your yarn needle, whipstitch the back loops of both panels together. Pack with fiberfill stuffing right before closing the last few stitches, finish sewing, knot securely, and pull the yarn tail inside the pillow to hide it.
Final Assembly Instructions
- Legs: Pin the flattened tops of the legs to the flat bottom area of the torso. Position them so that when the bear is placed on a flat surface, it sits upright with the heart-shaped soles facing forward and vertically straight. Sew securely.
- Arms: Position the arms directly beneath the head-to-body seam (approximately one row down from the neckline). Sew them in place. If the arms flare out unnaturally, add a hidden anchoring stitch or two on the underside of the arm to secure it flush against the torso.
- Muzzle: Ensure your embroidered nose is complete. Lightly stuff the muzzle, position it so the top edge rests precisely along Row 12 of the face, pin generously to maintain symmetry, and whip stitch it securely to the head.
- Ears: Position the flat ears evenly on top of the head and sew down.
- Tail: Set the bear down into its final sitting position to determine exactly where the tail should rest to act as a stabilizing balance point. Pin it down, stuff it lightly, and sew it to the lower back of the body.
