
Transitioning to a zero-waste lifestyle is all about swapping single-use items for sustainable, reusable alternatives.
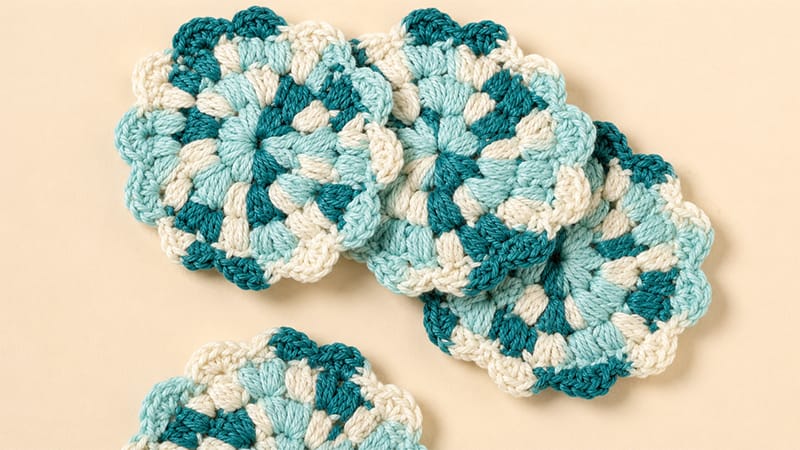
These crochet flower face scrubbies are a perfect replacement for disposable cotton rounds. Whether you use them for removing makeup, applying toner, or gently exfoliating your skin, they are soft, durable, and highly effective.
Because they are crafted from 100% cotton, they can be tossed in the washing machine and reused for years, making them an excellent eco-conscious project for yourself or a thoughtful handmade gift for a friend.
Project Details & Care Notes
- Easy Care: These scrubbies can be rinsed by hand with warm water and soap after daily use, or tossed into a mesh laundry bag for a gentle cycle in the washing machine.
- Gauge: Exact gauge is not critical for this project. Simply aim for a tight enough tension so that your stitches stay dense and functional.
Materials Needed
- Yarn: 100% Cotton Yarn (Sport weight/Fine weight, such as Schachenmayr Catania or any similar cotton yarn). Note: Cotton is highly recommended for skincare items as it is absorbent, breathable, and holds up well to washing.
- Hook Size: 4.00 mm (US E/4)
- Extras: Tapestry needle for weaving in ends, scissors.
Stitch Abbreviations & Special Techniques
- ch: Chain
- ss: Slip stitch
- st / sts: Stitch / Stitches
- hdc: Half double crochet
- puff-4 (4-Loop Puff Stitch): Yarn over, insert hook into the specified stitch, and pull up a loop to the height of a normal stitch (3 loops on hook). Repeat from * 3 more times in the same stitch. You will have 9 loops on your hook. Yarn over and pull through all 9 loops.
- puff-5 (5-Loop Puff Stitch): Yarn over, insert hook into the specified stitch, and pull up a loop (3 loops on hook). Repeat from * 4 more times in the same stitch. You will have 11 loops on your hook. Yarn over and pull through all 11 loops.
Step-by-Step Pattern Instructions
Start by forming a magic ring (or magic circle).
Round 1: The Core
- Step 1: Chain 2 (this does not count as a stitch).
- Step 2: Work a [puff-5, ch 1] directly into the center of the magic ring.
- Step 3: Repeat the [puff-5, ch 1] Sequence 7 more times into the ring (You will have a total of 8 puff stitches separated by chain-1 spaces).
- Step 4: Close the round by working a slip stitch into the top of the very first puff-5 stitch.
- Step 5: Pull the yarn tail firmly to close the center hole of the magic ring tightly.
Round 2: Expanding the Circle
- Step 1: Chain 2.
- Step 2: At the top of the first puff-5 stitch from the previous round, work the following increase sequence: [puff-5, ch 1, puff-5].
- Step 3: Chain 1, then skip over the next chain-1 space.
- Step 4: Repeat this pattern * [puff-5, ch 1, puff-5] in the next puff-5 st, ch 1, skip the ch-1 space * around a total of 7 more times.
- Step 5: Complete the round by working a slip stitch into the top of the first puff-5 stitch.
Round 3: Building the Flower Base
- Step 1: Chain 2, then skip over the first puff-5 stitch.
- Step 2: Work a
puff-4into the next chain-1 space, followed by a chain 1. Skip the next stitch. - Step 3: In the subsequent chain-1 space, work an increasing sequence: [puff-4, ch 1, puff-4]. Chain 1, then skip the next stitch.
- Step 4: Repeat this entire sequence around 7 more times to complete the round.
- Step 5: Finish the round with a slip stitch into the top of the first puff-5 from the previous round.
Round 4: The Petal Border
- Step 1: * Skip the next stitch, work 5 hdc into the following stitch to create a rounded petal shape. Skip the next stitch, then work a slip stitch into the next stitch to secure the petal. *
- Step 2: Repeat the instructions between the asterisks
*11 more times around the edge to form a scalloped, flower-like border. - Step 3: Fasten off your yarn, cut the thread, and use a tapestry needle to weave in your remaining ends securely.
Tip for Gifting: Make a set of 5 to 7 scrubbies in different colors, stack them up, and tie them together with a piece of twine or a scrap piece of cotton yarn for a beautiful, eco-friendly presentation!
