
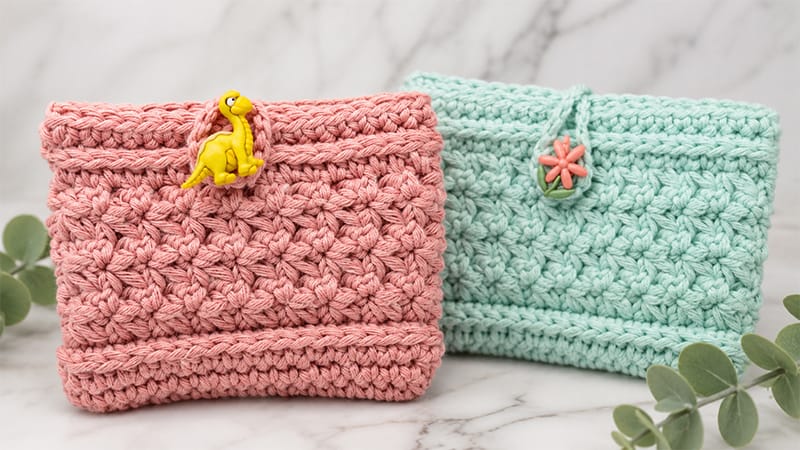
This quick, beginner-friendly crochet pattern is the perfect solution for a last-minute, thoughtful gift. Compact, gender-neutral, and highly functional, it is an excellent scrap-busting project that requires less than 40 yards of yarn and under an hour of your time.
By utilizing a dense, gap-free stitch pattern, this holder keeps gift cards, credit cards, or business cards completely secure. It is worked in one continuous piece to eliminate tedious assembly, leaving you with only a single button to sew on at the end.
Project Specifications & Materials
- Skill Level: Confident Beginner / Intermediate
- Finished Dimensions: Approximately 4” wide by 3.2” tall
- Yarn: ~40 yards of Medium Weight Yarn (Category #4 / Aran). Cotton yarn is highly recommended for durability and stitch definition.
- Hook Size: 4.00 mm (G)
- Notions: 1 button, sewing needle and thread, yarn needle, scissors, and optional stitch markers.
- Gauge: 5 single crochet stitches and 4 rows = 1 inch (Adjust hook size if necessary to match dimensions).
Common Abbreviations (US Terms)
- Ch: Chain
- St(s): Stitch(es)
- Sl St: Slip Stitch
- Sc: Single Crochet
- Hdc: Half Double Crochet
- Sc3Tog: Single Crochet 3 Together
- Rem: Remaining
- Rep: Repeat
Special Stitches & Techniques
Third Loop Only: Look past the standard front and back loops on top of the half double crochet stitch to find the extra horizontal loop running along the back/inside of the work. Insert your hook only into this loop to create a decorative braided ridge on the front of your work.
The Trinity Stitch: Insert hook into the stitch just worked, yarn over (YO) and pull up a loop. Insert hook into the next unworked stitch, YO and pull up a loop. Insert hook into the subsequent stitch, YO and pull up a loop (4 loops on hook). YO and draw through all 4 loops. Always chain 1 to close the stitch.
Step-by-Step Pattern Instructions
Notes before starting:
- The closing Ch-1 of each Trinity Stitch counts as a stitch.
- The starting Ch-1 does not count as a stitch.
- Crucial: You must turn your work at the end of the specified rounds to achieve the correct texture.
Base and Lower Border
Round 1: Chain 19. Single crochet in the second chain from your hook and in each chain across. Turn your work vertically to access the opposite side of the foundation chain. Single crochet into the bottom loop of each chain across to the start. Slip stitch to the first single crochet to join the round. (36 stitches)
Round 2: Ch 1. Single crochet into every stitch around. Sl st to join. (36 stitches)
Round 3: Ch 1. Half double crochet into every stitch around. Sl st to join. (36 stitches)
Round 4: Ch 1. Single crochet into the third loop only of each stitch around. Sl st to join. (36 stitches)
The Textured Body
Round 5: Ch 1. Insert hook into the very first stitch, YO, and pull up a loop. [Insert hook into next stitch, YO and pull up a loop] twice. YO and pull through all 4 loops on the hook, Ch 1 (First Trinity Stitch complete).
*Insert hook back into the last stitch just worked, YO, and pull up a loop. [Insert hook into next stitch, YO and pull up a loop] twice. YO and pull through all 4 loops, Ch 1.*
Repeat from * to * until exactly 1 stitch remains unworked.
To finish the round: Insert the hook into the last stitch worked, pull up a loop. Insert the hook into the final unworked stitch of the round, and pull up a loop.
Insert the hook into the very first stitch of the previous round, and pull up a loop. YO and pull through all 4 loops, Ch 1. Sl st into the top of the first stitch to join. TURN YOUR WORK. (18 Trinity stitches + 18 closing chains = 36 stitches total)
Rounds 6–11: Repeat Round 5, making sure to work your stitches into the alternating chains and stitch tops from the previous round. Remember to turn in your work at the end of every round.
Top Border and Closure Loop
Round 12: (With the right side of the project facing you) Ch 1. Half double crochet into every stitch around. Sl st to join. (36 stitches)
Round 13: Ch 1. Single crochet into the third loop only of each stitch around. Sl st to join. (36 stitches)
Round 14: Lay the holder completely flat so the bottom edge is straight. Look at the side facing you and locate the exact center stitch (usually the 9th stitch from the edge). Place a stitch marker here.
Ch 1, single crochet in each stitch up to your marked center stitch. Slip stitch into the marked stitch. Chain 12 (adjust this chain length if needed to comfortably loop over your chosen button). Sl st back into that same center stitch. Single crochet into every remaining stitch around. Sl st to join. (35 single crochets, 1 button loop)
Finishing Touches
Fasten off your yarn and use a tapestry needle to securely weave in all loose ends. Position your button on the front side of the holder, aligning it perfectly underneath the chain loop, and sew it in place using a standard sewing needle and thread.
Your handmade, textured card holder is now ready to use!
