
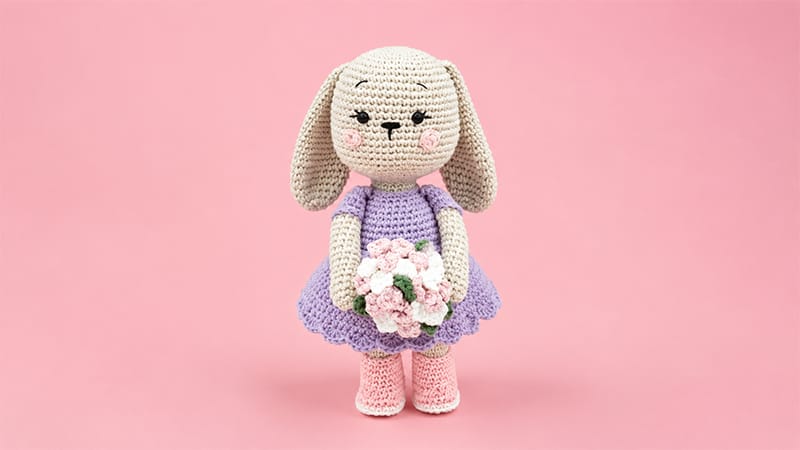
Meet Millie, an adorable handmade crochet bunny doll designed to bring charm, warmth, and cozy craftsmanship into your home.
Perfect as a springtime display, a beloved childhood keepsake, or a festive Easter companion, Millie stands out with her delicate vintage-style dress, tailored apron, tiny removable shoes, and a mini potted floral garden.
This detailed step-by-step guide walks you through every stage—from shaping her soft body and framing her sweet expression to assembling her garden accessory.
Grab your hook, select your favorite pastel yarns, and get ready to bring this heartwarming amigurumi character to life!
Materials & Tools
- Yarn: Fine/Sport weight (Cotton or Cotton-Blend recommended)
- Beige (Skin & ears)
- White (Panties, apron, eye details, white petals)
- Coral / Pinkish-Orange (Dress)
- Light Green (Shoes)
- Green (Leaves)
- Brown (Flower pot)
- Dark Brown (Soil)
- Yellow (Yellow petals)
- Pink (Blush circles)
- Crochet Hook: 3.0 mm
- Safety Eyes: 7 mm
- Stuffing: High-grade polyester fiberfill
- Notions: Yarn needle, black embroidery floss, scissors, stitch markers, crafting glue (optional)
Pattern Abbreviations (US Terms)
- MR: Magic Ring
- sc: Single Crochet
- inc: Single Crochet Increase (2 sc in one stitch)
- dec: Single Crochet Decrease (sc 2 stitches together)
- hdc: Half Double Crochet
- dc: Double Crochet
- ch: Chain
- sl st: Slip Stitch
- BLO: Back Loop Only
- FLO: Front Loop Only
- [ ]: Total stitch count at the end of the round/row
- ()*: Repeat instructions within parentheses specified number of times
Detailed Step-by-Step Instructions
1. Lower Limbs & Main Body
Legs (Make 2)
Work in continuous rounds.
- Rnd 1 (Beige): Create an MR, 6 sc into the ring [6]
- Rnd 2: (inc)* 6 times [12]
- Rnd 3–19: sc in all 12 stitches [12]
Switch to White yarn for the underwear base.
- Rnd 20: sc in all 12 stitches [12]
Note: Firmly stuff the first leg, fasten off, and weave in the end. Crochet the second leg identically through Round 20, but do not cut the yarn.
First Leg: [MR 6] -> [12 sc] -> [17 rounds of 12 sc] -> [Color Change to White: 12 sc] -> Fasten Off Second Leg: [MR 6] -> [12 sc] -> [17 rounds of 12 sc] -> [Color Change to White: 12 sc] -> Keep Loop Active
Joining the Body
- Rnd 21: From the second leg, sc across 6 stitches. Ch 6, then join to the first leg by working 1 sc into its 6th stitch (ensuring color changes face back). sc across the remaining 11 stitches of the first leg, work 6 sc across one side of the ch-6 chain, then sc in the remaining 6 stitches of the second leg [36]
- Rnd 22: 6 sc, work 6 sc into the opposite loops of the ch-6 chain, 5 sc, inc, 17 sc, inc [38]
- Rnd 23: 6 sc, (1 sc, inc)* 3 times, 26 sc [41]
- Rnd 24: sc all around [41]
- Rnd 25: 6 sc, (inc, 2 sc)* 3 times, 26 sc [44]
- Rnd 26: sc all around [44]
Switch back to Beige yarn.
- Rnd 27–30: sc in all 44 stitches [44]
Switch to Coral yarn for the dress torso.
- Rnd 31: (dec, 20 sc)* 2 times [42]
- Rnd 32: Work in BLO across all 42 stitches [42]
- Rnd 33: 10 sc, (dec, 2 sc)* 2 times, 24 sc [40]
- Rnd 34: (dec, 18 sc)* 2 times [38]
- Rnd 35: sc all around [38] (Pause here to begin stuffing the lower body firmly, continuing as you work).
- Rnd 36: (dec, 17 sc)* 2 times [36]
- Rnd 37: (dec, 4 sc)* 6 times [30]
- Rnd 38: sc all around [30]
- Rnd 39: (dec, 3 sc)* 6 times [24]
- Rnd 40: sc all around [24]
Switch to Beige yarn for the neck.
- Rnd 41: Work in BLO, (dec, 2 sc)* 6 times [18]
- Rnd 42: sc in all 18 stitches [18]
Fasten off, leaving a long tail for attaching the head later.
2. Dress & Neck Details
Dress Skirt
Orient the doll with legs pointing upward. Attach Coral yarn to the exposed FLO loops of Round 31.
- Rnd 1: sc in all 42 front loops [42]
- Rnd 2: (3 sc, inc, 3 sc)* 6 times [48]
- Rnd 3: (7 sc, inc)* 6 times [54]
- Rnd 4: (4 sc, inc, 4 sc)* 6 times [60]
- Rnd 5: (9 sc, inc)* 6 times [66]
- Rnd 6: (5 sc, inc, 5 sc)* 6 times [72]
- Rnd 7: (11 sc, inc)* 6 times [78]
- Rnd 8: (6 sc, inc, 6 sc)* 6 times [84]
- Rnd 9: sc all around [84]
- Rnd 10 (Scalloped Hem): (Skip 1 st, work 5 dc into the next st, skip 1 st, 1 sl st in the next st)* repeat 21 times around [84]. Fasten off and weave in ends.
Neckline Trim
Attach Coral yarn to the exposed FLO loops of Round 40 on the body.
- Crochet 24 sl st evenly around. Fasten off and hide ends.
- (Optional) Craft a small white yarn pom-pom and attach it to the back of the dress for a cute bunny tail!
3. Arms (Make 2)
Work in continuous rounds. Do not stuff the upper arm area.
- Rnd 1 (Beige): MR, 6 sc [6]
- Rnd 2: (inc)* 6 times [12]
- Rnd 3–5: sc in all 12 stitches [12]
- Rnd 6: (4 sc, dec)* 2 times [10]
- Rnd 7–15: sc in all 10 stitches [10]
Switch to Coral yarn.
- Rnd 16: sc in all 10 stitches [10]
- Rnd 17: Work in BLO, sc in all 10 stitches [10]
- Rnd 18–20: sc in all 10 stitches [10]
Flatten the top opening and work 5 sc across both layers to seal the edge.
Sleeve Ruffle
Attach Coral yarn to the exposed FLO loops of Round 16 (hand facing upward).
- Work 10 sc around. Fasten off, leaving a yarn tail to sew the arms onto the body between Rounds 41 and 42.
4. Head & Facial Features
Work in continuous rounds.
- Rnd 1 (Beige): MR, 6 sc [6]
- Rnd 2: (inc)* 6 times [12]
- Rnd 3: (1 sc, inc)* 6 times [18]
- Rnd 4: (2 sc, inc)* 6 times [24]
- Rnd 5: (3 sc, inc)* 6 times [30]
- Rnd 6: (2 sc, inc, 2 sc)* 6 times [36]
- Rnd 7: (5 sc, inc)* 6 times [42]
- Rnd 8: sc in all 42 stitches [42]
- Rnd 9: (3 sc, inc, 3 sc)* 6 times [48]
- Rnd 10–15: sc in all 48 stitches [48]
- Rnd 16: (7 sc, inc)* 6 times [54]
- Rnd 17–21: sc in all 54 stitches [54]
- Rnd 22: (4 sc, dec)* 9 times [45]
- Rnd 23: (3 sc, dec)* 9 times [36]
- Rnd 24: (2 sc, dec, 2 sc)* 6 times [30]
- Rnd 25: (3 sc, dec)* 6 times [24]
- Rnd 26: (2 sc, dec)* 6 times [18]
Fasten off, leaving yarn for assembly.
Assembly & Facial Detailing
- Safety Eyes: Insert 7 mm safety eyes between Rounds 13 and 14, spaced 6 stitches apart.
- Facial Embroidery: Using fine black thread, embroider a small nose/muzzle shape centered between the eyes. Add small delicate eyelashes to the outer eye edges and subtle eyebrows a few rounds above the eyes.
5. Ears & Blush
Ears (Make 2)
Work in Beige yarn. Do not stuff.
- Rnd 1: MR, 6 sc [6]
- Rnd 2: (inc)* 6 times [12]
- Rnd 3: (1 sc, inc)* 6 times [18]
- Rnd 4: sc in all 18 stitches [18]
- Rnd 5: (5 sc, inc)* 3 times [21]
- Rnd 6–7: sc in all 21 stitches [21]
- Rnd 8: (6 sc, inc)* 3 times [24]
- Rnd 9–12: sc in all 24 stitches [24]
- Rnd 13: (10 sc, dec)* 2 times [22]
- Rnd 14–16: sc in all 22 stitches [22]
- Rnd 17: (9 sc, dec)* 2 times [20]
- Rnd 18: (8 sc, dec)* 2 times [18]
- Rnd 19–20: sc in all 18 stitches [18]
- Rnd 21: (7 sc, dec)* 2 times [16]
- Rnd 22–23: sc in all 16 stitches [16]
- Rnd 24: (6 sc, dec)* 2 times [14]
- Rnd 25–27: sc in all 14 stitches [14]
Press top edges together and work 7 sc across to close. Fasten off with a long tail. Sew ears to the upper head between Rounds 7 and 8, spaced 8 stitches apart at the back.
Cheek Blush (Make 2)
- Rnd 1 (Pink): Into a MR, work 6 sc. Join with a sl st to the first st [6].
- Fasten off and sew or fabric-glue directly under each eye.
6. Accessories & Wardrobe
Removable Shoes (Make 2)
Worked with Light Green yarn. Start with a foundation chain.
- Foundation: Ch 6.
- Rnd 1: Start in 2nd ch from hook: inc, 3 sc, 4 sc in last ch st. Turn along bottom of chain: 3 sc, inc [14]
- Rnd 2: 2 inc, 3 sc, 4 inc, 3 sc, 2 inc [22]
- Rnd 3: 2 inc, 8 sc, inc, 1 sc, inc, 8 sc, inc [27]
- Rnd 4: Work in BLO, sc in all 27 stitches [27]
- Rnd 5: 9 sc, 2 dec, 1 sc, 2 dec, 9 sc [23]
- Rnd 6: 8 sc, 5 dec, 5 sc [18]
- Rnd 7–10: sc in all 18 stitches [18]
- Rnd 11: sl st in all 18 stitches [18]. Fasten off and weave in ends.
- Trim: Join White yarn to the exposed FLO loops of Round 3 (shoe opening pointed toward you) and work 27 sc around. Fasten off.
Apron
Worked in flat rows back and forth using White yarn.
- Foundation: Ch 13.
- Rows 1–12: 12 sc, ch 1, turn [12]
- Row 13: 2 dec, 4 sc, 2 dec, ch 1, turn [8]
- Row 14: 8 sc, ch 1, turn [8]
- Row 15: dec, 4 sc, dec, ch 1, turn [6]
- Row 16: 6 sc, ch 1, turn [6]
- Row 17: dec, 2 sc, dec [4]
- Edging: Work sc evenly around all outer edges of the apron, making an (sc, ch 1, sc) in corners. Sl st to join at Row 17.
Apron Pocket
- Foundation (White): Ch 9.
- Rows 1–5: 8 sc, ch 1, turn [8].
Fasten off and sew centered onto the front of the apron.
Neck Ties & Waist Straps
- Neck Straps: Attach White yarn to the top left and right corners of Row 17 of the apron. Ch 40 for each side. Fasten off (ties around the neck).
- Waist Straps: Attach White yarn to the middle side edges of the apron. Ch 30 for each side. Fasten off (ties behind the waist).
7. Potted Floral Garden
Flower Pot (Brown)
- Rnd 1: MR, 6 sc [6]
- Rnd 2: (inc)* 6 times [12]
- Rnd 3: (1 sc, inc)* 6 times [18]
- Rnd 4: (2 sc, inc)* 6 times [24]
- Rnd 5: (3 sc, inc)* 6 times [30]
- Rnd 6: Work in BLO, sc in all 30 stitches [30]
- Rnd 7–10: sc in all 30 stitches [30]
- Rnd 11: Work in FLO, sl st in all 30 stitches [30]. Fasten off.
Soil Insert (Dark Brown)
- Rnd 1: MR, 6 sc [6]
- Rnd 2: (inc)* 6 times [12]
- Rnd 3: (1 sc, inc)* 6 times [18]
- Rnd 4: (2 sc, inc)* 6 times [24]
- Rnd 5: (3 sc, inc)* 6 times [30]
Align soil with pot interior (BLO loops of Round 10) and sew together, stuffing the pot firmly before completing the seam.
| Component | Quantity | Color Options | Construction Technique |
|---|---|---|---|
| Flowers | 12 Yellow / 8 White | Yellow, White | MR: (ch 1, 2 sc, ch 2, 1 sl st) × 3 petals |
| Leaves | 5 | Green | Ch 4, starting in 2nd ch: 1 hdc, 3 sc in last st, turn: 1 dc, 2 sc, 1 sl st |
After crafting all components, stitch or hot-glue the flowers and leaves neatly onto the soil surface to complete Millie’s garden pot!
