
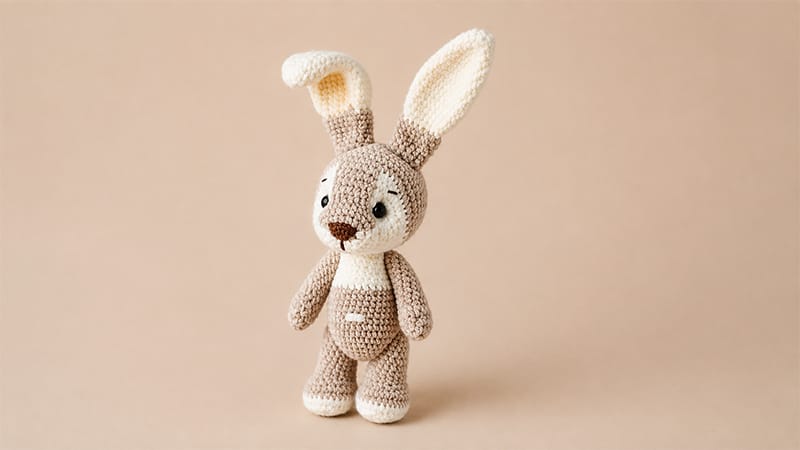
Discover the joy of crafting a plush, velvety companion with this comprehensive crochet guide.
Perfect for intermediate and advanced crafters, this soft bunny project blends luxury yarn with intricate design techniques to create a classic handmade treasure.
Soft amigurumi pieces bring a heartwarming touch to any handmade collection, offering equal parts comfort and technical delight.
Throughout this pattern, you will explore color transitions, joint assembly, and textured stitching to bring an adorable long-eared bunny to life from nose to tail.
Prepare your favorite velvet yarns, settle into a comfortable crafting space, and let us dive into building this whimsical plush creation step-by-step!
Pattern Overview & Materials
Suggested Supplies
- Primary Body Yarn (FY): Cotton-blend or plush velvet yarn (approx. 160m / 50g)
- Secondary Contrast Yarn (SY): Complementary shade (approx. 160m / 50g)
- Embroidery Thread: Thin cotton thread for facial features
- Crochet Hooks: 1.5 mm and 2.0 mm sizes
- Safety Eyes: 10 mm pair
- Hardware: 1 cotter pin with two matching 2.0–2.5 mm joint discs
- Notions: Fiberfill stuffing, stitch markers, tapestry needle, scissors
Abbreviations Key
- MR: Magic Ring
- st / sts: Stitch / Stitches
- ch: Chain stitch
- sc: Single crochet
- hdc: Half double crochet
- dc: Double crochet
- tr: Treble crochet
- slst: Slip stitch
- inc: Increase (work 2 sc in same stitch)
- dec: Decrease (single crochet 2 stitches together)
- FDC: Fluffy double crochet (textured stitch variation)
- FLO / BLO: Front loop only / Back loop only
- FY / SY: First main yarn / Second contrast yarn
- PSM: Shift/Displacement stitch (adjust marker position)
Step-by-Step Instructions
1. Upper Legs (Make 2)
Crafting the Toes
- Toes 1 & 2:
- Rnd 1: 6 sc in MR (6)
- Rnd 2: 6 sc (6). Fasten off, leaving a tail for closing gaps.
- Toe 3:
- Rnd 1: 6 sc in MR (6)
- Rnd 2: 6 sc (6). Do not cut yarn.
Joining the Paw
- Rnd 3: Crochet 3 sc along Toe 2, 6 sc around Toe 1, 3 sc back along Toe 2, and 6 sc around Toe 3 (18)
- Rnd 4: 18 sc. Use yarn tails from Toes 1 & 2 to stitch close any tiny gaps between toes. (18)
- Rnd 5: 16 sc. Place stitch marker here; this marks the new start of your rounds. (16)
- Rnd 6: 7 sc, 3 FDC into the same stitch, 6 sc, dec (15)
- Rnd 7: 6 sc, dec, 5 sc, dec (13)
- Rnd 8: 11 sc, dec (12)
- Rnds 9–19: 12 sc across all 11 rounds (12)
- Rnd 20: 6 dec (6). Fasten off, weave tail through remaining stitches, pull tight, and hide thread.
2. Lower Legs (Make 2)
- Rnd 1: Ch 6. Starting in 2nd chain from hook: 4 sc, 5 sc all in the end chain; working on opposite side of chain: 4 sc (13)
- Rnd 2: Inc, 3 sc, 5 inc, 3 sc, inc (20)
- Rnd 3: Inc, 4 sc, [1 sc, inc] × 5, 4 sc, inc (27)
- Rnd 4: 27 sc worked into the back vertical post/bar behind the lower row stitches (27)
- Rnd 5: 27 sc. Attach secondary shade if desired. (27)
- Rnds 6–7: 27 sc across both rounds. Add 1 shift stitch (PSM) at the end of Rnd 7 to re-center. (27)
- Rnd 8: 5 sc, 4 dec, 1 sc, 4 dec, 5 sc (19)
- Rnd 9: 5 sc, 2 dec, 1 sc, 2 dec, 5 sc (15)
- Rnds 10–13: 15 sc across all 4 rounds (15)
- Rnd 14: 4 sc, 3 inc (18)
- Rnds 15–18: 18 sc across all 4 rounds (18)
- Rnd 19: 1 sc, 6 dec (12)
- Rnd 20: 6 dec (6). Fasten off, pull opening shut, weave in end.
3. Long Ears (Make 2)
- Rnd 1: 5 sc in MR (5)
- Rnd 2: 5 inc (10)
- Rnd 3: [1 sc, inc] × 5 (15)
- Rnds 4–5: 15 sc across both rounds (15)
- Rnd 6: 4 sc, 3 inc (18)
- Rnds 7–8: 18 sc across both rounds (18)
- Rnd 9: 5 sc, 3 inc (21)
- Rnds 10–14: 21 sc across all 5 rounds. Introduce contrast yarn (SY) at end of Rnd 14. (21)
- Rnd 15: [1 sc SY, 2 sc FY] × 7 (21)
- Rnd 16: [2 sc SY, 1 sc FY] × 6, 1 sc SY. Snip main yarn (FY). (21)
- Rnds 17–19: 21 sc across all 3 rounds in SY (21)
- Rnd 20: 5 sc, 3 dec (18)
- Rnd 21: 18 sc (18)
- Rnd 22: 4 sc, 3 dec (15)
- Rnd 23: 15 sc (15)
- Rnd 24: 3 sc, 3 dec (12)
- Rnd 25: 12 sc (12)
Fasten off, leaving a long yarn end for attachment.
4. Fluffy Tail
- Rnd 1: 6 sc in MR (6)
- Rnd 2: 6 inc (12)
- Rnd 3: [1 sc, inc] × 6 (18)
- Rnds 4–5: 18 sc across both rounds (18)
- Rnd 6: 9 dec (9)
Fasten off, leaving a long strand for sewing. Lightly stuff before securing.
5. Main Body
- Rnd 1: 6 sc in MR (6)
- Rnd 2: 6 inc (12)
- Rnd 3: [1 sc, inc] × 6 (18)
- Rnd 4: [2 sc, inc] × 6 (24)
- Rnd 5: [3 sc, inc] × 6 (30)
- Rnd 6: [4 sc, inc] × 6 (36)
- Rnd 7: [5 sc, inc] × 6 (42)
- Rnds 8–11: 42 sc across all 4 rounds (42)
- Rnd 12: [5 sc, dec] × 6 (36)
- Rnds 13–15: 36 sc across all 3 rounds (36)
- Rnd 16: [4 sc, dec] × 6 (30)
- Rnds 17–19: 30 sc across all 3 rounds (30)
- Rnd 20: [3 sc, dec] × 6 (24)
- Rnds 21–23: 24 sc across all 3 rounds (24)
- Rnd 24: [2 sc, dec] × 6 (18)
- Rnd 25: 18 sc. Insert the joint cotter pin through the top opening at this stage. (18)
- Rnd 26: [1 sc, dec] × 6. Fill firmly with fiberfill. (12)
- Rnd 27: 6 dec (6). Pull opening tightly closed, knot securely, and hide loose thread inside body.
6. Head & Forehead Construction
Muzzle & Color Shifts
- Rnd 1: Using Secondary Yarn (SY), 6 sc in MR (6)
- Rnd 2: 6 inc (12). Introduce Primary Yarn (FY).
- Rnd 3: With SY: (inc, 3 sc, inc); switch to FY: (2 inc, 3 sc, 2 inc) (18)
- Rnd 4: With SY: (inc, 5 sc, inc, 1 sc); switch to FY: (inc, 1 sc, inc, 3 sc, inc, 1 sc, inc, 1 sc) (24)
- Rnd 5: With SY: (inc, 7 sc, inc, 1 sc); switch to FY: (1 sc, inc, 2 sc, inc, 3 sc, inc, 2 sc, inc, 2 sc) (30)
- Rnd 6: With SY: 12 sc; switch to FY: 18 sc (30)
Fasten off secondary yarn (SY). Continue solely with main yarn (FY).
Shaping Cheek & Eye Placement
- Rnd 7: Working into BLO of the previous SY stitches: 1 sc, 3 inc, 4 sc, 3 inc, then regular 19 sc (36)
- Rnd 8: 1 sc, [1 sc, inc] × 3, 4 sc, [inc, 1 sc] × 3, 19 sc (42)
Safety Eyes Installation: Secure 10 mm safety eyes between Rounds 8 and 9, keeping a gap of 16 to 18 stitches between them.
- Rnd 9: [3 sc, inc, 3 sc] × 6 (48)
- Rnd 10: 7 sc, 6 inc, 35 sc (54)
- Rnd 11: Reintroduce SY: FY 30 sc, SY 24 sc (54). Cut FY strand.
Forehead Extension
Working into the front loops (FLO) of the 6 central stitches from Round 6, attach SY yarn:
- Rows 1–5: Ch 1, 6 sc across; turn at end of each row (5 turning rows total).
Completing the Head
- Rnd 12: Work 13 sc, attach 6 sc along the forehead extension edge, continue with 35 sc around head (54)
- Rnds 13–18: 54 sc across all 6 rounds (54)
Joint Attachment: Secure the body’s cotter pin base between Rounds 15 and 16 at the central bottom area of the head.
- Stuff head firmly with fiberfill as you reduce rows.
- Rnd 19: [7 sc, dec] × 6 (48)
- Rnd 20: [6 sc, dec] × 6 (42)
- Rnd 21: [5 sc, dec] × 6 (36)
- Rnd 22: [4 sc, dec] × 6 (30)
- Rnd 23: [4 sc, dec] × 5 (25)
- Rnd 24: [3 sc, dec] × 5 (20)
- Rnd 25: [2 sc, dec] × 5 (15)
- Rnd 26: [1 sc, dec] × 5 (10)
- Rnd 27: 5 dec (5). Pull opening shut, knot, and weave tail through head.
Final Assembly & Finishing
                       [ Ears ]
                           |
                     [ Head/Face ]
                     /     |     \
          [Nose Stitch] [Eyes] [Sculpting Thread]
                           |
                     [ Cotter Pin ]
                           |
                      [ Torso ] --- [ Tail ]
                     /         \
         [Upper Legs]           [Lower Legs]
Nose Stitching
- Using double-stranded thin embroidery thread in a Magic Ring: Ch 1, 5 dc, turn work, 5 sc across top edge.
- Sew the triangular nose piece one row above center down through the row below.
Facial Sculpting
- Eye Sculpting: Thread a long needle from the bottom joint base up to the inner corner of the right eye, across to the outer corner, down to the joint base. Pull snug to indent eye socket. Repeat for left eye 2–3 times.
- Muzzle Sculpting: Run thread from base of nose straight down toward neck joint to create a cleft muzzle.
- Details: Embroider subtle eyebrows and a small smile using thin embroidery thread.
Attaching Limbs & Details
- Ears: Curve bottom edges slightly and stitch symmetrically to top of head.
- Upper Arms: Use the thread-jointing method to attach arms between Rounds 1 and 2, spaced approximately 13–14 stitches apart across chest.
- Lower Legs: Thread-joint legs between Rounds 8 and 9, spaced roughly 21–23 stitches apart across front belly so bunny sits comfortably.
- Tail: Position on lower back to act as a stabilizing tripod when bunny sits.
- Belly Button: Pass thread between Rounds 12 and 15 across 5 stitches multiple times, pulling gently to form a cute belly indent.
