
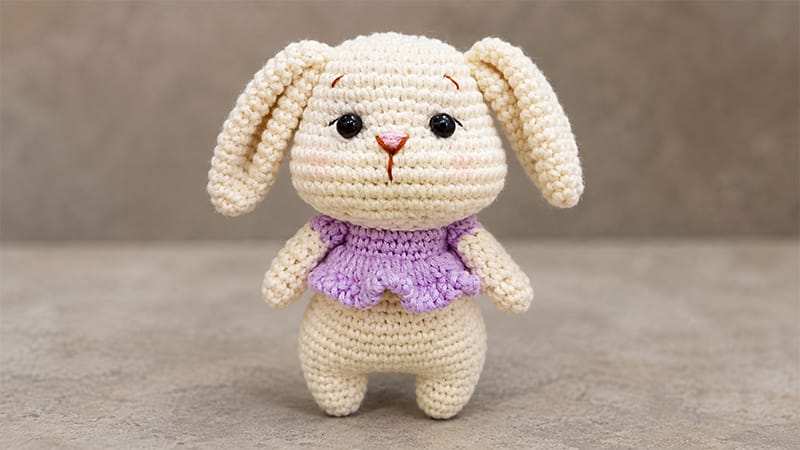
This adorable chubby-cheeked bunny is the perfect weekend project, featuring a sweet, detailed face, a ruffled skirt, and uniquely shaped cheeks built right into the crochet work.
Designed for low-stress crafting, this intermediate-beginner pattern brings together simple stitches and simple shaping techniques to form a cozy handmade toy.
Whether you are crafting a soft gift for a loved one or adding a whimsical piece to your personal collection, this step-by-step guide walks you through every round.
Grab your hook, pick your favorite yarn colors, and let’s start stitching this cuddly rabbit!
Chubby Cheeks Bunny Pattern
Materials Needed
- Yarn: 1mm Cotton Yarn (Cream for the body, Pink for the dress)
- Crochet Hook: 2.0 mm
- Notions: Safety eyes, fiberfill stuffing, tapestry needle, stitch markers, and scissors
Stitch Abbreviations
- MR: Magic Ring
- st(s): Stitch(es)
- sc: Single Crochet
- dc: Double Crochet
- inc: Increase (2 sc in the same stitch)
- dec: Decrease (sc 2 stitches together)
- BLO: Back Loop Only
- ch: Chain
- sl st: Slip Stitch
Pattern Instructions
Legs & Torso
First Leg
- Rnd 1: Work 6 sc into a MR (6)
- Rnd 2: [1 sc, 1 inc] repeat 3 times (9)
- Rnd 3: 4 sc, 1 inc, 4 sc (10)
- Rnd 4: 5 sc, 1 inc, 4 sc (11)
- Rnd 5: 5 sc, 1 inc, 5 sc (12)
Fasten off yarn on the first leg.
Second Leg & Joining
- Work Rnds 1–5 identically for the second leg, but do not cut the yarn.
- Joining: Ch 6, then join to the first leg with a single crochet.
- Rnd 6: Work 12 sc across the first leg, 6 sc along one side of the chain, 12 sc across the second leg, and 6 sc along the other side of the chain (36)
- Rnd 7: [5 sc, 1 inc] repeat 6 times (42)
- Rnds 8–11: Sc in each st around (42)
- Rnd 12: [5 sc, 1 dec] repeat 6 times (36)
- Rnds 13–14: Sc in each st around (36)
- Rnd 15: [4 sc, 1 dec] repeat 6 times (30)
- Rnds 16–17: Sc in each st around (30)
- Rnd 18: [3 sc, 1 dec] repeat 6 times (24)
- Rnd 19: Switch to Pink yarn. Sc in each st around (24)
- Rnd 20: Working in BLO, sc in each st around (24)
- Rnds 21–22: Sc in each st around (24)
Stuff the legs and body firmly. Fasten off and leave a tail for assembly.
Head
Using Cream yarn:
- Rnd 1: Work 8 sc into a MR (8)
- Rnd 2: Work 1 inc in every st (16)
- Rnd 3: [1 sc, 1 inc] repeat 8 times (24)
- Rnd 4: [1 inc, 2 sc] repeat 8 times (32)
- Rnd 5: Sc in each st around (32)
- Rnd 6: [3 sc, 1 inc] repeat 8 times (40)
- Rnds 7–11: Sc in each st around (40)
- Rnd 12 (Cheek Expansion): 10 sc, 8 inc, 4 sc, 8 inc, 10 sc (56)
- Rnds 13–16: Sc in each st around (56)
- Rnd 17 (Cheek Reduction): 10 sc, 8 dec, 4 sc, 8 dec, 10 sc (40)
- Rnd 18: [3 sc, 1 dec] repeat 8 times (32)
- Rnd 19: [1 sc, 1 dec, 1 sc] repeat 8 times (24)
Insert safety eyes between rounds 11 and 12, spacing them across the flat center 4 stitches. Stuff the head thoroughly, ensuring the cheeks hold their round volume. Fasten off.
Arms (Make 2)
Start with Cream yarn:
- Rnd 1: Work 6 sc into a MR (6)
- Rnd 2: [1 sc, 1 inc] repeat 3 times (9)
- Rnd 3: [1 sc, 1 dec] repeat 3 times (6)
- Rnds 4–7: Sc in each st around (6)
- Rnds 8–9: Switch to Pink yarn. Sc in each st around (6)
Stuff only the lower hand portion lightly. Flatten the top opening and fasten off, leaving a long end to attach to the body.
Ears (Make 2)
Using Cream yarn:
- Rnd 1: Work 6 sc into a MR (6)
- Rnd 2: [1 sc, 1 inc] repeat 3 times (9)
- Rnd 3: [2 sc, 1 inc] repeat 3 times (12)
- Rnd 4: Sc in each st around (12)
- Rnd 5: [2 sc, 1 inc] repeat 4 times (16)
- Rnd 6: Sc in each st around (16)
- Rnd 7: [3 sc, 1 inc] repeat 4 times (20)
- Rnds 8–15: Sc in each st around (20)
Do not stuff the ears. Flatten them out and fasten off, leaving a tail for sewing.
Skirt
Attach Pink yarn to the unworked front loops on Round 20 of the body and chain 3.
- Rnd 1: Work 2 dc into every front loop around (48)
- Rnd 2: [Ch 3, sl st into the same stitch, sl st into the next stitch] repeat around to form a decorative ruffle border.
Fasten off and weave in the loose ends.
Assembly & Facial Features
- Head & Body: Securely sew the head onto the top of the body, lining up the 24 opening stitches.
- Arms: Attach the arms to the sides of the upper body, just below the neck seam.
- Ears: Position the ears on top of the head around rounds 4 to 6 and stitch them firmly in place.
- Face Details: Use embroidery floss to stitch a tiny pink nose at the center, add soft eyebrow arches above the safety eyes, and add short whisker or mouth lines to accentuate the chubby cheeks.
