
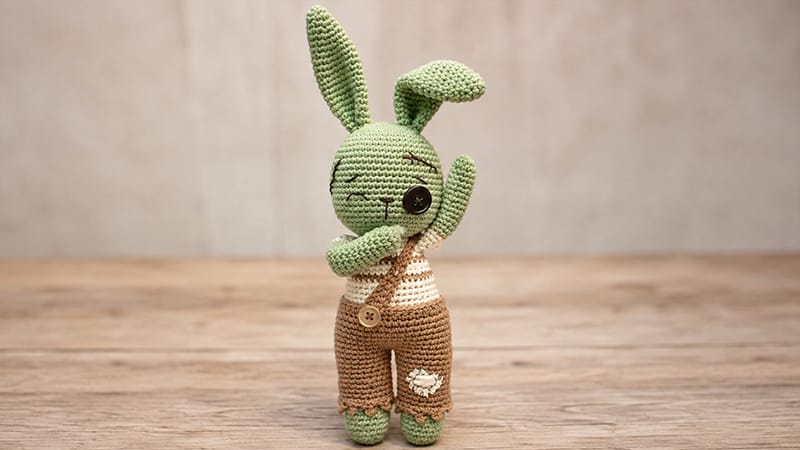
Get ready to add a charmingly spooky twist to your handmade decor with this Halloween Zombie Bunny!
Combining classic amigurumi techniques with a delightfully ragged aesthetic, this project allows you to craft a customized undead rabbit complete with mismatched details and distressed clothing.
Perfect as a fun holiday accent, a playful prank gift, or a unique addition to your toy collection, this soft zombie project is surprisingly easy to construct.
Follow along with these step-by-step instructions to stitch together your new favorite eerie companion just in time for the trick-or-treat season!
Materials & Tools
- Yarn: Medium-weight cotton yarn in light blue, heather gray, silver, and navy blue
- Hook: 3.0 mm crochet hook
- Notions:
- Fiberfill stuffing
- Yarn needle
- One black accent button (for the eye)
- Black embroidery thread or yarn
Abbreviations
- ch: chain
- sl st: slip stitch
- sc: single crochet
- hdc: half double crochet
- inc: single crochet increase
- dec: single crochet decrease
- MR: magic ring
- FLO: front loops only
- BLO: back loops only
Step-by-Step Assembly & Pattern
1. Head
Work using light blue yarn. Stuff firmly as you decrease.
- Rnd 1: 6 sc into MR (6)
- Rnd 2: Inc in each st around (12)
- Rnd 3: [1 sc, inc] x 6 (18)
- Rnd 4: 1 sc, inc, [2 sc, inc] x 5, 1 sc (24)
- Rnd 5: [3 sc, inc] x 6 (30)
- Rnd 6: 2 sc, inc, [4 sc, inc] x 5, 2 sc (36)
- Rnd 7: [5 sc, inc] x 6 (42)
- Rnd 8: 3 sc, inc, [6 sc, inc] x 5, 3 sc (48)
- Rnd 9: [7 sc, inc] x 6 (54)
- Rnds 10–21: Sc in each st around (54)
- Rnd 22: [7 sc, dec] x 6 (48)
- Rnd 23: 3 sc, dec, [6 sc, dec] x 5, 3 sc (42)
- Rnd 24: [5 sc, dec] x 6 (36)
- Rnd 25: 2 sc, dec, [4 sc, dec] x 5, 2 sc (30)
- Rnd 26: [3 sc, dec] x 6 (24)
Facial Placement Note: Attach the mismatched button eye between Rnds 16 and 20. Embroider the nose centered at Rnd 18. Add custom stitches, black yarn x’s, or fabric paint around the face for an extra zombie effect.
2. Legs & Body
Start with light blue yarn. Stuff as you go.
Legs (Make 2)
- Rnd 1: 6 sc into MR (6)
- Rnd 2: Inc in each st around (12)
- Rnd 3: [1 sc, inc] x 6 (18)
- Rnds 4–20: Sc in each st around (18)
Fasten off the first leg. Do not fasten off after completing the second leg.
Joining & Lower Torso
- Rnd 21: From the 2nd leg, ch 2. Join to 1st leg with a sc. Sc in remaining 17 sts of 1st leg, work 2 sc across ch-2 bridge, sc 18 sts around 2nd leg, and 2 sc across opposite side of ch-2 bridge (40 sts total).
- Rnd 22: 19 sc, inc, 20 sc (42)
- Rnds 23–26: Sc in each st around (42)
- Rnd 27: 15 sc, inc, 9 sc, inc, 16 sc (44)
- Rnds 28–31: Sc in each st around (44)
- Rnd 32: 15 sc, dec, 9 sc, dec, 16 sc (42)
- Rnd 33: Sc in each st around (42)
Color Striping (Shirt Section)
- Rnd 34: Change to silver gray; sc in each st around (42)
- Rnd 35: Switch to navy blue; 9 sc, dec, 19 sc, dec, 10 sc (40)
- Rnd 36: Change to silver gray; sc in each st around (40)
- Rnd 37: 3 sc, dec, 8 sc, dec, 9 sc, dec, 8 sc, dec, 4 sc (36)
- Rnd 38: Switch to navy blue; sc in each st around (36)
- Rnd 39: Change to silver gray; [4 sc, dec] x 6 (30)
- Rnd 40: Attach arms on the sides by crocheting through both arm and body sts simultaneously (or skip to sew them on later) (30)
- Rnd 41: [3 sc, dec] x 6 (24)
- Rnd 42: Sc in each st around (24)
Fasten off, leaving a long tail for attaching to the head.
3. Arms (Make 2)
Begin in light blue yarn. Stuff lightly at the hands only.
- Rnd 1: 6 sc into MR (6)
- Rnd 2: Inc in each st around (12)
- Rnds 3–16: Sc in each st around (12)
- Rnds 17–21: Switch to silver gray; sc in each st around (12)
Fasten off.
4. Ears (Make 2)
Work in light blue yarn. Do not stuff.
- Rnd 1: 6 sc into MR (6)
- Rnd 2: [1 sc, inc] x 3 (9)
- Rnd 3: Sc in each st around (9)
- Rnd 4: [2 sc, inc] x 3 (12)
- Rnd 5: [3 sc, inc] x 3 (15)
- Rnds 6–7: Sc in each st around (15)
- Rnd 8: [4 sc, inc] x 3 (18)
- Rnd 9: [5 sc, inc] x 3 (21)
- Rnds 10–12: Sc in each st around (21)
- Rnd 13: [5 sc, dec] x 3 (18)
- Rnds 14–22: Sc in each st around (18)
Pinch the base flat and sew both ears onto the head around Rnd 3.
5. Ragged Trousers
Work in navy blue yarn.
- Waistband: Ch 44, join with a sl st to form a ring (be careful not to twist).
- Rnds 1–7: Sc in each st around in a continuous spiral (44)
- Leg Separation: Divide the 44 stitches into two equal openings of 22 stitches each.
- Right Leg: Work 7 continuous rounds of 22 sc.
- Left Leg: Work 9 continuous rounds of 22 sc.
Distress Details (Torn Edges)
At the end of each pant leg, work an uneven picot-style rim to create a shredded appearance:
- Edging Sequence: *2 sc, (ch 2, work 1 hdc into 1st ch, sl st back to leg), 3 sc, (ch 3, work 2 sc back along chain, sl st to leg)*; repeat this uneven pattern around the bottom of each leg cuff.
Finishing
- Round the top waistband with 1 row of sc to clean up the edge.
- Shoulder Strap: Ch 60, fasten off, and weave through the pants to create an asymmetrical overall strap!
