
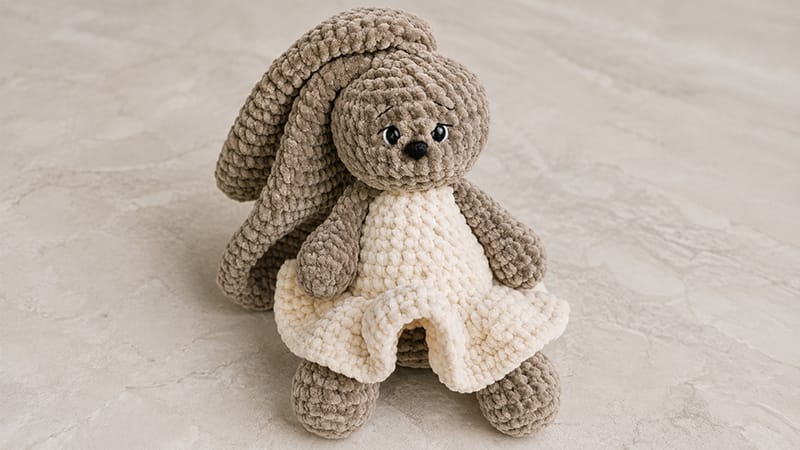
Crafting your own stuffed companion is a delightful, creative journey that transforms simple yarn into a cherished keepsake.
This soft and charming plush rabbit pattern features oversized floppy ears, a sweet embroidered nose, and an adorable integrated skirt base, making it an ideal handmade gift or decorative piece.
Worked seamlessly in circular rounds using plush chenille yarn, the project builds key amigurumi skills like working into back loops, seamless decreases, and shaping continuous parts.
The soft velvet texture gives the finished doll an exceptionally cozy feel, perfect for crafters seeking a fun, satisfying, and whimsical plushie build.
Materials & Tools
- Main Yarn: Super bulky velvet/chenille yarn (1 skein main color, ½ skein dress color)
- Embroidery Thread: Dark brown or black floss for facial details
- Hardware: 4.0 mm – 5.0 mm crochet hook, 7–8 mm safety eyes, 14 mm safety nose
- Notions: Fiberfill stuffing, yarn needle, stitch marker
Stitch Guide
- MR: Magic Ring
- sc: Single Crochet
- inc: Single Crochet Increase (2 sc in same st)
- dec: Single Crochet Decrease (sc 2 together)
- BLO: Back Loop Only
Pattern Instructions
Body
Work from the base upward:
- R1: 6 sc in MR (6)
- R2: 6 inc (12)
- R3: (1 sc, inc) × 6 (18)
- R4: (2 sc, inc) × 6 (24)
- R5: (3 sc, inc) × 6 (30)
- R6: (4 sc, inc) × 6 (36)
- R7–11: 36 sc (Switch to skirt color on R9; work R10 in BLO)
- R12: (4 sc, dec) × 6 (30)
- R13: 30 sc
- R14: (3 sc, dec) × 6 (24)
- R15–16: 24 sc
- R17: (2 sc, dec) × 6 (18)
- R18–19: 18 sc
- R20: (1 sc, dec) × 4 (12) (Stuff firmly)
- R21: 6 dec (6) — Fasten off and weave in end.
Head
- R1: 6 sc in MR (6)
- R2: 6 inc (12)
- R3: (1 sc, inc) × 6 (18)
- R4: (2 sc, inc) × 6 (24)
- R5: (3 sc, inc) × 6 (30)
- R6: (4 sc, inc) × 6 (36)
- R7: (5 sc, inc) × 6 (42)
- R8–11: 42 sc (Insert safety eyes between R9–10, 6 sts apart; attach 14 mm nose centered between eyes)
- R12: (5 sc, dec) × 6 (36)
- R13: (4 sc, dec) × 6 (30)
- R14: (3 sc, dec) × 6 (24)
- R15: (2 sc, dec) × 6 (18)
- R16: (1 sc, dec) × 6 (12) (Stuff firmly)
- R17: 6 dec (6) — Fasten off, leave long tail for sewing.
Arms (Make 2)
- R1: 6 sc in MR (6)
- R2: 6 inc (12)
- R3–5: 12 sc
- R6: (1 sc, dec) × 4 (8)
- R7–12: 8 sc — Stuff lightly at the bottom; fasten off with a sewing tail.
Legs (Make 2)
- R1: 6 sc in MR (6)
- R2: 6 inc (12)
- R3: (1 sc, inc) × 6 (18)
- R4: 18 sc in BLO
- R5–6: 18 sc
- R7: 6 sc, 3 dec, 6 sc (15)
- R8: (1 sc, dec) × 5 (10)
- R9–14: 10 sc — Stuff foot firmly; leave sewing tail.
Ears (Make 2)
- R1: 6 sc in MR (6)
- R2: 6 inc (12)
- R3: (1 sc, inc) × 6 (18)
- R4: (2 sc, inc) × 6 (24)
- R5: (3 sc, inc) × 6 (30)
- R6–9: 30 sc
- R10: (3 sc, dec) × 6 (24)
- R11–14: 24 sc
- R15: (2 sc, dec) × 6 (18)
- R16–19: 18 sc
- R20: (1 sc, dec) × 6 (12)
- R21–24: 12 sc — Do not stuff; flatten and leave tail for sewing.
Assembly & Finishing
- Stitch head securely to top of body.
- Attach arms to sides of body directly below neck seam.
- Position legs on the bottom base of body so bunny sits upright.
- Fold top opening of ears flat and sew evenly to top of head.
- Use dark thread to embroider delicate eyebrows and mouth details.
