
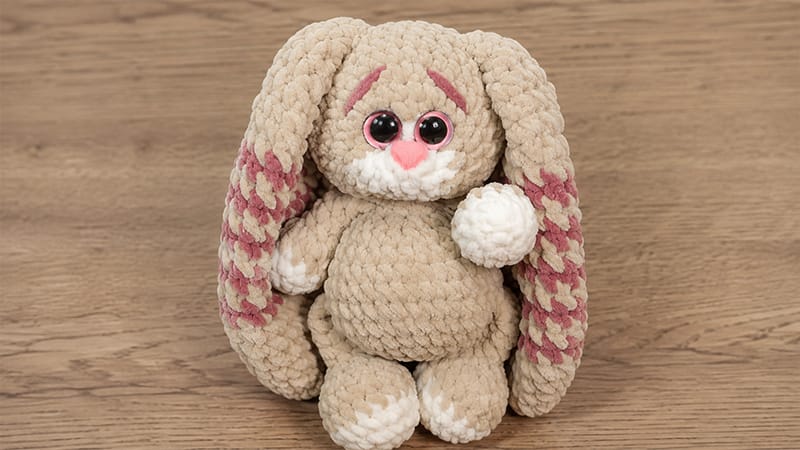
This adorable plush bunny amigurumi project brings a classic woodland favorite to life with modern, ultra-soft textures and sweet expression details.
Designed for plush, chenille, or plush-style bobbin yarn, this soft toy features contrasting muzzle and paw details, floppy oversized ears, and integrated limbs that minimize sewing.
The color choices—often a blend of crisp white and soft grey or pastel accents—create a gentle contrast that highlights the round silhouette and friendly features.
With safety eyes and a heart-shaped nose adding distinct personality, this charming plush makes a delightful handmade gift for children, standard nursery decor, or a cozy addition to any handmade plushie collection.
Project Overview & Notes
- Skill Level: Advanced Beginner / Intermediate
- Finished Size: Approx. 8–10 inches (20–25 cm) tall, depending on yarn density and tension.
- Construction Style: Worked in continuous spiral rounds without joining unless specified. Limbs and ears are crocheted directly into the main head and body rounds, drastically reducing final assembly.
Materials Required
- Plush Yarn: Main color (e.g., Grey) and secondary color (e.g., White) in super bulky plush or chenille weight (~160m / 100g).
- Crochet Hooks: 4.0 mm for the main body/limbs and 6.0 mm for the long floppy ears.
- Safety Attachments: 14mm plastic safety eyes, 12mm heart-shaped safety nose.
- Stuffing: Fiberfill / Holofiber stuffing (approx. 50g).
- Tools: Stitch markers, tapestry needle, scissors.
Abbreviations & Stitch Glossary
- MR: Magic Ring (or Magic Circle)
- sc: Single Crochet
- inc: Increase (2 sc in the same stitch)
- dec: Decrease (Invisible sc decrease recommended)
- dc: Double Crochet
- sl st: Slip Stitch
- st / sts: Stitch / Stitches
- ( ) x N: Repeat sequence inside brackets N times.
Step-by-Step Pattern Instructions
Ears (Make 2)
Use the 6.0 mm hook for a looser, floppy drape.
- Round 1: 6 sc into MR (6)
- Round 2: (2 sc, inc) x 2 (8)
- Round 3: (3 sc, inc) x 2 (10)
- Round 4: (4 sc, inc) x 2 (12)
- Round 5: (5 sc, inc) x 2 (14)
- Round 6: (6 sc, inc) x 2 (16)
- Round 7: (7 sc, inc) x 2 (18)
- Round 8: (8 sc, inc) x 2 (20)
- Rounds 9–19: sc in each st around (20 sts per round for 11 rounds)
- Round 20: (8 sc, dec) x 2 (18)
- Round 21: (7 sc, dec) x 2 (16)
- Round 22: (6 sc, dec) x 2 (14)
- Round 23: (5 sc, dec) x 2 (12)
- Round 24: sc in each st around (12)
- Round 25: Flatten open end; sc 6 sts across through both layers to seal (6). Fasten off, leaving a tail if extra securing is desired. Do not stuff.
Head:
Switch to the 4.0 mm hook for the rest of the body. Start with White yarn for the muzzle.
- Round 1: 6 sc into MR (6)
- Round 2: (inc) x 6 (12)
- Round 3: (1 sc, inc) x 6 (18)
Change to Main Color (Grey).
- Round 4: (2 sc, inc) x 6 (24)
- Round 5: 1 sc, inc, (3 sc, inc) x 5, 2 sc (30)
- Round 6: (4 sc, inc) x 6 (36)
- Rounds 7–8: sc in each st around (36 sts per round)
- Round 9 (Ear Attachment): 10 sc, (join first ear by crocheting 6 sc through both ear edge and head sts), 4 sc, (join second ear by crocheting 6 sc through both ear edge and head sts), 10 sc (36)
- Rounds 10–11: sc in each st around (36 sts per round)
Note: Place safety eyes between Rounds 4 and 5 (or per preference) and attach the heart nose near the center of the white muzzle. Begin stuffing firmly.
- Round 12: (4 sc, dec) x 6 (30)
- Round 13: (3 sc, dec) x 6 (24)
- Round 14: (2 sc, dec) x 6 (18)
- Round 15: (1 sc, dec) x 6 (12)
- Round 16: (dec) x 6 (6)
Fasten off. Top up stuffing, weave yarn end through front loops of remaining 6 sts, pull tight to close, and hide thread inside head.
- Arms / Upper Legs (Make 2) Start with White yarn.
- Round 1: 6 sc into MR (6)
- Round 2: (inc) x 6 (12)
- Round 3: sc in each st around (12)
Change to Main Color (Grey).
- Round 4: sc in each st around (12)
- Round 5: (dec) x 6 (6)
- Rounds 6–9: sc in each st around (6 sts per round for 4 rounds)
Stuff lower white portion lightly; keep upper arm unstuffed.
- Round 10: Flatten top opening; sc 3 sts across both sides to seal (3). Fasten off and weave in tail.
Feet / Lower Legs (Make 2)
Start with White yarn.
- Round 1: 6 sc into MR (6)
- Round 2: (inc) x 6 (12)
- Round 3: (1 sc, inc) x 6 (18)
- Round 4: sc in each st around (18)
- Change to Main Color (Grey).
- Rounds 5–6: sc in each st around (18 sts per round)
- Round 7: 3 sc, (dec) x 6, 3 sc (12)
- Round 8: 4 sc, (dec) x 2, 4 sc (10)
- Rounds 9–12: sc in each st around (10) — add 2 extra sc at the end of Round 12 to maintain symmetry if needed.
- Stuff foot area firmly; keep leg portion lightly stuffed.
- Round 13: Flatten top opening; sc 5 sts across both sides to seal (5). Fasten off and weave in tail.
Body
Use Main Color (Grey) throughout.
- Round 1: 6 sc into MR (6)
- Round 2: (inc) x 6 (12)
- Round 3: (1 sc, inc) x 6 (18)
- Round 4: (2 sc, inc) x 6 (24)
- Round 5: 1 sc, inc, (3 sc, inc) x 5, 2 sc (30)
- Round 6: (4 sc, inc) x 6 (36)
- Round 7 (Tail Round): 35 sc, 5 dc into the next single stitch (bobble-style tail structure) (36)
- Round 8 (Leg Attachment): 6 sc, (join first lower leg: 5 sc through leg and body), 13 sc, (join second lower leg: 5 sc through leg and body), 7 sc (36)
- Round 9: sc in each st around (36)
- Round 10: (4 sc, dec) x 6 (30)
- Round 11: sc in each st around (30)
- Round 12: (3 sc, dec) x 6 (24)
- Round 13: 7 sc, (dec) x 6, 5 sc (18)
- Round 14: (1 sc, dec) x 6 (12)
- Round 15 (Arm Attachment): 2 sc, (join first arm: 3 sc through arm and body), 2 sc, (join second arm: 3 sc through arm and body), 2 sc (12)
- Round 16 (Optional): sc in each st around (12)
Fasten off, leaving a long tail to attach the body securely to the finished head. Stuff body firmly before final assembly.
Final Assembly Details
- Ensure the head and body are both stuffed evenly to retain a round, plush shape.
- Align the head centrally over Round 15/16 of the body, making sure the muzzle faces directly forward over the space between the legs.
- Using the remaining yarn tail from the body and a tapestry needle, stitch the neck ring of the body to the base of the head securely.
- Weave in all loose ends inside the body cavity. Gently sculpt the facial features around the eyes with matching thread for extra expression if desired.
