
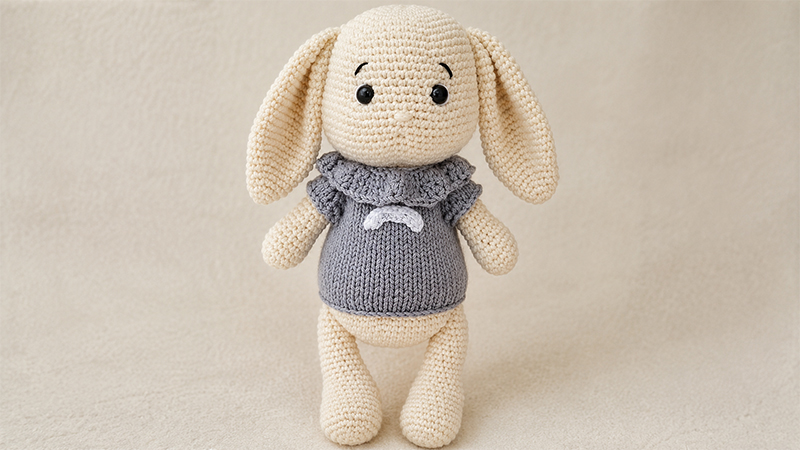
Bring a little handmade charm to your crochet collection with this adorable Poncino Bunny Amigurumi Pattern.
This sweet bunny features long floppy ears, tiny movable arms, cute facial details, and a charming knitted sweater finished with a ruffle collar and rainbow accent.
Whether you are making it as a thoughtful handmade gift, a cuddly toy for a child, or a decorative keepsake,
Poncino Bunny is a fun and rewarding project for amigurumi lovers. The combination of crochet and knitting techniques makes this pattern especially enjoyable for crafters who like trying different techniques in one project.
Gather your yarn, crochet hook, knitting needles, stuffing, and other supplies, then follow the instructions below to create your own lovable Poncino Bunny stitch by stitch.
Materials Needed
- Crochet hook: 2.2 mm
- Knitting needles: 2.0 mm for the shirt
- Safety eyes: 12 mm
- Yarn in your preferred colors, including red for the sweater
- Stuffing material
- Tapestry needle for sewing and embroidery
- Yarn needle and scissors
Stitch Abbreviations
- MR / AR / MC: Magic Ring
- ch: Chain
- sc: Single Crochet
- inc: Increase — 2 sc in the same stitch
- dec: Decrease — join 2 stitches into 1
- hdc: Half Double Crochet
- dc: Double Crochet
- tr: Treble Crochet
- sl-st: Slip Stitch
- BLO: Back Loops Only
- FLO: Front Loops Only
- k: Knit
- p: Purl
- sl: Slip stitch in knitting
1. Crochet Head
Begin with the bunny’s head using the following rounds:
- Round 1: Make a magic ring and crochet 6 sc. (6 sc)
- Round 2: Increase in every stitch around. (12 sc)
- Round 3: Repeat [1 sc, inc] 6 times. (18 sc)
- Round 4: Repeat [2 sc, inc] 6 times. (24 sc)
- Round 5: Repeat [1 sc, inc] 6 times. (30 sc)
- Round 6: Repeat [4 sc, inc] 6 times. (36 sc)
- Round 7: Repeat [5 sc, inc] 6 times. (42 sc)
- Round 8: Repeat [6 sc, inc] 6 times. (48 sc)
- Round 9: Crochet 1 sc in every stitch around. (48 sc)
- Round 10: Repeat [7 sc, inc] 6 times. (54 sc)
- Rounds 11–16: Crochet 1 sc in every stitch around. (54 sc)
- Round 17: Repeat [8 sc, inc] 6 times. (60 sc)
- Round 18: Repeat [9 sc, inc] 6 times. (66 sc)
- Rounds 19–24: Crochet 1 sc in every stitch around. (66 sc)
- Round 25: Repeat [9 sc, dec] 6 times. (60 sc)
- Round 26: Repeat [8 sc, dec] 6 times. (54 sc)
- Round 27: Repeat [7 sc, dec] 6 times. (48 sc)
- Round 28: Work decreases around the entire round. (24 sc)
- Round 29: Crochet 1 sc in every stitch around. (24 sc)
Face Assembly
Insert the 12 mm safety eyes between rounds 16 and 17, leaving 10 stitches between the eyes. Add the nose and a small embroidered mouth to give Poncino his sweet expression.
2. Ears — Make 2
Create two long, floppy ears using these rounds:
- Round 1: Magic ring with 6 sc. (6 sc)
- Round 2: Repeat [1 sc, inc] 3 times. (9 sc)
- Round 3: Repeat [2 sc, inc] 3 times. (12 sc)
- Round 4: Repeat [3 sc, inc] 3 times. (15 sc)
- Round 5: Crochet 1 sc in every stitch around. (15 sc)
- Round 6: Repeat [4 sc, inc] 3 times. (18 sc)
- Round 7: Repeat [5 sc, inc] 3 times. (21 sc)
- Round 8: Repeat [6 sc, inc] 3 times. (24 sc)
- Rounds 9–23: Crochet 1 sc in every stitch around. (24 sc)
- Round 24: Repeat [6 sc, dec] 3 times. (21 sc)
- Round 25: Repeat [5 sc, dec] 3 times. (18 sc)
- Round 26: Repeat [4 sc, dec] 3 times. (15 sc)
- Round 27: Crochet 1 sc in every stitch around. (15 sc)
Fasten off and sew both ears securely to the head between rounds 9 and 10.
3. Body
The body is worked from the bottom upward:
- Round 1: Magic ring with 6 sc. (6 sc)
- Round 2: Increase in every stitch. (12 sc)
- Round 3: Repeat [1 sc, inc] 6 times. (18 sc)
- Round 4: Repeat [2 sc, inc] 6 times. (24 sc)
- Round 5: Repeat [3 sc, inc] 6 times. (30 sc)
- Round 6: Repeat [4 sc, inc] 6 times. (36 sc)
- Round 7: Repeat [5 sc, inc] 6 times. (42 sc)
- Round 8: Repeat [6 sc, inc] 6 times. (48 sc)
- Round 9: Repeat [7 sc, inc] 6 times. (54 sc)
- Round 10: Repeat [8 sc, inc] 6 times. (60 sc)
- Rounds 11–16: Crochet 1 sc in every stitch around. (60 sc)
- Round 17: Repeat [8 sc, dec] 6 times. (54 sc)
- Round 18: Crochet 1 sc around. (54 sc)
- Round 19: Repeat [7 sc, dec] 6 times. (48 sc)
- Round 20: Crochet 1 sc around. (48 sc)
- Round 21: Repeat [6 sc, dec] 6 times. (42 sc)
- Rounds 22–23: Crochet 1 sc around. (42 sc)
- Round 24: Repeat [5 sc, dec] 6 times. (36 sc)
- Rounds 25–26: Crochet 1 sc around. (36 sc)
- Round 27: Repeat [4 sc, dec] 6 times. (30 sc)
- Rounds 28–30: Crochet 1 sc around. (30 sc)
- Round 31: Repeat [3 sc, dec] 6 times. (24 sc)
- Rounds 32–33: Crochet 1 sc around. (24 sc)
4. Arms — Make 2
Make two arms following these instructions:
- Round 1: Magic ring with 6 sc. (6 sc)
- Round 2: Increase in every stitch. (12 sc)
- Round 3: Repeat [1 sc, inc] 6 times. (18 sc)
- Rounds 4–6: Crochet 1 sc around for 3 rounds. (18 sc)
- Round 7: Repeat [7 sc, dec] 2 times. (16 sc)
- Round 8: Repeat [6 sc, dec] 2 times. (14 sc)
- Round 9: Repeat [5 sc, dec] 2 times. (12 sc)
- Rounds 10–17: Crochet 1 sc around for 8 rounds. (12 sc)
- Round 18: Decrease around the entire round. (6 sc)
Fasten off and close the opening. Attach the arms to round 30 of the body using a movable joint technique so they can be positioned and articulated.
5. Legs — Make 2
Work two legs using the following instructions:
- Round 1: Magic ring with 6 sc. (6 sc)
- Round 2: Increase in every stitch. (12 sc)
- Round 3: Repeat [1 sc, inc] 6 times. (18 sc)
- Round 4: Repeat [2 sc, inc] 6 times. (24 sc)
- Rounds 5–10: Crochet 1 sc around. (24 sc)
- Round 11: Crochet 12 sc. (12 sc)
- Round 12: Turn, ch 1, skip 1 stitch, crochet 9 sc, then dec. (10 sc)
- Round 13: Turn, ch 1, skip 1 stitch, crochet 7 sc, then dec. (8 sc)
- Round 14: Turn, ch 1, skip 1 stitch, crochet 5 sc, then dec. (6 sc)
- Round 15: Turn, ch 1, skip 1 stitch, crochet 3 sc, then dec. (4 sc)
- Round 16: Stop turning. This becomes the new round starting point. Crochet 24 sc evenly around the foot opening. (24 sc)
- Round 17: Work 3 sl-st, 14 sc across the front, 3 sl-st, and 4 sc across the back. (24 sc)
- Round 18: Crochet 1 sc around. (24 sc)
- Round 19: Repeat [2 sc, dec] 6 times. (18 sc)
- Round 20: Crochet 1 sc around. (18 sc)
- Round 21: Work [3 sc, dec], 8 sc, dec, then 3 sc. (16 sc)
- Round 22: Work [3 sc, dec], 7 sc, dec, then 2 sc. (14 sc)
- Rounds 23–29: Crochet 1 sc around. (14 sc)
- Round 30: Work [3 sc, dec], 6 sc, dec, then 1 sc. (12 sc)
- Round 31: Decrease around the entire round. (6 sc)
Close and fasten off.
6. Ruffle Collar
Add a pretty ruffle collar to complete Poncino’s outfit:
- Row 1: Chain 32. (32 ch)
- Row 2: Turn, sc in the second chain from the hook, then work 30 sc across. (30 sc)
- Row 3: Turn, ch 2, then work 3 dc increases into each stitch across. (90 sc)
- Row 4: Turn, ch 2, and work 1 dc in every stitch across. (90 sc)
- Row 5: Ch 2 and finish with a row of hdc. Fasten off.
7. Rainbow Applique
Create the decorative rainbow accent for the sweater:
- Row 1: Crochet a foundation row of 15 sc. (15 sc)
- Row 2: Work a shorter section of 12 sc. (12 sc)
- Row 3: Work the inner arc with 9 sc. (9 sc)
Fasten off and sew the rainbow securely onto the sweater.
8. Knitted Shirt
Use 2.0 mm knitting needles to make Poncino’s sweater.
- Row 1: Cast on 32 stitches. (32 st)
- Row 2: Slip 1 stitch, then purl 31 stitches. (32 st)
- Row 3: Slip 1, k4, [inc, k1, inc], k4, [inc, k1, inc], k10, [inc, k1, inc], k4, [inc, k1, inc], k5. (40 st)
- Row 4: Slip 1, purl 39 stitches. (40 st)
- Row 5: Slip 1, k5, [inc, k1, inc], k6, [inc, k1, inc], k12, [inc, k1, inc], k6, [inc, k1, inc], k6. (48 st)
- Row 6: Slip 1, purl 47 stitches. (48 st)
- Row 7: Slip 1, k6, [inc, k1, inc], k8, [inc, k1, inc], k14, [inc, k1, inc], k8, [inc, k1, inc], k7. (56 st)
- Row 8: Slip 1, purl 55 stitches. (56 st)
- Row 9: Slip 1, k7, [inc, k1, inc], k10, [inc, k1, inc], k16, [inc, k1, inc], k10, [inc, k1, inc], k8. (64 st)
- Row 10: Slip 1, purl 63 stitches. (64 st)
- Row 11: Slip 1, k8, [inc, k1, inc], k12, [inc, k1, inc], k18, [inc, k1, inc], k12, [inc, k1, inc], k9. (72 st)
- Row 12: Slip 1, purl 71 stitches. (72 st)
- Row 13: Slip 1, k9, cast off 14 stitches, k21, cast off 14 stitches, then k11.
- Row 14: Slip 1, purl 11, cast on 3 stitches, purl 22, cast on 3 stitches, then purl 10.
- Row 15: Slip 1, knit 49 stitches. (49 st)
- Row 16: Slip 1, purl 49 stitches. (49 st)
- Rows 17–29: Continue alternating knit and purl rows. (49 st)
- Row 30: Cast off all 49 stitches.
Finishing Your Poncino Bunny
Once all the crocheted and knitted pieces are complete, stuff the head, body, arms, and legs firmly but evenly. Sew the pieces together securely, attach the ears and arms in their designated positions, and finish the facial embroidery.
Finally, dress the bunny in the knitted sweater, attach the ruffle collar and rainbow applique, and check all seams to make sure everything is secure.
Your adorable Poncino Crochet Bunny is now ready for cuddles, display, or gifting!
This project combines classic amigurumi techniques with a cute knitted outfit, making it a delightful handmade creation for crochet and craft enthusiasts.
