
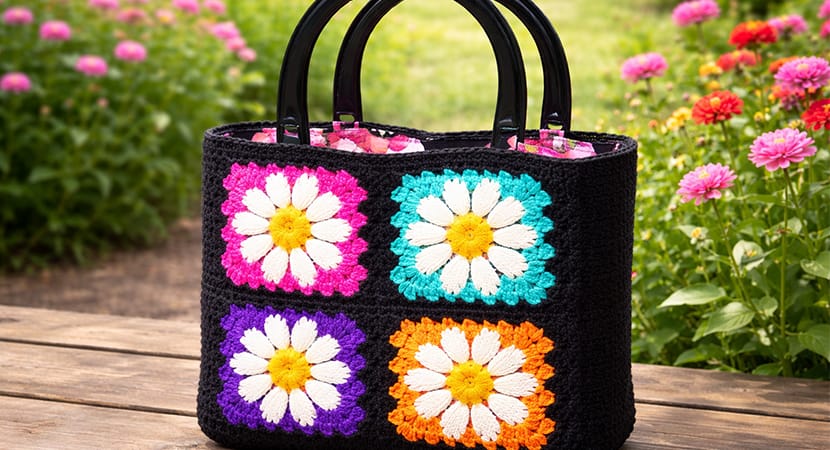
Ready to give your crochet projects a fresh yet nostalgic twist? The Granny Square Pucker Purse is a vibrant, texture-rich accessory that blends vintage charm with modern functionality.
Inspired by classic scrap granny square blankets—those cozy, colorful heirlooms often passed down through generations—this purse captures that same warmth and personality in a stylish, wearable form.
Originally designed by Marly Bird, this project pays tribute to traditional crochet techniques while introducing clever construction details that make the finished piece stand out.
The result is a compact yet eye-catching purse that works just as well for everyday errands as it does for a night out.
Why You’ll Love This Pattern
This purse is more than just a functional item—it’s a creative experience. It combines:
- Bold colorwork using multiple yarn shades
- Textured stitches for added dimension
- Visible seaming as a design feature
- A structured shape that holds up with use
Despite its intricate appearance, the pattern is approachable for advanced beginners and enjoyable for intermediate crocheters looking to try something new.
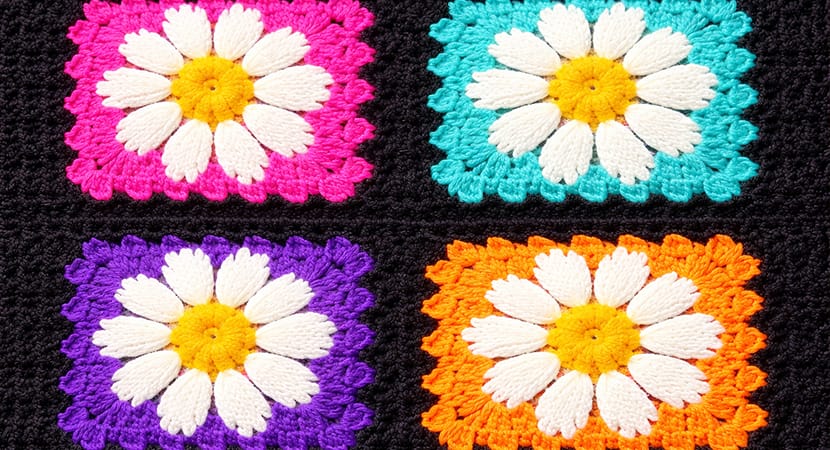
Key Technique: Long Double Crochet (LDC)
The standout feature of this purse is its rich texture, created using the long double crochet stitch.
How to work LDC:
- Yarn over.
- Insert hook into the indicated stitch or space in a lower row.
- Yarn over and pull up a loop, extending it to the height of your current row.
- Yarn over, pull through two loops.
- Yarn over, pull through the remaining two loops.
This elongated stitch connects different rounds visually, creating a layered, almost woven effect across the square.
Materials Required
Yarn
Use worsted-weight yarn in multiple colors. The original design used Caron Simply Soft Brites, but any similar yarn works well.
You’ll need:
- 6 contrasting colors (A–F)
- 1 main color (G) for joining and finishing
Each color: approximately one 6 oz skein.
Tools & Notions
- Crochet hook: 5 mm (H-8) or size needed for gauge
- Tapestry needle
- Sewing needle and matching thread
- 1 yard of cotton fabric (for lining)
- 2 pieces of plastic canvas (18 inches each)
- Purse handles (optional)
Gauge & Measurements
- Each square: 5.5″ x 5.5″
- Panel (4 squares): 11″ x 11″
- Gusset strip: 2.6″ x 33″
Gauge does not need to be exact, but consistency is important—ensure all squares are the same size.
Color Sequences
Make 8 squares total, 2 of each sequence:
- E, F, D, E, F, G
- B, C, A, B, C, G
- F, A, B, F, A, G
- D, E, C, D, E, G
Step-by-Step: Granny Square Motif
Round 1 (Foundation)
- Chain 4, join to form a ring.
- Chain 3 (counts as first double crochet).
- Work 2 double crochets into ring, chain 1.
- Repeat (3 dc, ch 1) three times.
- Join with slip stitch. Fasten off.
Round 2
- Join new color in any corner space.
- In same space: (3 dc, 1 LDC into ring, 3 dc, ch 1)
- Repeat in each corner.
- Join and fasten off.
Round 3
- Join new color to any LDC stitch.
- In that stitch: (3 dc, ch 1, 3 dc, ch 1)
- Between corners:
- Work (1 dc, 1 LDC around post from Round 1, 1 dc, ch 1)
- Continue around.
- Join and fasten off.
Round 4
- Join color to any corner.
- In corner: (3 dc, 1 LDC around previous LDC, 3 dc, ch 1)
- Between corners: work (3 dc, ch 1) in each space.
- Repeat around, join, fasten off.
Round 5
- Join color to any LDC.
- In that space: (3 dc, ch 1, 3 dc, ch 1)
- Alternate between standard clusters and LDC detail stitches.
- Join and fasten off.
Round 6 (Main Color)
- Join main color in a corner.
- Work standard granny square clusters all around.
- No LDC stitches in this round.
- Fasten off.
Assembly Instructions
1. Make the Gusset (Sides & Bottom)
- Chain 11.
- Single crochet across (10 stitches).
- Chain 1, turn.
- Repeat rows until strip measures about 33 inches.
2. Join the Squares
- Arrange 4 squares into a panel.
- Place squares wrong sides together.
- Slip stitch through both loops to join.
Important: This creates a raised seam on the front—this is intentional and adds texture.
Make 2 panels total.
3. Add Edging
- Single crochet around each panel.
- Work 3 sc in each corner for shaping.
- Keep edges even and neat.
4. Attach Gusset
- Align gusset with one panel (wrong sides together).
- Slip stitch along three sides.
- Repeat with second panel.
- Leave top open.
Creating Structure: The “Pucker” Effect
To help the bag stand upright and maintain shape:
- Cut plastic canvas to fit the bottom and sides.
- Insert inside the bag.
- This reinforces the structure and enhances the “pucker” look at the top.
Adding the Lining
Steps:
- Cut fabric: approx. 25″ x 12.5″
- Sew side seams to form a fabric pouch.
- Fold top edge inward and hem.
- Insert lining into the bag over the canvas.
- Hand-stitch lining to crochet edges.
Optional: Add a pocket using an extra granny square.
Handles & Strap Options
You have flexibility here:
- Sew-on handles: Attach to lining before securing
- Crochet strap: Extend gusset into a long strap
- Crossbody option: Adjust length for comfort
Customization Tips
- Use cotton yarn for better structure
- Try scrap yarn combinations for a true vintage feel
- Increase square size or count to make a larger bag
- Add a drawstring closure for extra security
What Makes It a “Pucker Purse”?
The name comes from the gathered top edge. When slightly cinched or structured with lining, the top creates a soft, ruched “pucker” effect that gives the bag its unique silhouette.
