
Step into a greener, more sustainable world with this beautiful and functional crochet market bag pattern.
This project is far more than just another accessory; it is a testament to eco-conscious living, a personal stand against the disposable culture of plastic waste, and a stylish way to carry your groceries.
Every time you use this bag, you will feel a sense of accomplishment knowing you crafted a reliable, sturdy, and charming item yourself.
Whether you are a seasoned crocheter or a beginner looking for your first functional project, this step-by-step guide will walk you through creating a durable tote that’s sure to turn heads at the local farmer’s market.
Why You Will Love This Market Bag
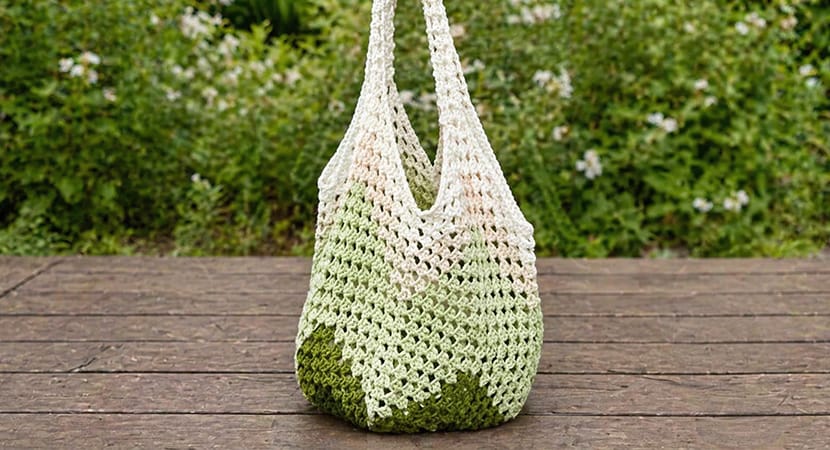
This bag is designed for those who value both aesthetics and utility. Because it is made using the classic granny stitch, it has a timeless, vintage feel while remaining incredibly practical.
The construction allows the bag to be flexible yet strong. Unlike many crochet items that might stretch too much when filled, this pattern is optimized for weight-bearing by using specific materials and stitches.
Additionally, it is an eco-friendly alternative to plastic bags, helping you reduce your environmental footprint one shopping trip at a time.
Choosing the Best Yarn for Your Tote
When it comes to a market tote, the yarn you choose is the most critical decision. You need a fiber that combines strength, style, and functionality.
Cotton yarn is the clear winner for this project. As an all-natural fiber, cotton offers exceptional durability, which is vital for a bag intended to carry heavy groceries.
Most importantly, cotton doesn’t stretch out as much as acrylic or wool, ensuring your bag maintains its shape even when loaded.
Benefits of Cotton Yarn:
- Sustainability: It is a natural, biodegradable fiber.
- Washability: It is machine washable, meaning you can keep your bag fresh and clean after messy trips to the market.
- Versatility: It comes in a vast array of colors, allowing for endless personalization.
Recommended Yarns and Substitutions
The original pattern uses Hobbii Rainbow 8/6 (100% cotton). However, you can use any yarn from your stash, though cotton remains the best choice for longevity. If you need to substitute, consider these options:
- Lion Brand Pima Cotton: 100% Cotton, 170m/100g.
- Lion Brand 24/7 Cotton DK: 100% Cotton, 250m/100g.
- Paintbox Yarn Cotton DK: 100% Cotton, 125m/50g.
Pattern Details and Materials
Final Measurements: Approximately 31 cm x 32 cm (excluding handles).
Materials Needed:
- Yarn: Approximately 200g of 100% cotton yarn.
- Hook Size: 3.5 mm crochet hook.
- Tools: A pair of scissors, a tapestry needle for weaving in ends, and 4 stitch markers.
Color Scheme Suggestion:
To achieve a beautiful gradient or striped look, you can follow this round-by-round color guide:
- Rounds 1–8: Navy Blue
- Rounds 9–12: Jeans Blue
- Rounds 13–15: Grey
- Rounds 16–18: Light Jeans Blue
- Rounds 19–21: Light Blue
- Rounds 22–24: Light Grey
- Rounds 25–27: Ice Blue.
Stitch Abbreviations (US Terms)
- ch(s): chain(s)
- st(s): stitch(es)
- sl st: slip stitch
- sc: single crochet
- dc: double crochet
- sk: skip
- sp: space
- CL (Cluster): Three double crochet stitches worked in the same space.
- Dc3tog (Decrease): Double crochet three together.
Mastering the Special Stitches

The beauty of this bag lies in its simplicity. It is made almost entirely of cluster stitches. If you can do a double crochet, you can make this bag.
The Double Crochet Cluster (CL): This is the heart of the “granny stitch.” Simply work three double crochet stitches into the designated chain space.
The Decrease (Dc3tog): To give the bag its unique shape, you will use a double crochet 3 together decrease starting at Round 14.
- Step 1: Yarn over, insert hook in the next ch-1 space, pull through (3 loops on hook), yarn over, pull through 2.
- Step 2: Yarn over, insert hook in the next designated stitch (usually the middle of a cluster or a previous decrease), pull through (4 loops), yarn over, pull through 2.
- Step 3: Yarn over, insert hook in the next ch-1 space, pull through (5 loops), yarn over, pull through 2.
- Step 4: Yarn over and pull through all 4 remaining loops.
The Pattern Instructions
The Base of the Bag
Round 1: Start with a magic ring. Ch 3 (counts as first dc), 2 dc, ch 3. *Work 1 CL, ch 3. Repeat from * 2 more times. Join with a sl st to the top of the first ch-3. (4 clusters, 4 corner spaces).
Round 2: Sl st to the first corner space. (Ch 3, 2 dc, ch 3, 1 CL) all in the corner. *Ch 1, sk 3 sts, (1 CL, ch 3, 1 CL) in the next corner space. Repeat from * 2 more times. Ch 1, join. (8 clusters).
Round 3: Sl st to corner space. (Ch 3, 2 dc, ch 3, 1 CL) in corner. *Ch 1, sk 3 sts, 1 CL in next ch-1 space, ch 1, sk 3 sts, (1 CL, ch 3, 1 CL) in corner. Repeat from * 2 more times. Ch 1, sk 3 sts, 1 CL in next ch-1 space, ch 1, join. (12 clusters).
Round 4: Sl st to corner. (Ch 3, 2 dc, ch 3, 1 CL) in corner. {*Ch 1, sk 3 sts, 1 CL in next ch-1 space. Repeat until the next corner, ch 1, (1 CL, ch 3, 1 CL) in corner.} Repeat around. (16 clusters).
Rounds 5–13: Repeat Round 4. You should end with 52 clusters in total (13 clusters per side).
Creating the Body and Shape
At this stage, you must place markers on the middle stitch of each side. You should have 6 clusters on each side of your marker.
Round 14: Sl st to corner, (ch 3, 2 dc, ch 3, 1 CL) in corner. {*Ch 1, sk 3 sts, 1 CL in next ch-1 space. Repeat 4 more times. Work a dc3tog over the next ch-1 space, the middle stitch of the cluster, and the next ch-1 space. *Ch 1, sk 3 sts, 1 CL in next ch-1 space. Repeat 4 more times, ch 1, (1 CL, ch 3, 1 CL) in the corner.} Repeat around.
Note: The base will begin to fold here; this is normal and creates the bag’s depth.
Round 15: Repeat the logic of Round 14, but work your dc3tog over the ch-1 space, the decrease stitch from the previous round, and the following ch-1 space.
Rounds 16–27: Repeat Round 15.
Round 28 (The Border): Sl st to corner, ch 1. (2 sc, ch 2, 2 sc) in the corner. Work 1 sc in each stitch and ch-1 space around, placing (2 sc, ch 2, 2 sc) in each corner. Fasten off and weave in ends.
The Handles
To ensure strength, work the handles into the chain spaces of Round 27 (the last granny stitch round), not the single crochet border.
Row 1: Insert hook into the ch-1 space near a corner. Ch 4, sk 3 sts, (3 dc, ch 3, 3 dc) in the corner space, ch 1, sk 3 sts, 1 dc in the next ch-1 space. Turn. Row 2: Ch 4, sk the ch-1 space and 3 sts, (3 dc, ch 3, 3 dc) in the corner space, ch 1, 1 dc in the 3rd chain of the beginning ch-4. Turn.
Repeat Row 2 until the handle reaches half your desired length (e.g., 30 cm for a 60 cm handle). Finishing Row: Ch 4, sk all sts, 1 sc in the corner space, ch 4, sl st to the final dc.
Repeat this for all four corners. You will have four pieces which you will then join in pairs with single crochet or a tapestry needle to form two complete handles.
Final Touches and Community
Once your handles are joined and your ends are woven in, your Granny Stitch Market Bag is ready for its first adventure!
Happy crocheting, and enjoy your new sustainable tote!
