
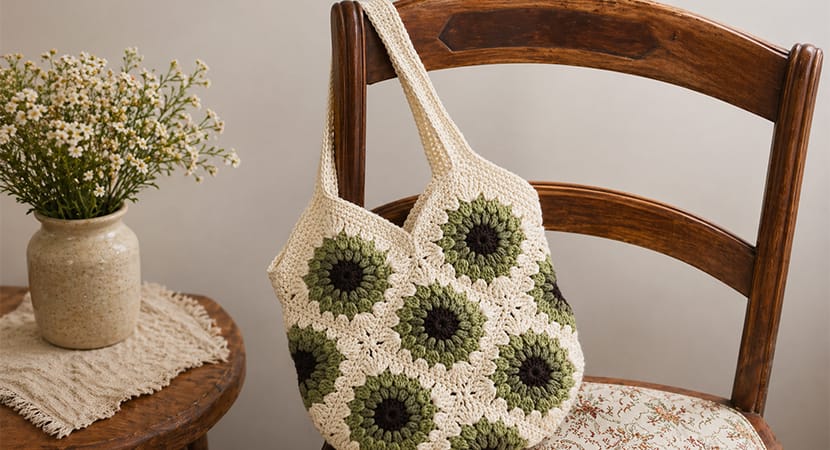
This cheerful tote bag is made from sunflower-inspired granny squares using a variation of the Starburst Granny Square. It’s a great project for practicing textured stitches and simple construction while creating a sturdy, stylish bag perfect for everyday use.
Materials
Hook
- US G6 / 4.0 mm crochet hook
Yarn (Worsted Weight Cotton Recommended)
- Ivory (main/background color) – approx. 3.5 oz
- Curry / Yellow – approx. 1.75 oz
- Antique Gold / Caramel – approx. 1 oz
- Brown (center) – approx. 0.75 oz
(Cotton yarn is strongly recommended for durability and structure.)
Other Tools
- Tapestry needle (for sewing & weaving ends)
- Scissors
Finished Size
- Approximately 11 inches wide × 19 inches tall (including handles)
Special Stitches (Important)
Puff Stitch
- Yarn over, insert hook into stitch.
- Pull up a loop to double crochet height.
- Repeat this process 3 times total (you should have 7 loops on hook).
- Yarn over, pull through all loops.
- Chain 1 to secure.
Bobble Stitch
- Yarn over, insert hook into space.
- Pull up a loop, yarn over, pull through 2 loops (partial dc).
- Repeat until you have 5 loops on hook.
- Yarn over, pull through all loops.
- Chain 2 to secure.
Step 1: Make Sunflower Squares (Make 13)
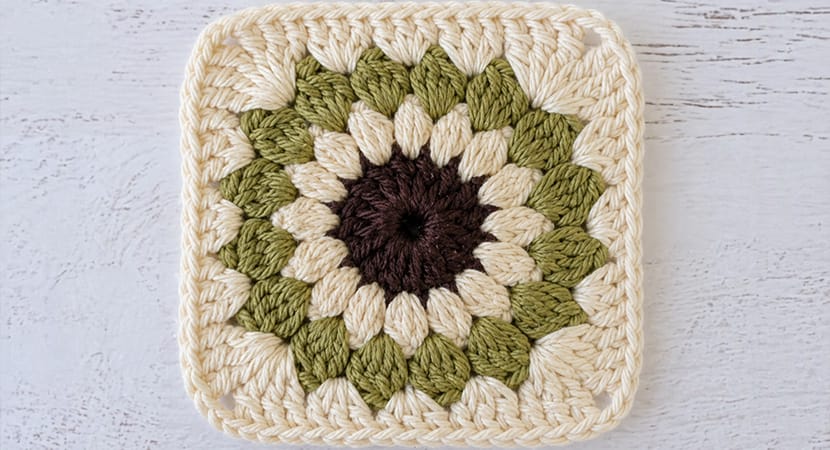
Each square has 4 rounds.
Round 1: Center (Brown)
- Chain 5, join with slip stitch to form a ring.
- Chain 3 (counts as first dc).
- Work 15 double crochets (dc) into the ring.
- Join with slip stitch to top of ch-3.
Total: 16 stitches
Fasten off and weave ends
Round 2: Puff Petals (Antique Gold)
- Join yarn in any stitch.
- Work 1 puff stitch in each stitch around.
- Join with slip stitch.
Total: 16 puff stitches
Fasten off
Round 3: Bobble Petals (Curry/Yellow)
- Join yarn in any space between puff stitches.
- Work 1 bobble stitch in each space around.
- Join with slip stitch.
Total: 16 bobble stitches
Fasten off
Round 4: Squaring the Circle (Ivory)
This round transforms the circle into a square.
- Join yarn in any space.
- Work 3 dc in that space.
Corners (Make 4 total)
In every 4th space:
- Work: (3 treble crochet, ch 2, 3 treble crochet)
Between Corners (Sides)
Work the following between corners:
- 3 dc
- 3 half double crochet (hdc)
- 3 dc
- Continue this pattern around.
- Join and fasten off.
Your square should now be flat and even
Weave in all ends neatly
Step 2: Assembly
- Arrange your 13 squares in your desired layout (commonly a grid with one center panel).
- Use whip stitch or preferred joining method:
- Align squares edge to edge
- Sew through both loops for a strong seam
Forming the Bag Shape
- Fold the layout so the sides come together.
- The top edges will form two peaks (for handles).
- Sew:
- Both side seams
- Bottom seam
Turn bag right-side out after sewing
Step 3: Border & Handles
Use Ivory (main color).
Round 1: Top Edge
- Work single crochet (sc) evenly around entire top edge.
Important (Valleys between squares):
- Either:
- Skip the join stitch
- OR crochet 2 stitches together (decrease)
Be consistent throughout
Round 2: Create Handles
- Sc until you reach first peak.
- Chain 70 (or preferred handle length).
- Skip across to the opposite peak and attach with sc.
- Continue around.
- Repeat for second handle.
Rounds 3–4: Strengthen Edges
- Work sc around entire bag and handles.
- Crochet across chain handles as well.
Tip:
- Use decreases at side valleys to keep shape neat and flat.
Rounds 5–6: Inner Handle Reinforcement
- Attach yarn to inside edge of handle opening.
- Work sc around inner opening.
- Decrease at center valleys.
This strengthens handles and improves appearance
Helpful Tips
Yarn Choice
- Cotton = sturdy, less stretchy, better structure
- Acrylic = softer but may stretch over time
Handle Length
- Adjust chain length to preference
- Test by holding bag before finalizing
Even Edges
- Always treat valleys the same way (skip or decrease)
- Inconsistency causes uneven shaping
Optional Lining
- Not required, but recommended if carrying small items
- Use fabric lining for extra durability
Skill Level
Beginner to Advanced Beginner
Great for learning:
- Granny squares
- Puff & bobble stitches
- Bag construction
