
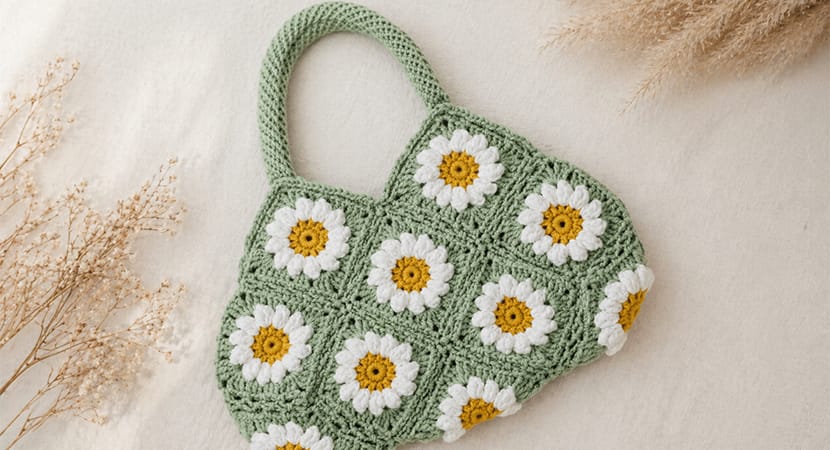
There’s something undeniably magical about flower season. As the weather warms and the sky turns bright blue, it inspires creativity—and what better way to celebrate than with a handmade floral crochet bag?
The Daisy Mae Crochet Bag blends the timeless charm of granny squares with soft, puffy daisies to create a beautiful and functional accessory. With its roomy structure and eye-catching spiral handles, this bag is both practical and stylish.
Why You’ll Love This Pattern
- Combines classic granny squares with a modern floral twist
- Features 3D puffy daisy petals for texture
- Highly customizable—swap squares or colors easily
- Great for both relaxing crochet sessions and travel projects
- Works up in manageable steps, making it beginner-friendly with some experience
Materials Needed
Yarn (Worsted Weight #4):
- Main Color (Pink): 5 oz
- Petals (White): 3.5 oz
- Centers (Yellow/Mustard): 2 oz
Tools:
- Crochet Hook: US H/8 (5 mm)
- Tapestry needle
- Scissors
Optional:
- Fabric (½–¾ yard) for lining
- Sewing machine
- Magnetic snap closure
Finished Size
- Bag: 17.5” wide × 18.5” tall (including handles)
- Each square: 4.5” × 4.5”
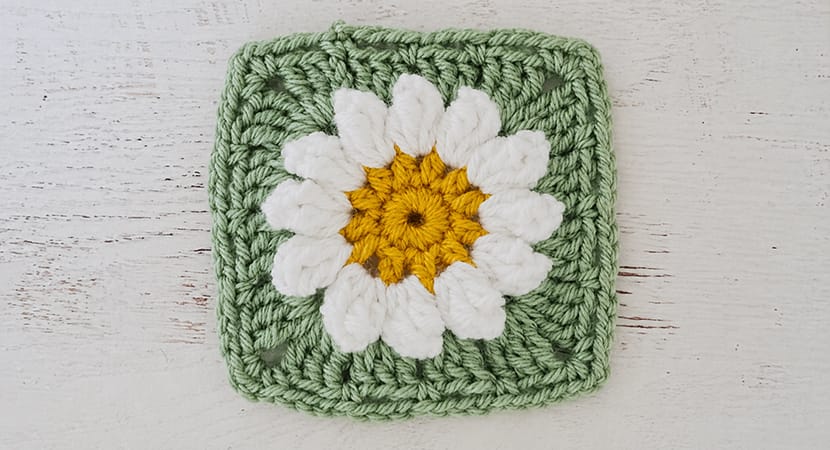
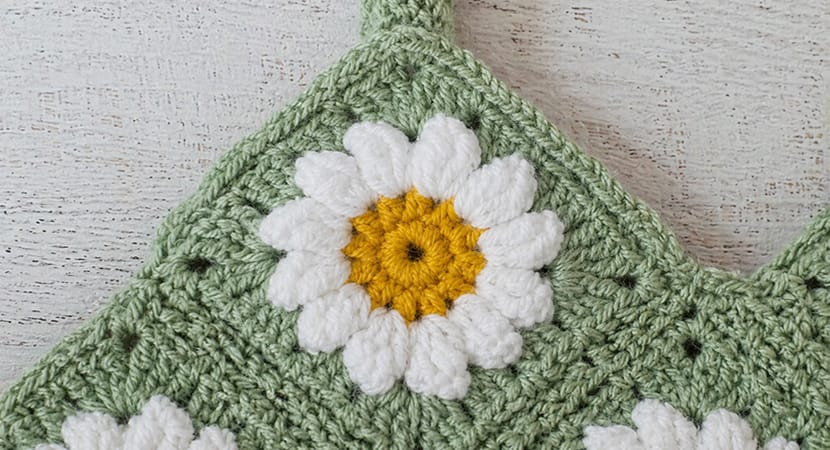
Step 1: Make 17 Daisy Granny Squares
Pro Tip:
Work in batches:
- Make all centers first
- Then petals
- Finish with outer rounds
Round 1: Center Ring
- Chain 4, slip stitch to form a ring
- Chain 1
- Work 12 single crochets (sc) into the ring
- Join with slip stitch
Round 2: Create Spaces
- Chain 3 (counts as hdc + ch 1)
- Repeat:
→ 1 half double crochet (hdc), chain 1 in each stitch - You should have:
- 12 hdc
- 12 chain-1 spaces
- Join and fasten off
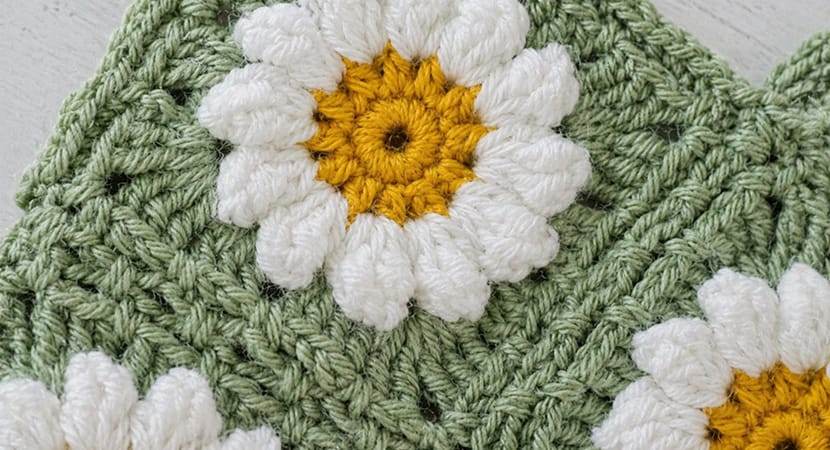
Round 3: Puffy Petals
Join white yarn in any chain-1 space.
For each petal:
- Chain 4 (counts as first treble crochet)
- Make 3 more treble crochets (tr) in the same space
- Remove hook from loop
- Insert hook into the first treble stitch
- Pull loop through → forms puff
Repeat:
- Chain 2 between petals
- Continue around until you have 12 petals
- Fasten off
Round 4: Shape into a Square
Join pink yarn between petals.
- In corners:
→ (3 tr, ch 2, 3 tr) - Along sides:
→ Work 3 double crochets (dc) in each space - Repeat to form a square
Round 5: Prep Round for Joining
- Work single crochet (sc) across
- Chain 3 between groups
- In corners:
→ (sc, ch 2, sc)
This round prepares squares for joining.
Step 2: Join the Squares (Faux Braid Join)
Layout:
- Arrange all 17 squares according to your bag diagram
Joining Method:
- Use Faux Braid Join for a neat, braided look
- Join squares in rows first
- Then connect rows together
Important Tips:
- Always join corner to corner properly
- When 4 squares meet, reinforce the join twice
- Do NOT accidentally close openings
Step 3: Fold into Bag Shape

- Fold from the bottom center upward
- Follow the layout carefully
Key Detail:
- Top squares form an “M” shape
- This creates the bag opening
Step 4: Add Handles
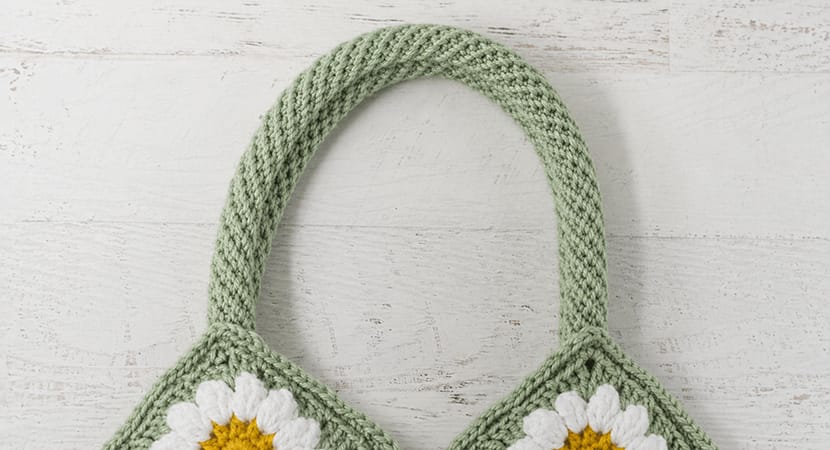
Option 1: Spiral Handles (Recommended)
- Make 16-inch spiral straps
- Attach at top peaks
Option 2: Simple Straps
- Chain desired length
- Work rows of single crochet
Step 5: Crochet the Edging
Work around the opening:
- In chain-3 spaces:
→ (sc, hdc, sc) - Between spaces:
→ Slip stitch - At handle peaks:
→ 3 half double crochets - Front/back valleys:
→ Single crochet 3 together - Side valleys:
→ Single crochet 2 together (twice)
This prevents stretching and keeps edges neat
Step 6: Optional Lining
Highly recommended if:
- Carrying small items
- Want extra durability
Steps:
- Trace bag shape onto fabric
- Sew lining before attaching handles
- Add pocket or magnetic closure if desired
- Insert and sew lining inside bag
Final Steps
- Attach handles securely
- Weave in all loose ends
- Shape your bag gently
Finished Result
You’ll have a:
- Beautiful handmade floral tote
- Strong, functional design
- Unique piece that stands out
Enjoy making your Daisy Mae Crochet Bag.
