
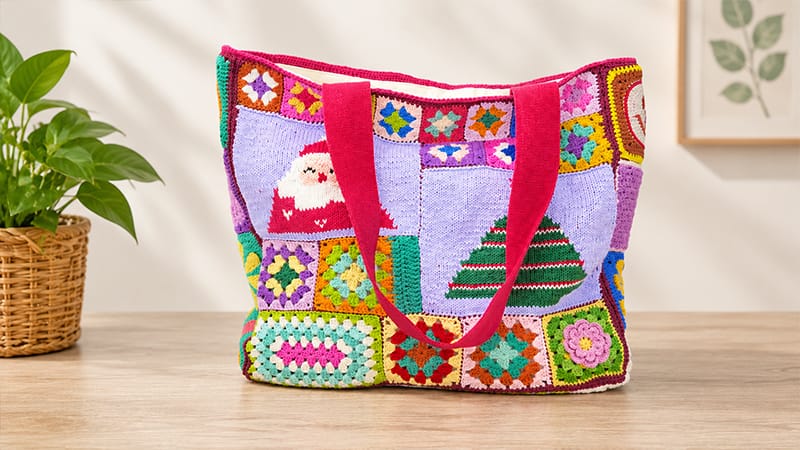
Embrace the festive spirit with this vibrant, patchwork-style Christmas tote bag. Balancing holiday tradition with modern crochet artistry, this project blends textured granny squares with an optional knitted centerpiece. The beauty of this design lies in its flexibility—giving you total control over the colors, layout, and size.
Project Overview & Specifications
- Finished Dimensions: Approximately 15 inches (38 cm) tall by 20 inches (50 cm) wide.
- Total Squares Required: Around 44 individual blocks.
- Design Aesthetic: A playful, bohemian-inspired holiday rainbow anchored by a rich, cohesive border.
The Original Palette vs. Your Imagination
The prototype features a festive burgundy framework that grounds an eclectic mix of purples, greens, yellows, and blues. However, you can easily shift the aesthetic to match your personal style:
- Traditional: Holly berry red, forest green, and crisp winter white.
- Modern Chic: Metallic-flecked yarns paired with minimalist cream and charcoal tones.
- Winter Wonderland: Ice blues, silver grays, and soft snow whites.
Materials & Tools
1. Yarn Selection
For a structural accessory like a tote bag, yarn durability is key. Loopara 4-ply or 5-ply milk cotton (or combed cotton) is highly recommended.
It offers incredible stitch definition, doesn’t pill easily during heavy use, and provides the sturdiness required to carry holiday shopping.
- Main Border Color: Rich Burgundy.
- Centerpiece Background: Soft Blue.
- Motif Colors: Assorted scraps of reds, greens, purples, and yellows.
2. Hooks & Notions
- Crochet Hook: 3.0mm (Adjust to 3.5mm if you crochet tightly, or 2.75mm if your stitches tend to be loose. The goal is a dense, firm fabric).
- Tapesty Needle: For weaving in ends and sewing components.
- Stitch Markers & Fabric Clips: Essential for alignment.
- Sharp Scissors
- Fabric Lining: Pre-cut to fit your finished panel dimensions.
- Bag Straps: Sturdy webbing, leather handles, or thick crocheted cords cut to your preferred carrying length.
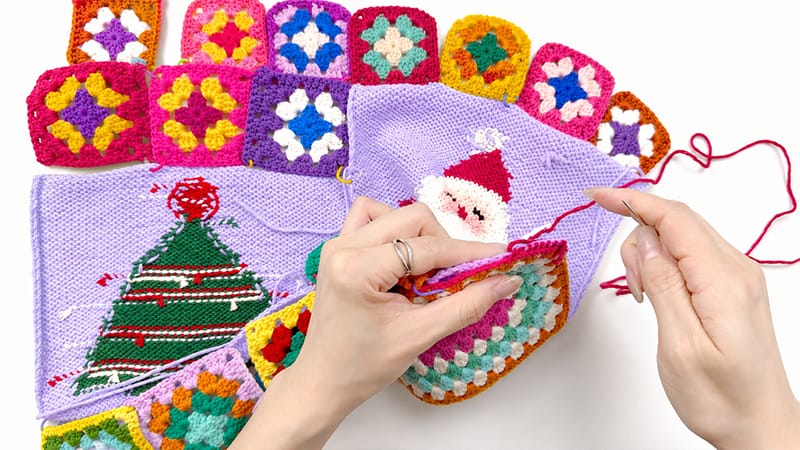
1: Crafting the Motifs
To build this intricate patchwork, you will craft a variety of motifs. The heart of the bag is a larger, central knitted panel depicting Santa Claus and a Christmas tree against a soft blue sky.
Surrounding this centerpiece, you will crochet an array of 9 different granny square styles:
- Black and White: For a striking, graphic pop.
- Vintage Daisy: Adding a touch of nostalgic floral charm.
- Textured: Creating physical depth and tactile interest.
- Hibiscus: A tropical twist on holiday symmetry.
- Leaf: Bringing natural, organic elements into the patchwork.
- Moon: For an enchanting, celestial vibe.
- Farmhouse: Classic, clean, and rustic lines.
- Rectangle: To help break up the grid and bridge different shapes.
- Classic Multi-Color: To tie your varied yarn stash together.
Pro Tip: Because different patterns naturally work up to different dimensions, you can standardize your square sizes by adding framing rounds of Single Crochet (sc) or Double Crochet (dc) around the smaller blocks until they match your larger ones.
2: Assembling the Tote Layout
+---------------------------------------+
|  [Square]   [Square]   [Square]   ... |
|  [Square]   +------------------+  ... |
|    ...      | CENTRAL KNITTED  |  ... |
|    ...      |     PANEL        |  ... |
|  [Square]   +------------------+  ... |
|  [Square]   [Square]   [Square]   ... |
+---------------------------------------+
              (MAIN PANEL)
- Design the Grid: Lay your knitted centerpiece flat on a table. Arrange your assortment of granny squares around it to construct a balanced, visually pleasing rectangular layout. Repeat this process to create an identical layout for the back of the bag.
- Secure the Layout: Flip the arranged squares over so the wrong sides are facing up. Use stitch markers to temporarily link adjacent squares together so they don’t shift.
3: Joining the Squares & Panels
While there are many joining methods—such as the Join-As-You-Go method or the invisible mattress stitch—the standard approach for this bag uses a flat, durable slip stitch join.
1: Connecting the Squares
Place two adjacent squares right sides together. Insert your 3.0mm hook through the outer loops only (the front loop of the square closest to you and the back loop of the square furthest from you).
Slip stitch loosely across the seam. Repeat this process until all blocks are joined into two solid main panels (Front and Back).
2: Framing the Panels
Attach your main border yarn (Burgundy) to any corner of your completed front panel. Work one uniform round of single crochet around the entire perimeter. Repeat for the back panel. This creates a clean, sturdy edge for the final construction.
Step 3: Integrating the Sides and Base (Edging)
- Align your side/bottom edging strip with the top edge of your front panel, ensuring the right sides are facing inward. Pin them together securely with stitch markers.
- Using the outer-loop slip stitch method, seam the side/bottom strip around the three sides of the front panel. One side of your bag’s body is now fully connected.
- Flip the piece over, align the back panel (wrong side up) with the open edge of the side strip, pin it in place, and slip stitch it shut.
Adding the Lining & Final Flourishes
Step 1: Sewing the Lining
- Turn your fully assembled crochet bag right-side out.
- Drop your fabric lining into the interior of the bag, smoothing it down so the bottom corners sit snugly against the crocheted corners.
- Fold the raw top edge of the fabric lining inward to create a clean, hidden hem. Secure this folded edge around the rim of the bag opening using fabric clips.
- Thread your yarn needle with matching thread or yarn. Whipstitch or slip stitch through the folded fabric edge and into the inner loops of the top crochet row, securing the lining perfectly inside.
Step 2: The Top Border & Straps
- Join your main color yarn to the top opening of the bag.
- Work two clean rounds of single crochet evenly around the entire top rim of the bag to reinforce the opening and conceal the lining edge. Fasten off and weave in all loose ends securely.
- Measure your pre-cut straps and place them symmetrically on the front and back panels.
- Using your yarn needle and heavy-duty stitches (like a box stitch pattern
Xinside a square), sew the handles deeply into the crocheted fabric to ensure they can handle heavy holiday loads.
Your custom, festive Christmas Granny Square Tote Bag is now complete and ready to show off!
