
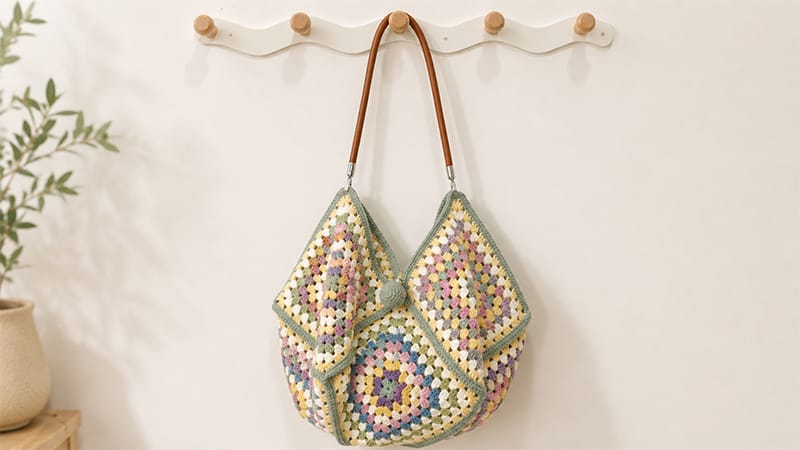
This cheerful, retro-inspired tote is the ultimate summer companion. Generous enough to hold your beach towel, sunscreen, sunglasses, and a good book, it combines functional durability with a lively aesthetic.
Project Dimensions & Structure
- Finished Size: Approximately 18 inches (45 cm) wide by 14 inches (35 cm) tall.
- Component Breakdown: You will need to crochet 8 large granny squares in total. Six squares form the front and back panels (the body), while the remaining two squares are joined to create a sturdy, flat base.
- Individual Square Size: Each completed square should measure 7 inches (19 cm) across.
Materials & Tools
Yardage & Color Curation
For the best results, use Loopara 5-ply combed milk cotton yarn. This yarn provides excellent stitch definition, handles beach wear beautifully, and feels soft against the skin.
You can play with your own color combinations or use the suggested palette below:
- The Summer Palette: White (Main background/joining color), Grey (Modern trim), and a mix of Green, Yellow, Blue, Red, and two shades of Pink for the internal square rings.
- Alternative Moods: Try Coastal (sandy neutrals, aquas, and deep blues), Tropical (hot pink, tangerine, and bright lime), or Nautical (classic navy, crisp white, and crimson).
Hardware & Notions
- Crochet Hook: 3.0 mm (or the size needed to achieve the correct gauge).
- Notions: Sharp yarn needle, scissors, and a handful of locking stitch markers.
- Handles: A pair of pre-made bag straps (canvas, leather, or rope).
Step-by-Step Crochet Patterns
1. The Regular Granny Square (Make 8)
Note: To achieve a vibrant look, change yarn colors after every two rounds, or as desired, using a seamless color-change technique.
- Round 1: Begin by chaining 4. Insert your hook into the very first chain and work a slip stitch to form a small working ring.
- Round 2: Chain 3 (this counts as your first double crochet throughout). Work 2 double crochets into the center of the ring, then chain 2. *Work 3 double crochets into the ring, followed by a chain 2. Repeat from * 2 more times. Join the round with a slip stitch into the 3rd chain of your opening chain-3. (You will have 4 clusters of 3-dc).
- Round 3: Slip stitch across the tops of the stitches until you reach the first corner chain-2 space. Chain 3, then work (2 dc, ch 2, 3 dc) all inside that same corner space. *Move to the next corner space and work (3 dc, ch 2, 3 dc). Repeat from * around. Join with a slip stitch to the top of the initial chain-3.
- Round 4: Slip stitch to the nearest corner chain-2 space. Chain 3, then work (2 dc, ch 2, 3 dc) in that space. *In the space between the side clusters of the previous row, work 3 dc. In the next corner space, work (3 dc, ch 2, 3 dc). Repeat from * around, completing the final side cluster before joining with a slip stitch to the top of the chain-3.
- Rounds 5–10: Continue building the square using the established granny pattern: work 3 dc into every straight side space, and (3 dc, ch 2, 3 dc) into every corner space. Each round will naturally increase by one side cluster per side.
- Round 11 (The Structural Border): Insert your hook into any corner space. Chain 1 (does not count as a stitch). Work (1 sc, ch 2, 1 sc) into the corner space. Single crochet evenly into every stitch across the side. Repeat this pattern around the entire square to create a clean, firm edge for joining. Fasten off and weave in your ends.
2. The Spherical Toggle Button / Charm (Make 1)
This plush little ball acts as a beautiful decorative accent or a functional toggle closure for your tote. Fill it firmly with synthetic fiberfill as you work.
- Round 1: Create a magic ring. Chain 1, then work 6 sc into the loop. Pull the tail tight to close the hole. Join with a slip stitch to the first sc. (6 sts)
- Round 2: Chain 1. Work 2 sc into every single stitch around. Join with a slip stitch. (12 sts)
- Round 3: Chain 1. *Work 1 sc in the first stitch, then 2 sc in the next stitch. Repeat from * around. Join with a slip stitch. (18 sts)
- Round 4: Chain 1. *Work 1 sc in each of the next 2 stitches, then 2 sc in the following stitch. Repeat from * around. Join with a slip stitch. (24 sts)
- Rounds 5–9: Chain 1. Work 1 sc into every stitch around to create the walls of the sphere. Join with a slip stitch at the end of each round. (24 sts)
- Round 10: Chain 1. *Work 1 sc in each of the next 2 stitches, then single crochet 2 together (sc2tog) over the next two stitches. Repeat from * around. Join with a slip stitch. (18 sts)
- Round 11: Chain 1. *Work 1 sc, then sc2tog. Repeat from * around. Join with a slip stitch. (12 sts) Stop here to stuff the sphere firmly with fiberfill.
- Round 12: Chain 1. Work sc2tog across all remaining stitches. (6 sts). Cut your yarn, leaving a long tail. Thread the tail through a yarn needle, weave it through the front loops of the remaining 6 stitches, pull tight to close, and secure.
Assembly & Construction
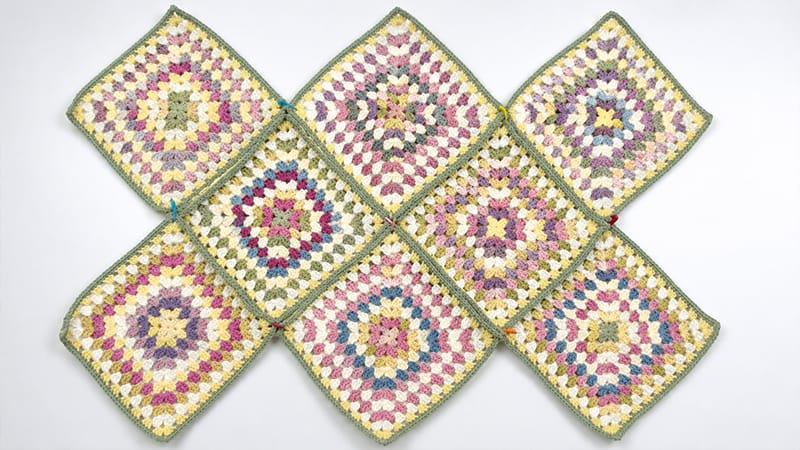
    [ Square 1 ]  [ Square 2 ]  [ Square 3 ]  <-- Front Panel
    ----------------------------------------
    [ Base Sq 1]  [   ---    ]  [ Base Sq 2]  <-- Bottom Base
    ----------------------------------------
    [ Square 4 ]  [ Square 5 ]  [ Square 6 ]  <-- Back Panel
Layout & Pre-Assembly
Lay your 8 completed squares out on a flat surface. Arrange 3 squares side-by-side for the front wall, 3 squares side-by-side for the back wall, and position the remaining 2 squares beneath them to form the floor of the bag.
Use locking stitch markers to clip the corners together, allowing you to visualize the 3D shape before joining.
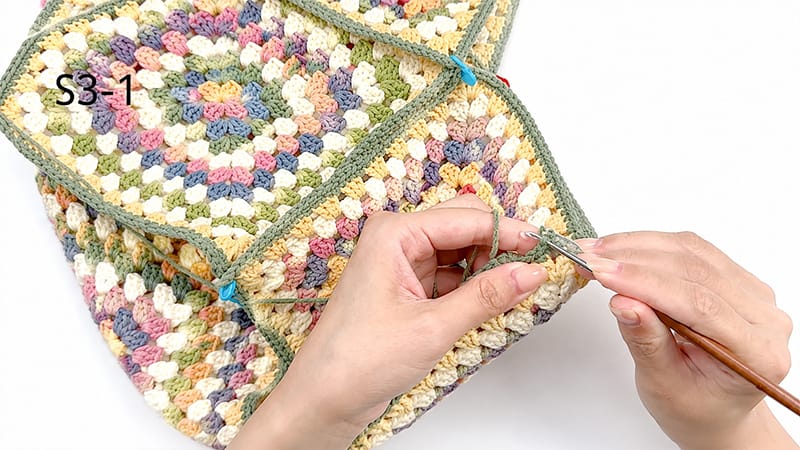
Joining the Squares
We will use a raised single crochet join to assemble the bag, which provides fantastic structural integrity and a beautiful, framed border appearance.
- Seaming the Panels: Align two squares with their wrong sides facing together. Insert your hook through the corner chain-spaces of both squares, pull up a loop of your joining yarn, and make a locking chain. Single crochet in the same space.
- Stitch Matching: Working through both loops of both squares simultaneously, work a single crochet into every matching pair of stitches across the side. Maintain an even, consistent tension so the seam doesn’t puckering.
- Navigating Intersections: When you reach a four-corner intersection, work 1 sc into the current corner space, chain 1 to jump the gap safely, and work 1 sc directly into the corner space of the next pair of squares.
- Attaching the Base: Fold your assembled front and back panels up, matching them to the borders of the 2 base squares. Single crochet along the perimeter of the base to join the bottom floor to the walls of the tote.
Top Border, Closure, & Straps
Framing the Opening
Join your trim color (Grey) to the top rim of the bag. Work 1 single crochet into every stitch around the entire upper opening of the bag to clean up the edges and add strength where the straps will pull.
Crafting the Loop Closure
- Find the exact center stitch on the back panel of your bag.
- Join your yarn, and chain approximately 22 stitches (adjust this length so it perfectly wraps around your crocheted ball charm).
- Slip stitch back into the starting anchor stitch, fasten off, and weave in the ends securely.
Final Polish & Straps
Attach the Button
Center the crocheted ball on the front panel of the bag, aligning it perfectly with the chain loop on the back. Use a yarn needle and a double strand of yarn to sew the ball securely to the bag wall, reinforcing it multiple times.
Affix the Straps
Position your bag handles evenly on the front and back panels. Sew them down using strong, heavy-duty stitches or secure them with their built-in hardware according to the manufacturer’s placement.
Finishing Touches
Weave in any remaining loose yarn tails on the inside of the bag. Give your finished tote a light steam blocking to set the stitches perfectly for its first beach outing!
