
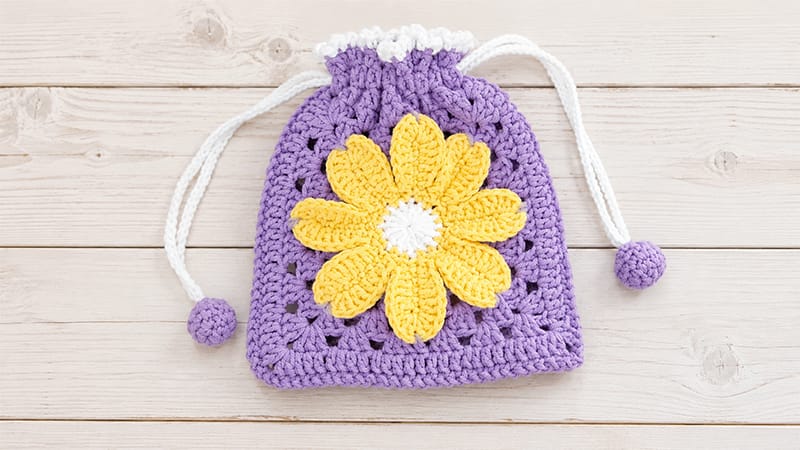
This charming, vintage-inspired drawstring bag combines the timeless beauty of a central daisy motif with a functional, modern accessory.
By crafting two detailed floral squares, joining them seamlessly, and adding a dual-cord drawstring closure, you will create a beautiful pouch perfect for gifting or personal use.
Materials & Tools
- Yarn: Premium 5-ply combed cotton (Loopara or equivalent weight) in your chosen palette (e.g., yellow for the center, white for petals, and a contrasting background color).
- Hook: 3.0 mm (Size C-2 or D-3 depending on your tension).
- Notions: Sharp yarn needle, scissors, and at least 4 locking stitch markers.
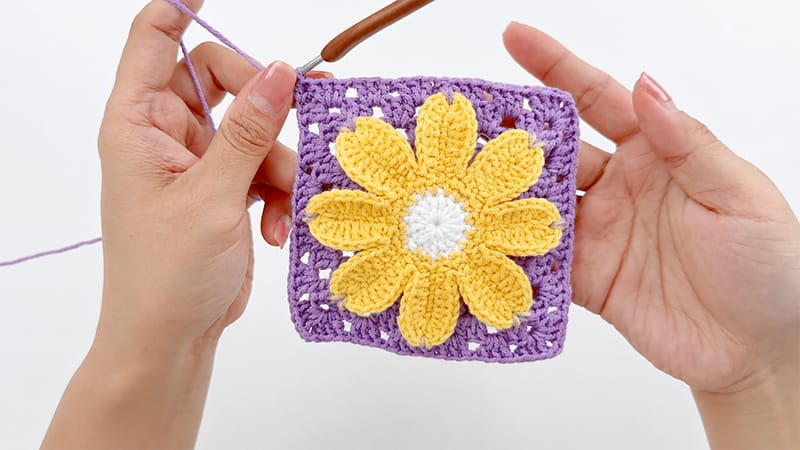
Part 1: The Daisy Granny Squares (Make 2)
Each panel begins as a dimensional daisy flower that gradually transitions into a crisp, structural square.
Phase A: The Flower Center & Petals
- Round 1 (Center): Form a magic ring. Chain 3 (counts as your first double crochet). Work 16 double crochets into the ring. Pull the tail tight to close the center hole completely. Slip stitch into the top of the initial chain-3 to join. Fasten off this color and weave in the tail.
- Round 2 (Petal Base): Attach your petal color to any stitch. Chain 1. *Work 2 single crochets in the next two stitches, chain 7, then work 6 single crochets back down the chain starting from the second chain from your hook.* Repeat from * to * a total of 8 times around. Slip stitch to the first single crochet to join. You will have 8 structural petal points.
- Round 3 (Petal Shaping): Slip stitch to the base of the first chain loop. Chain 1. Around each of the 8 petal loops, work the following sequence to round them out: *1 single crochet, 1 single crochet, 1 half double crochet, 2 double crochets, a double crochet increase (2 dc in one stitch), 3 double crochets in the peak stitch, 3 double crochets in the next peak stitch, a double crochet increase, 2 double crochets, 1 half double crochet, 1 single crochet.* Repeat this sequence around all 8 petals. Slip stitch to join, fasten off, and neatly weave in the ends.
Phase B: Squaring the Circle
- Round 4 (Back Grid): Join your background yarn. Working strictly behind the petals, insert your hook into the back loops of the Round 3 single crochets. *Work 1 back-post single crochet, then chain 5.* Repeat from * to * 8 times to create an anchoring grid behind the flower. Slip stitch to join.
- Round 5 (Squaring Foundation): Slip stitch into the first chain-5 space. Chain 3 (counts as a dc), 2 double crochets in the same space, chain 1. In the next space, work 3 double crochets, chain 1. *To form the first corner in the next space, work: 3 double crochets, chain 2, 3 double crochets, then chain 1. In the following space, work 3 double crochets, chain 1.* Repeat from * to * 3 more times around to establish the four corners of your square. End with 3 double crochets and a half double crochet into the starting chain to join.
- Round 6 (Expansion): Chain 3, work 2 double crochets in the current space, chain 1. Work 3 double crochets and a chain-1 into each of the next two side spaces. *In the corner space, create the turn by working: 3 double crochets, chain 2, 3 double crochets, followed by a chain 1. Work 3 double crochets and a chain 1 in each side space across to the next corner.* Repeat around, ending the round with 3 double crochets and a half double crochet to join.
Phase C: Anchoring the Petals
- Round 7 (First Petal Catch): Chain 3. Catch the tip of the corresponding daisy petal by inserting your hook through both the petal tip and the current stitch, executing a double crochet to secure it. Work 1 regular double crochet, then chain 1. Work 3 double crochets and a chain-1 into the next 3 side spaces. *At the corner, work: 1 double crochet, 1 double crochet catching the next petal tip, 1 double crochet, chain 2, 1 double crochet, 1 double crochet catching the petal, 1 double crochet, chain 1. Resume the side spaces with 3 double crochets and a chain-1 across.* Repeat around, ending with the final petal-catching sequence and a half double crochet join.
- Round 8 (Second Petal Catch): Chain 3, 2 double crochets in the space, chain 1. Work through the side spaces with clusters of 3 double crochets and a chain 1, ensuring that the middle double crochet of the central cluster catches the remaining free petal tips. Repeat the standard corner sequence (3 dc, ch 2, 3 dc) at each turn. End with 3 double crochets and a half double crochet join.
- Round 9 (Solid Border): Chain 3, work 1 double crochet in the same space. Work 1 double crochet into every single stitch across the side (23 double crochets total per side). *In the corner chain-spaces, work: 2 double crochets, chain 3, 2 double crochets. Continue with 23 double crochets down the next side.* Repeat around. Join with a slip stitch to the first chain-3. Fasten off and securely weave in all remaining yarn tails.
Part 2: Accent Baubles (Make 2)
These small, stuffed spheres add weight to the drawstrings, preventing them from slipping inside the bag casing.
- Round 1: Form a magic ring. Chain 1, work 6 single crochets into the ring. Slip stitch to the first single crochet to close the circle, then chain 1.
- Round 2: Work 2 single crochets into every stitch around (12 stitches total). Slip stitch to join, chain 1.
- Round 3 & 4: Work 1 single crochet into every stitch around (12 stitches per round). Slip stitch to join, chain 1.
- Round 5: *Single crochet two stitches together (decrease)* repeat 6 times around (6 stitches remaining). Slip stitch to join, fasten off, leaving the small top opening unsealed for assembly later.
Part 3: The Braided Drawstrings (Make 2)
Instead of a standard chain, this technique creates a durable, non-stretch cord.
- Create a secure slip knot on your crochet hook.
- Holding your working yarn, bring the yarn tail from front to back over the hook (creating an extra loop).
- Yarn over with the working strand and pull through both loops currently on your hook.
- Repeat this motion—wrapping the front strand and pulling the working strand through—until your braided cord reaches your desired length (approximately 120 repetitions). Fasten off.
Part 4: Bag Assembly & Finishing
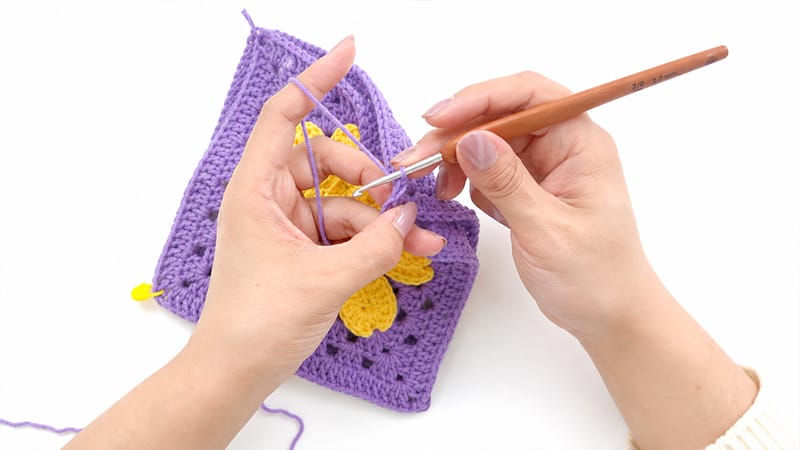
Step 1: Seaming the Panels
Align your two finished daisy squares with their right sides facing outwards. Use your locking stitch markers to pin the bottom and side edges together, ensuring the stitches match up perfectly.
Attach your yarn to a top corner. Insert your hook through the back loop of the front square and the front loop of the back square.
Work a continuous row of slip stitches downward, across the bottom, and up the opposite side. Keep your tension relaxed so the edges do not puck or distort. Leave the top side completely open.
Step 2: Crafting the Collar
Attach your yarn to the top open edge of the bag.
- Rounds 1 & 2: Work 2 complete rounds of treble crochet (tc) all the way around the opening, matching stitch for stitch to create a wide, open-slotted collar for the drawstrings.
- Edge Round: To create a decorative scalloped trim, work a final round of: *1 single crochet, chain 3, skip one stitch.* Repeat this pattern completely around the rim, slip stitch to join, and fasten off.
Step 3: Threading the Cords
Lay the bag flat.
- Take your first braided drawstring and a yarn needle. Thread it through the second-to-last row of treble crochets, weaving over and under every two stitches all the way around the bag until both ends exit from the left side.
- Take the second drawstring and thread it through the exact same row of treble crochets, but start from the opposite side so that both of its ends exit from the right side.
       [ Scalloped Edge Trim ]
=================================== <- Treble Crochet Row 2
<- (Cord 1 Exits)  [= = = = = =]  (Cord 2 Exits) ->
=================================== <- Treble Crochet Row 1
       [ Seamed Bag Body ]
Step 4: Attaching the Baubles
Slide the raw ends of the left drawstrings through the small opening of one crochet bauble. Tie the cord ends into a secure, bulky knot. Use a sewing needle and matching thread to stitch over the knot several times so it cannot unravel.
Tug the cord so the knot is hidden deep inside the bauble, then sew the opening of the ball shut. Repeat this process with the right drawstring ends and the second bauble.
Pull both baubles outward simultaneously to smoothly cinch your new Daisy Granny Square bag closed!
