
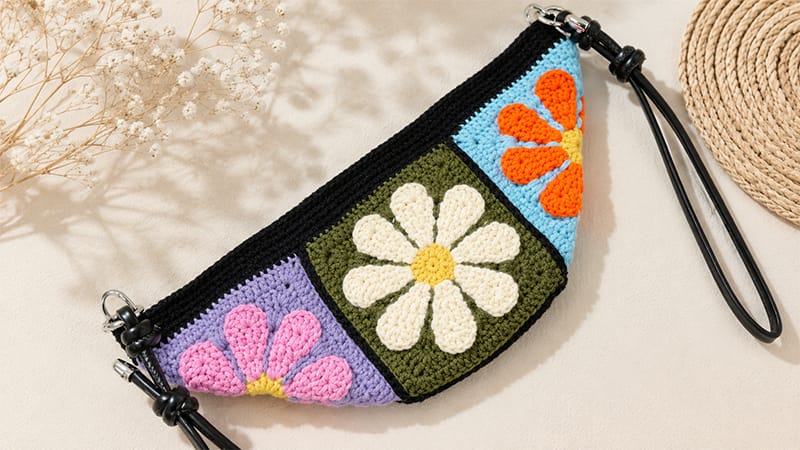
This tutorial walks you through crafting a charming, dumpling-shaped crossbody bag using four beautifully detailed granny squares.
The unique assembly technique transforms flat, floral-centered geometric squares into a slouchy, professional-grade accessory.
Project Design & Dimension Specs
- Individual Square Size: 4.3 inches ($11\text{ cm}$)
- Finished Bag Height: 5.5 inches ($14\text{ cm}$)
- Finished Bag Width: 12.5 inches ($31.7\text{ cm}$)
- Aesthetic Guide: For a classic bohemian look, use a solid dark background (like midnight black or espresso brown) for your border rounds and joining seams, while cycling through three jewel tones for the interior floral layers. For a soft, romantic look, opt for cream borders paired with muted pastel interiors.
Materials & Tools Checklist
Yarn and Hook
- Yarn: Loopara 5-Ply Combed Milk Cotton Yarn (or any equivalent Category 2/3 sport weight cotton blend). You will need 1 main color (MC) for borders and assembly, and 2–3 contrasting colors (CC1, CC2, CC3) for the centers.
- Hook Size: 3.0 mm (US Size C/2 or D/3 equivalent) to ensure a dense, sturdy fabric that won’t stretch out over time.
Notions & Hardware
- Finishing Tools: Sharp scissors, a blunt-tipped yarn needle, and at least 6 locking stitch markers.
- Hardware & Trim: One coordinating zipper (approx. 10–12 inches), two D-rings, a clip-on leather crossbody strap, and a sew-on leather personalization label.
- Lining Fabric: A fat quarter of cotton woven fabric.
Abbreviations (US Crochet Terms)
- MR: Magic Ring
- ch: Chain
- sl st: Slip stitch
- sc: Single crochet
- hdc: Half double crochet
- dc: Double crochet
- dc inc: Double crochet increase (two double crochets worked into the same stitch)
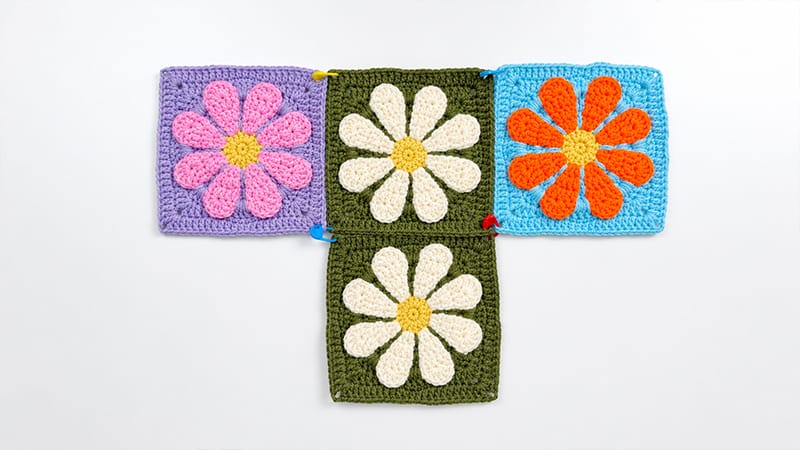
Step-by-Step Motif Pattern (Make 4)
Note on color management: To achieve flawless color transitions, always pull the new color through the final loop of the preceding slip stitch, locking the old yarn tail inside your initial chains.
           [Round 10-11: Square Borders]
               ---------------------
              |   [Round 8-9: Petals]  |
              |     -------------     |
              |    | [Rd 1-7:Core]|   |
              |    |      (MR)    |   |   <-- Visual layering of the motif
              |     -------------     |
              |                       |
               ---------------------
- Round 1 (CC1): Begin with a MR. Work 8 sc directly into the ring. Pull the tail tight to close the center hole. Sl st to the first sc to close the ring. Ch 3 (this counts as your first dc here and throughout).
- Round 2 (CC1): Place 1 dc into the exact same base stitch as your ch-3. Work 1 dc inc into each of the remaining 7 stitches around. Sl st to the top of the initial ch-3 to join. [16 dc]
- Round 3 (Switch to CC2): Fasten on your new color in any stitch. Ch 3, then work 1 dc into the next stitch. Ch 1, skip the next stitch, work 1 dc into each of the next 2 stitches. Repeat from * to * 7 more times. Ch 1, skip the final stitch, and sl st to the top of the ch-3 to join.
- Round 4 (Switch to CC3): Drop your yarn to the back and attach CC3. This round is worked specifically into the skipped stitches from Round 3, working over the ch-1 spaces. Ch 7 (counts as 1 dc and a ch-4 space). Work 1 dc into the next skipped stitch from Round 3, ch 4. Repeat from * to * 7 more times. Bring the previous round’s dropped yarn loop forward, then sl st to the 3rd chain of your starting ch-7 to close.
- Round 5 (CC3): Ch 3. Work a dc inc into the next stitch, followed by 1 dc in the next stitch. Work a dc inc, then 1 dc. Repeat from * to * 7 more times around the wheel. Bring the dropped yarn loop forward; sl st to the initial ch-3 to close.
- Round 6 (CC3): Ch 3, 1 dc into the next stitch, ch 4. Work a dc inc into the next stitch, ch 4. Repeat from * to * 7 more times. Bring your dropped loop forward; sl st to the initial ch-3 to join.
- Round 7 (CC3): Ch 3, work a dc inc in the next stitch, 2 dc across the next 2 stitches, ch 2. Work 1 dc, 1 dc inc, 2 dc, ch 2. Repeat from * to * 7 more times. Bring the dropped loop forward; sl st to join.
- Round 8 (Switch to CC1): Ch 1. Work 1 sc, skip 1 stitch, work 5 dc into the next stitch to create a shell petal, skip 1 stitch, 1 sc, followed by 3 standard sc across the next 3 stitches. Repeat this petal and spacing sequence 7 more times. Sl st to join. Break yarn and weave in these interior ends completely.
- Round 9 (Switch to MC): Join your main background color to any stitch. Ch 3, work a dc inc into the next stitch, then 5 dc across. Work 1 dc, 1 dc inc, 5 dc. Repeat from * to * 7 times. Sl st to join.
- Round 10 (MC): Work 6 sc, 2 hdc, 1 dc. In the next stitch, build your corner: (1 dc inc, ch 2, 1 dc inc). Follow this with 1 dc, 2 hdc, and 3 sc. Repeat this entire bracketed sequence 4 times total to square off your circle. Sl st to join, ch 3.
- Round 11 (MC): 2 hdc, 8 dc. At the corner ch-space, work: (1 dc inc, ch 2, 1 dc inc). Follow with 8 dc. Work 3 hdc, 8 dc, then create a corner in the next ch-space: (1 dc inc, ch 2, 1 dc inc), followed by 8 dc. Repeat from * to * 3 times. Sl st to the first stitch to finish. Fasten off and weave in all remaining tails.
Structural Bag Assembly
Layout & Layout Diagram
Lay your four completed squares flat on your blocking mat or table in a diamond layout configuration:
     [Square A]
[Square B]  [Square C]
     [Square D]
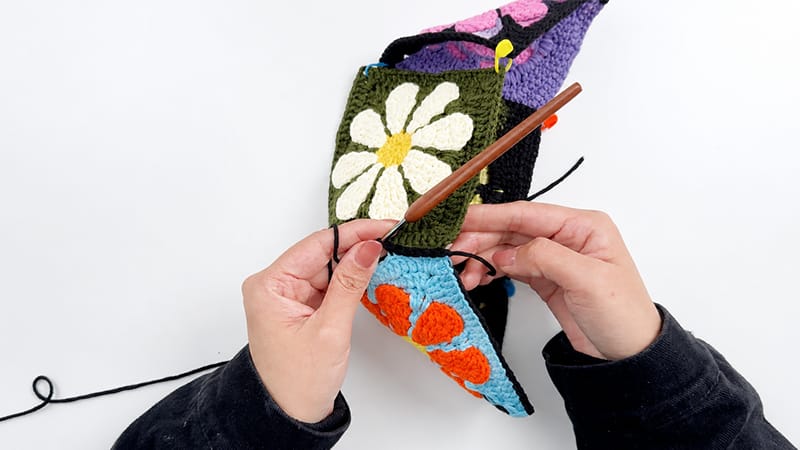
Seaming the Body
- Alignment: Bring the side points of Square B and Square C inward toward each other over Square D. Fold Square A downwards. Use locking stitch markers to pin the outer edges together, transforming the flat diamond into a dimensional, rounded pouch (the classic dumpling shape).
- Side Seaming: Attach your Main Color yarn to your hook with a slip knot. Align the top loops of the matching edges between Square B and Square A. Using a pull-through slip stitch method, insert your hook through the inner loops only of both panels, grabbing the yarn and pulling it cleanly through all loops on your hook. Work along the edge smoothly without pulling too tightly, which avoids puckering. Repeat this process for the seam between Square C and Square A. Cut and secure the yarn.
- Bottom Structural Seam: Flip the bag over to access the bottom corner joints. Secure your yarn with a slip knot and switch to a mattress stitch using your yarn needle. Thread the needle back and forth through the outer loops of the bottom edge stitches to form an invisible, durable seam that allows the bottom of the bag to expand naturally when filled. Weave in all yarn ends tightly.
Constructing the Bag Opening & Hardware Integration
- Round 1: Join your Main Color yarn with a slip stitch directly into the raw fabric edge where two squares meet at the bag opening. Ch 1, then work sc stitches evenly around the entire perimeter of the opening. When bridging the dipped gaps where the squares intersect, place your sc stitches carefully to prevent gaps. Sl st to join.
- Rounds 2–5: Ch 1. Work 1 sc into every stitch around the perimeter. Sl st to join. This creates a clean, thick band that stabilizes the opening of the bag and prevents it from stretching out from the weight of your items.
- Round 6 (Hardware Anchoring): Ch 1. Sc across the opening until you reach the exact structural fold on the left side of the bag. Position your first D-ring against the fabric. Work your next 3 to 4 sc stitches directly through both the metal center of the D-ring and the crochet fabric loops beneath it, completely encasing the flat side of the ring. Continue with standard sc stitches across the side of the bag until you reach the opposite fold. Repeat the anchoring process with your second D-ring. Finish the round with sc stitches and sl st to close. Fasten off.
Fabric Lining & Zipper Installation
| Step | Action | Technique Details |
| 1 | Template & Cut | Fold your lining fabric in half. Lay your completed crochet bag flat on top of it. Trace the rounded shape of the bag bag onto the fabric, adding a 0.5-inch seam allowance around the sides and bottom. Cut out two matching fabric panels. |
| 2 | Construct Pocket | Place the right sides of the fabric panels together. Using a sewing machine or standard needle and thread, sew around the curved sides and bottom. Leave the top opening unsewn. |
| 3 | Fitting & Ironing | Slip the fabric pouch inside your crochet bag to verify the fit. Remove it, press down a 0.5-inch fold around the raw top opening toward the inside (wrong side) of the fabric, and iron it flat. Secure this folded edge with sewing clips. |
| 4 | Zipper Prep | Center your zipper within the top opening of the bag, sandwiching it neatly between the crochet border and your ironed fabric lining. Pin or clip all layers firmly into place. |
| 5 | Hand Sewing | Thread your sewing needle with matching thread. Use a locking backstitch to sew through the fabric lining, the zipper tape, and the inner loops of the crochet border. Keep your stitches small and uniform. Hide your knots securely inside the lining layers. |
Final Flourishes
- Label Attachment: Position your leather label centered on the front face of the bag, just beneath the single-crochet top border. Use a yarn needle and a small piece of matching yarn to sew the label onto the bag through its pre-punched holes.
- Strap Attachment: Clip the swivel clasps of your leather crossbody strap directly onto the anchored metal D-rings on either side of the bag opening. Your durable, stylish, and handmade crossbody bag is now ready for use!
