
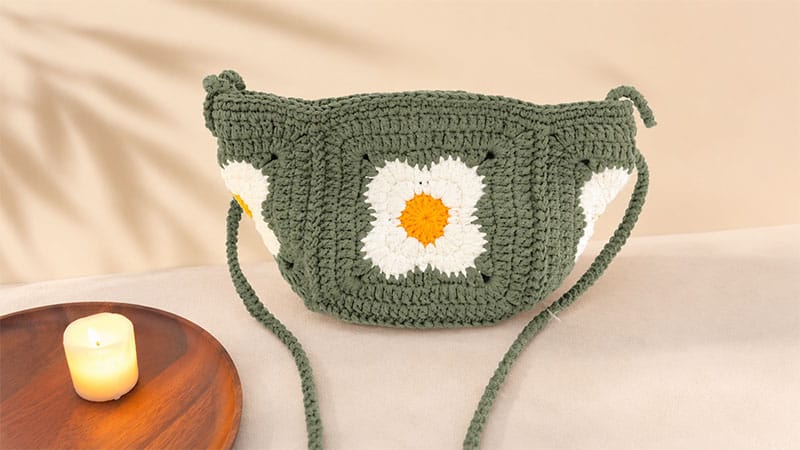
This project uses five identical geometric squares joined together to create a seamless, sturdy, and stylish everyday carrier.
Materials & Tools
| Item | Description |
| Yarn | 5-ply combed cotton yarn (Suggested: Orange, Brown, and White) |
| Hook | 4.0 mm crochet hook |
| Hardware | 1 magnetic snap or button closure |
| Notions | Tapestry needle, scissors, and stitch markers |
Stitch Key (US Terminology)
- MR: Magic Ring
- CH: Chain
- SC: Single Crochet
- DC: Double Crochet
- INC: Increase (working multiple stitches into the same space)
- SL ST: Slip Stitch
Part 1: Crocheting the Squares
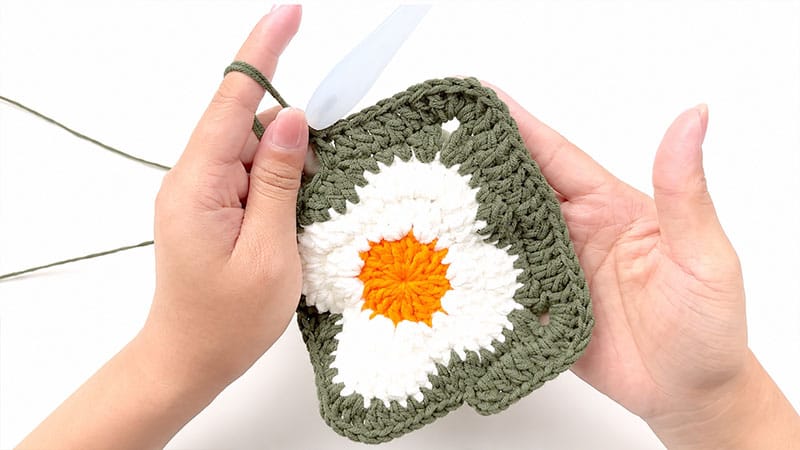
Note: You will need to make exactly 5 of these squares. Maintain an even tension so they all come out to the same dimensions.
Round 1 (Center Circle):
Begin by creating a Magic Ring. Chain 3 (this counts as your very first double crochet). Work 15 additional double crochets directly into the ring. Pull the tail to cinch the circle tightly shut, and join with a slip stitch to the top of your starting chain.
Round 2 (Forming the Petals/Core):
Switch to your second yarn color. Chain 1 to secure it. Work the following sequence along the edge: a single crochet, followed by 3 double crochets in the next stitch, 3 double crochets in the stitch after that, and another single crochet. Repeat this sequence four times in total around the circle, then slip stitch to close the round.
Round 3 (Expanding the Core):
Chain 1. For each of the four sides you are establishing, work this pattern: 1 single crochet, 1 double crochet, place 4 double crochets all into the exact same stitch to create a prominent corner, followed by 1 double crochet, and 1 single crochet. Repeat for all four sides and slip stitch to join.
Round 4 (Squaring Off):
Switch to your final background color (e.g., White). Chain 3. Work 1 double crochet, then 3 single crochets to flatten the side. When you reach the corner curve, work a double crochet increase, chain 3, and another double crochet increase into the corner space.
Follow up with 3 single crochets and 2 double crochets. Repeat this side-and-corner sequence around the entire piece, joining with a slip stitch at the end.
Round 5 (Building the Border):
Chain 3. Place one double crochet into every single stitch along the straight edges. Whenever you hit a chain-3 corner gap from the previous round, work 4 double crochets directly into that gap to turn the corner smoothly. Join with a slip stitch.
Round 6 (Final Sizing):
Chain 3. Continue putting one double crochet into each stitch along the sides. For the four outermost corners, work an increase of 2 double crochets, chain 1, and 2 double crochets into the exact corner point. Slip stitch to join, cut your yarn, and pull it through to fasten off.
Part 2: Bag Assembly
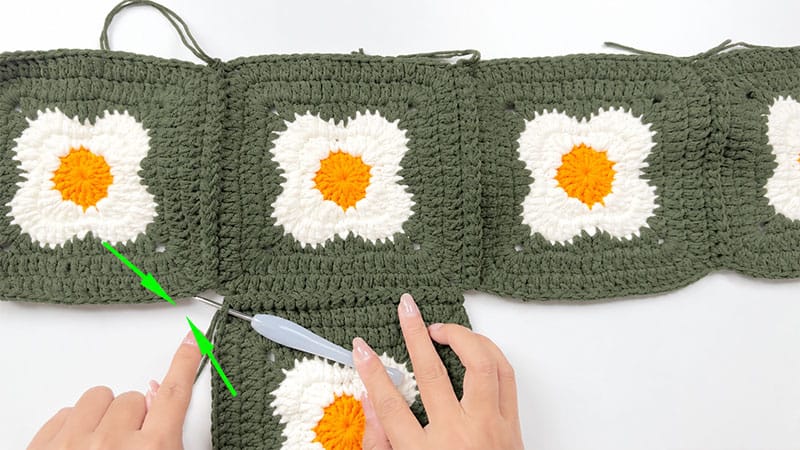
Proper alignment is the secret to a professional-looking bag. Block your squares with steam or water before sewing them together so their edges match perfectly.
Step 1: The Layout
Lay all 5 squares out flat in a single straight row. You will be folding this strip strategically to form a pocket shape, overlapping the panels so the bottom squares fold upward to meet the side panels. Use stitch markers to pin the corresponding edges together before you begin sewing.
Step 2: The Slip Stitch Seam
To join the panels, hold the two edges you want to connect right sides together (back-to-back). Insert your hook through the outer loops of both panels. Pull your yarn through with a slip stitch. Keep your working yarn loose so the bag doesn’t pucker.
Step 3: Joining the Body
Work your way down the seams, moving from one panel to the next without cutting your yarn if possible. Pivot at the corners to attach the folded bottom panels to the side panels.
Step 4: Finishing the Top Edge
Once the pouch shape is fully enclosed, reattach your yarn to the top opening of the bag. Crochet two continuous rounds of single crochet around the entire mouth of the bag. This hides any uneven seams and creates a sturdy brim for attaching your snap closure.
Part 3: Creating the Strap
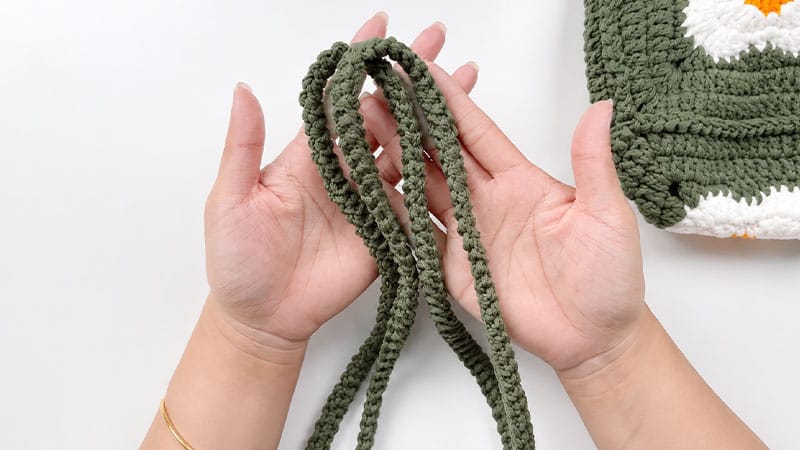
This technique creates a dense, non-stretchy thermal cord that is perfect for bearing weight.
Step 1: Chain 2. Insert your hook into the very first chain you made and work a standard single crochet.
Step 2: Rotate your work slightly toward you. You will see a single loop sitting on the left edge. Insert your hook under this loop, yarn over, and pull through both loops on your hook.
Step 3: Rotate your work again. From now on, you will see two parallel loops sitting on the left edge. Insert your hook under both of these loops, yarn over, and pull through everything on the hook.
Step 4: Keep repeating Step 3 until your strap is the exact length you need.
Step 5: Thread the finished cord through the upper corner gaps of your bag, tying thick knots on the interior to anchor the strap securely.
Part 4: Care and Maintenance
Handmade items require a gentle touch to ensure they last for years.
- Securing Ends: Use a tapestry needle to weave your loose yarn tails back and forth in at least three different directions before trimming. This locks them in place permanently.
- Washing: Submerge the bag in cool water with a gentle, bleach-free detergent. Swish it around softly. Do not wring or twist the fabric.
- Drying: Press the bag gently between two clean towels to extract excess moisture. Lay it completely flat on a dry towel to air-dry, keeping it away from harsh, direct sunlight.
- Storage: When not carrying your bag, stuff the interior lightly with plain tissue paper or plastic bags to help it retain its boxy shape. Store it on a shelf rather than hanging it by the strap to prevent the yarn from stretching out over time.
