
Before diving into the stitches, gather your supplies and review the required terminology.
Supplies Required
| Item | Description |
| Yarn | 5-ply combed cotton (Loopara or similar brand) in multiple colors |
| Crochet Hook | 3.0 mm |
| Hardware/Tools | Scissors, a blunt yarn needle, and stitch markers |
Stitch Key (US Terminology)
| Abbreviation | Meaning | Abbreviation | Meaning |
| ch | Chain stitch | dtr | Double treble crochet |
| sc | Single crochet | tr tr | Triple treble crochet |
| hdc | Half double crochet | sl st | Slip stitch |
| dc | Double crochet | inc | Increase (2 stitches in same space) |
| tr | Treble crochet | BLO | Back loop only |
Note on Clusters: This pattern relies on combining different height stitches into single spaces to shape the heart into a square.
When you see two stitch names hyphenated (e.g., sc-dc cluster), you will work both of those stitches into the same stitch space.
Creating the Heart Granny Square
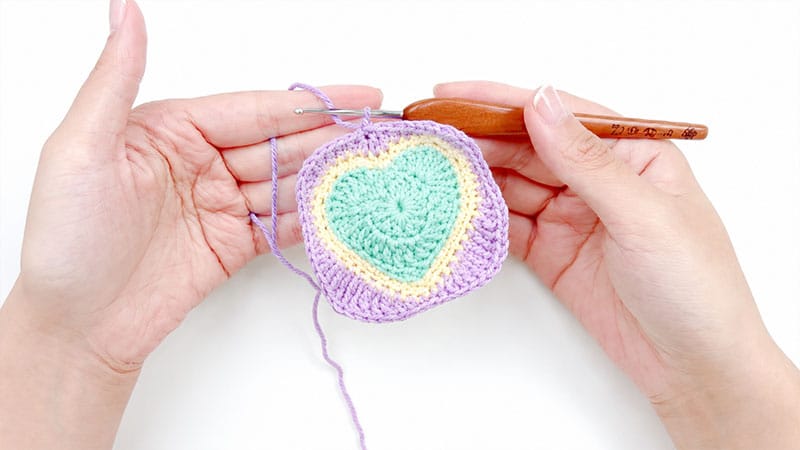
For a polished look, keep your tension even. You will build a round heart first, then square off the edges in later rounds.
Round 1: The Center
Begin by creating a magic circle. Form your initial chain of three, which will act as your very first double crochet for this round.
Work 11 more double crochets directly into the center of the ring. Pull your yarn tail firmly to close the hole, and slip stitch into the top of your initial chain-three to finish. You should have 12 stitches in a tight circle.
Round 2: Expanding the Heart Base
Chain one to step up. In the exact same stitch space, work a single crochet increase (two single crochets). Move to the next stitch and place one single crochet and one half double crochet together.
For the next three stitches, work a double crochet increase in each. In the following stitch, place a double crochet and a treble crochet. In the next row, a treble crochet and a double crochet. Work a double crochet increase in each of the next three stitches.
Then, place a half double crochet and a single crochet into the next stitch space. In the final stitch, work a single crochet increase. Join with a slip stitch to your very first single crochet.
Round 3: Defining the Heart Shape
Skip the very first stitch. Into the next four individual stitches, work the following: one single crochet, one double crochet, one treble crochet. Now, place one treble crochet into each of the next six stitches to form the upper curve.
Next, work down the side: one treble, one double, one half double, and four single crochets—each in their own stitch.
Create the bottom point: work a single crochet and double crochet into the next stitch, chain one, then work a double crochet and single crochet into the following stitch.
Work up the other side: four single crochets, one half double, one double, and one treble crochet. Place one treble crochet into each of the next six stitches for the second curve. Finish with a treble, a double, and a single crochet in the final stitches. Slip stitch to close.
Round 4: The Outline
Switch to a contrasting yarn color. Work this entire round in the Back Loops Only (BLO).
Skip the first stitch, slip stitch into the next, and make three normal single crochets. Over the next three stitches, shape the curve by working: an increase, a single crochet, and another increase. Crochet 11 single crochets down the side.
At the bottom tip, work a single crochet, half double crochet, and single crochet all into one stitch. Work 11 single crochets up the other side. Mirror the top curve with an increase, a single crochet, and an increase. Finish with three single crochets and join with a slip stitch.
Round 5: Squaring It Off
Introduce a new color to begin the background. Chain three, then place a half double crochet in each of the next four stitches.
Follow this specific sequence across the remaining stitches to turn the curves into straight edges:
Work an hdc and a dc together in one stitch, then a dc increase in the next. Work one hdc, then three sc. Next, work a sc and hdc together, an hdc and dc together, and a dc and tr together.
In the next stitch, place one dtr. In the next, one tr tr. Next space gets a dtr and tr together. Next gets a tr and dc together.
Work one dc, one hdc, one sc, and skip the next stitch.
Continue with one sc, one hdc, and one dc. Next space gets a DC and TR together. Next gets a tr and dtr together. Place one tr tr in the next, and one dtr in the following.
Work a tr and dc together, a dc and hdc together, and a hdc and sc together. Work three sc, one hdc, and a dc increase. Finish the side with a dc and hdc together, four hdc, and one final dc. Slip stitch to the top of your starting chain three.
Round 6: Final Border
Chain one. Work eight single crochets. Now establish the square’s corners: chain two, then work 14 single crochets down the edge.
Repeat this (chain two, 14 sc) two more times. For the final stretch, chain two for the last corner and work six single crochets. Slip stitch to the beginning, fasten off, and weave in your tail.
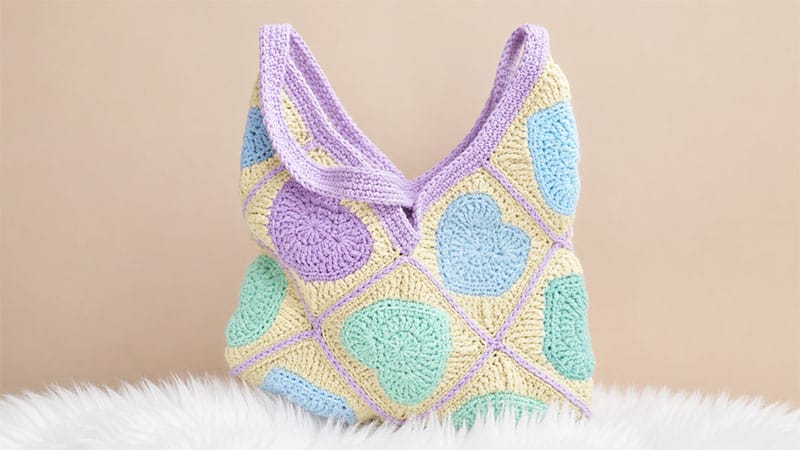
Assembly Instructions
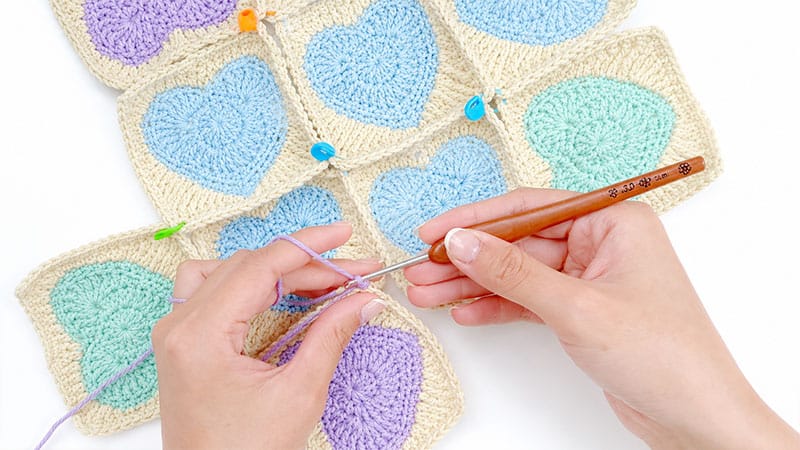
Joining the Squares
- Lay your completed squares out flat in your desired bag arrangement, keeping the wrong sides facing each other.
- Connect the squares using a slip stitch join. To ensure the seams lay flat on the inside, insert your hook only through the inner loops (the back loop of the piece closest to you, and the front loop of the piece furthest from you).
- Keep your yarn tension relaxed so the squares do not pucker or bunch.
- When you reach the chain-two corner spaces, slip stitch only into the first chain to keep the corners crisp.
- Once all pieces are connected flat, fold the project along the designated lines to create the pouch shape, and slip stitch the side seams closed using the same method.
Creating the Straps
- Attach your yarn to the top opening of the bag. Crochet one continuous round of single crochets along the entire rim. Whenever you encounter a corner gap, work three single crochets directly into the hole. Slip stitch to the start and chain one.
- For the second round, single crochet normally until you reach a corner. At the corner stitch, create your handle by chaining 72 stitches (you can add or subtract chains here to change the strap length). Anchor the chain to the opposite corner with a single crochet.
- Continue single crocheting around the other side of the bag and repeat the chaining process for the second strap.
- For the final rounds, single crochet around the entire bag body and work directly into each chain stitch of your new straps to thicken them.
- Complete 2 to 3 total rounds of single crochet over the straps for maximum durability. Fasten off and seamlessly weave in the remaining ends.
Care and Maintenance
Handmade items require a gentle touch to ensure they last for years to come.
- Washing: Always wash by hand. Submerge the bag in cool water (approximately 30°C) with a very mild soap. Gently press the soapy water through the fibers. Never wring, scrub, or tightly twist the bag, as this will warp the cotton and ruin the heart motifs.
- Drying: Rinse away all soap with cool water. Lay the bag flat on a thick, clean towel and roll the towel up to press out excess moisture. Unroll, reshape the bag with your hands while it is still damp, and leave it flat to dry in a shaded room.
- Storage: Do not hang the bag on a hook when not in use, as gravity will stretch the straps and square joints over time. Store it flat in a drawer, or lightly pad the inside with acid-free tissue paper and place it in a breathable cotton dust-bag.
