
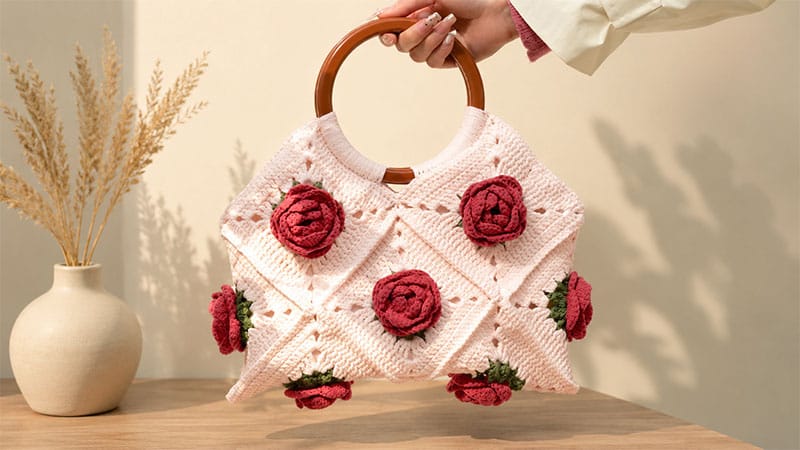
This vintage-inspired Crochet Rose Flower Granny Square Bag effortlessly blends romantic, three-dimensional textures with everyday functionality.
Featuring a striking, blooming 3D rose at the center of each motif, this project brings a modern, chic twist to the classic granny square.
Perfect for intermediate crocheters, the final piece is fully lined and structured to hold its shape beautifully, making it an eye-catching accessory for any season.
Project Blueprint
Required Materials
| Material | Specification | Purpose |
|---|---|---|
| Yarn | Loopara 5-ply combed cotton (or equivalent weight) | Offers excellent stitch definition and durability |
| Crochet Hook | 3.0mm | Ensures tight, clean stitches for a structured bag |
| Notions | Stitch markers, scissors, yarn needle | Essential for tracking, cutting, and weaving |
| Hardware | Resin ring accessories, metal magnetic buckle | Secures the straps and bag closure |
| Fabric | Lining cloth | Protects the interior and prevents stretching |
Abbreviations (US Terms)
- ch – Chain
- sl st – Slip stitch
- sc – Single crochet
- dc – Double crochet
- tr – Treble crochet
- BPsl – Back post slip stitch
- BPsc – Back post single crochet
- tr bo – Treble bobble stitch
- inc/dec – Increase / Decrease
Step-by-Step Motif Pattern (Make 10 Squares)
Design Layout Note: You will need a total of 10 squares. Arrange 6 squares to build the front and back panels of the main bag body, and use 4 squares (2 on each side) to create the side depth and structural transitions.
Step 1: Creating the Rose Core
- Round 1: Form a magic ring. Ch 3 (counts as first dc), then work 15 dc into the center of the ring. Pull the tail firmly to close the center hole. Sl st into the top of the starting ch-3 to join. (16 stitches total)
- Round 2: [Ch 2, skip the next stitch, sc into the following stitch] repeat 8 times total around. This creates 8 foundational chain-loops behind your stitches.
- Round 3: Sl st directly into the first chain-loop space. Ch 1, then work [1 sc, 5 dc] into the loop. Repeat this pattern 4 times total to form the inner flower petals, then sl st to join.
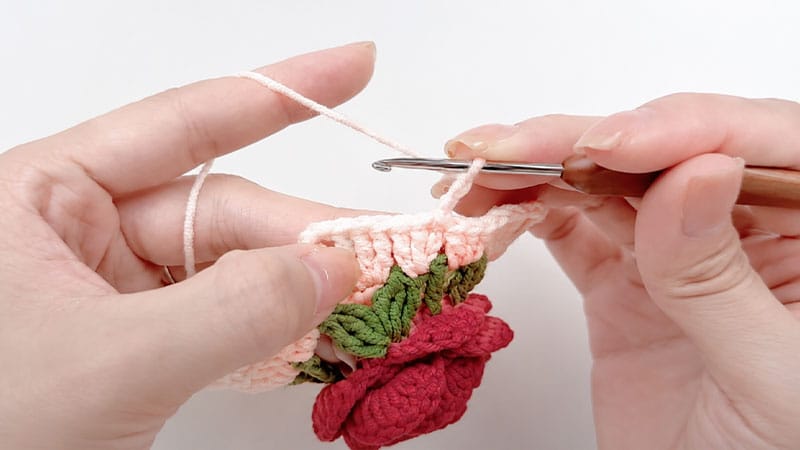
Step 2: Building the 3D Petal Layers
- Round 4: Working strictly on the back side of your piece, execute [1 BPsl, ch 3] repeating 8 times evenly around to create a new tier of 8 chain-loops. Sl st to join.
- Round 5: Sl st into the first back-loop space, ch 1. Work [1 sc, then place 7 dc in the subsequent loop], repeating this sequence 4 times total. Sl st to join.
- Round 6: Working on the back side again, create a structural row of loops by working [1 BPsl, ch 4] repeated 8 times. Sl st to join.
- Round 7: Sl st into the first loop, ch 1. Work [1 sc, then place 9 dc in the subsequent loop], repeating this sequence 4 times total around. Sl st to join.
- Round 8: Working on the back side, execute [1 BPsl, ch 4] repeating 8 times around. Sl st to join.
- Round 9: Sl st into the first loop, ch 1. Work [1 sc, then place 9 dc in the subsequent loop], repeating 4 times total. Sl st to join.
- Round 10: Working on the back side for the final rose row, work [1 BPsc, ch 4] repeating 8 times around to form 8 clean chain loops. Sl st to join, fasten off, and neatly weave in your yarn ends.
Step 3: Squaring Up the Motif
- Round 11: Attach your secondary background yarn color and ch 6. [Work 3-tr bobble, ch 4, work 3-tr bobble in the next space to create your corner; ch 2, then work 1 tr into the next space, ch 1] repeat the entire sequence inside the brackets 3 times. To finish, work the final corner cluster, ch 2, and sl st into the 5th chain of your initial ch-6.
- Round 12: Navigate to the right side of your corner space. Ch 3, work 2 dc. [In the ch-4 corner space, work 3 tr, ch 3, 3 tr; work 3 dc across each of the next two spaces] repeat this corner-and-side sequence 3 times. Finish with your final corner configuration, work 3 dc in the remaining space, and sl st to join.
- Round 13: Ch 3, then work 5 dc along the side. [In the corner space, work 3 dc, ch 3, 3 dc; work 12 dc evenly across the side flat] repeat this sequence 3 times. Finish with the final corner configuration, work 6 dc across the remaining stitches, and sl st to join.
- Round 14: Ch 3, work 8 dc along the side. [In the corner space, work 3 dc, ch 3, 3 dc; work 18 dc evenly across the side flat] repeat this sequence 3 times. Finish with your final corner configuration, work 9 dc to bridge the gap, sl st to join, fasten off, and secure all loose ends.
Assembly & Finishing Instructions

1. Connecting the Bag Body
Lay out your 10 completed squares according to your 6-body / 4-side distribution design. Use stitch markers to clamp the edges together cleanly before stitching.
- Fold the panels along the designated center lines of your layout.
- Join your yarn at a corner and use single crochet seaming on the wrong side to stitch the panels together.
- Align your stitches perfectly 1-to-1. Maintain an even, medium tension so the seams don’t pull or puckering occurs. Pay extra attention to the corner intersections to keep them secure.
- Once the main shape is formed, attach your yarn to the top opening and work one clean round of single crochet all the way around the rim. Complete a sc-decrease (dec) at each dip/crossing point where the squares meet to keep the edge flat and stable.
2. Fabric Lining Insertion
- Lay your assembled crochet bag flat onto your lining fabric. Trace its shape, adding a 0.5-inch seam allowance around the perimeter. Cut two matching pieces.
- With right sides facing together, sew the side seams of the fabric lining using a strong double-stranded thread.
- Press the top raw edge of the lining fabric down with an iron to create a clean hem, then slip the fabric pocket inside your crochet bag body.
- Pin or clip the lining to the top rim of the bag opening. Use an invisible ladder stitch to sew the lining to the interior stitches of the crochet bag securely.
3. Hardware & Handles
- Magnetic Lock: Center the two halves of your metal magnetic buckle on the inside rim of the bag opening. Using a needle and reinforced thread, sew through the metal tabs directly into the lining fabric and inner crochet layers.
- Straps: Secure your resin ring accessories to the top points of the bag’s side panels. Pull loops through your edge stitches, work 10 stabilizing slip stitches across the central rim section to reinforce the weight-bearing zones, and anchor your strap cords securely through the resin rings. Fasten off with multiple knots and weave the remaining tails deep into the stitches.
Care Guide
- Washing: Always hand-wash in cool water using a delicate liquid detergent. Do not wring or twist the bag; gently squeeze the suds through the fibers.
- Drying: Roll the damp bag inside a clean towel to press out excess water. Reshape the 3D rose petals with your fingers while damp, and lay them completely flat to dry away from direct sunlight.
- Storage: To protect the 3D structure of the roses when the bag is not in use, gently stuff the interior with tissue paper and store it flat in a breathable cotton dust bag.
