
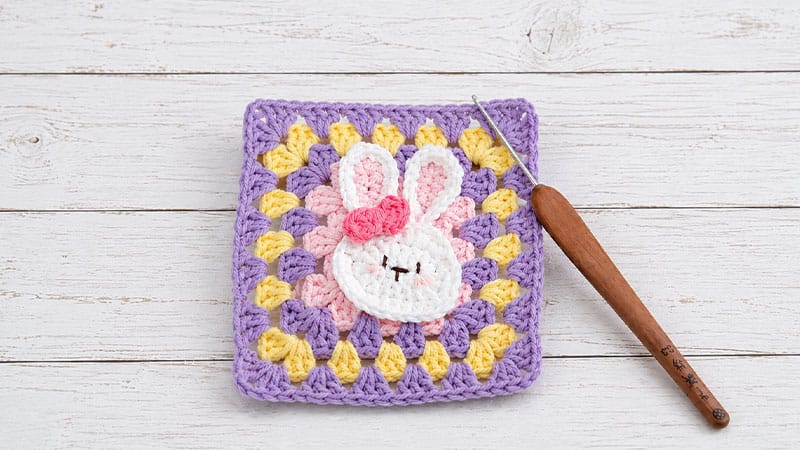
Bring a touch of whimsical charm to your next crochet project with this adorable Bunny Granny Square!
Perfect for Easter garlands, baby blankets, coasters, or tote bag motifs, this beginner-friendly pattern combines a classic granny square base with an attached, sweet-faced bunny embellishment.
When completed with the recommended materials, each finished square measures approximately 3.7 inches.
Materials & Tools
- Yarn: 4-ply combed cotton yarn (Suggested colors: White for the bunny, plus Green, Blue, Yellow, Pink, and Red for the square base and bow details).
- Hook Size: 2.3 mm crochet hook
- Notions: Stitch markers, scissors, yarn needle, black embroidery floss (for facial features), and a small dab of hot melt adhesive or fabric glue.
Technical Abbreviations (US Terms)
- ch: Chain
- sc: Single crochet
- hdc: Half double crochet
- dc: Double crochet
- sl st: Slip stitch
- inc: Increase (work 2 stitches into the same stitch)
- MR: Magic Ring
Step-by-Step Patterns
1. The Square Base (Main Body)
The base is worked in standard granny clusters (groups of 3 dc), building outward.
- Round 1: Inside a MR, ch 3 (counts as first dc). Work 2 dc, ch 2. *Work 3 dc, ch 2 into the ring. Repeat from * 2 more times. Join with a sl st to the top of the initial ch-3. (4 clusters total)
- Round 2: Sl st across to the first ch-2 corner space. Ch 3, work (2 dc, ch 2, 3 dc) in the same corner space. *In the next corner space, work (3 dc, ch 2, 3 dc). Repeat from * around. Join with a sl st to the top of the ch-3.
- Round 3: Sl st to the corner space. Ch 3, work (2 dc, ch 2, 3 dc) in the corner. *Work 3 dc in the space between the clusters of the previous row. In the next corner, work (3 dc, ch 2, 3 dc). Repeat from * around. Join with a sl st.
- Round 4: Join your second color choice in any corner. Ch 3, work (2 dc, ch 2, 3 dc) in the corner. *Work 3 dc in each of the next 2 spaces between clusters. In the next corner, work (3 dc, ch 2, 3 dc). Repeat from * around. Join with a sl st.
- Round 5: Join your third color choice in a corner. Ch 3, work (2 dc, ch 2, 3 dc) in the corner. *Work 3 dc in each of the next 3 spaces between clusters. In the next corner, work (3 dc, ch 2, 3 dc). Repeat from * around. Join with a sl st.
- Round 6: Join your final background color choice in a corner. Ch 3, work (2 dc, ch 2, 3 dc) in the corner. *Work 3 dc in each of the next 4 spaces between clusters. In the next corner, work (3 dc, ch 2, 3 dc). Repeat from * around. Join with a sl st. Fasten off and weave in all yarn tails.
2. The Bunny Head & Face
- Round 1: Using white yarn, ch 8. Starting in the 4th ch from your hook, work a dc inc. Work 1 dc in each of the next 3 chains. In the last remaining chain, work 6 dc to turn the corner. Working down the opposite side of the chain foundation, work 1 dc in each of the next 3 stitches, and finish with 3 dc in the final space. Join with a sl st.
- Round 2: Ch 2, hdc in the first stitch, hdc inc in each of the next 2 stitches. Work 3 hdc across the straight side. Work an hdc inc in each of the next 6 stitches around the curve. Work 3 hdc down the second side, and finish with a hdc inc in each of the last 3 stitches. Join with a sl st. Fasten off, leaving a long tail if you prefer sewing over gluing.
3. Inner & Outer Ears
- Inner Ears (Make 2): Using pink yarn, ch 5. Secure the yarn directly into the top of the bunny’s head with a sl st. Work 2 sl st, 2 sc, 5 hdc all into the chain loop to create the inner shape, followed by 2 sc and 2 sl st down the opposite side. Fasten off.
- Outer Ears: Join white yarn at the base of the ears. Work 3 sl st, 4 sc, 5 sc inc around the top curvature to create a border, followed by 4 sc and 4 sl st down the side. Repeat across both ears to frame the pink centers. Fasten off and weave in the ends.
4. Accent Bow
- Round 1: In a MR, ch 2, work 2 sc, 2 dc, 2 sc, and 1 sl st. (This forms the first loop). Ch 2, work 2 sc, 2 dc, 2 sc, and 1 sl st. (This forms the second loop).
- Round 2: Pull the magic ring tight to bunch the center. Fasten off, leaving a long yarn tail. Wrap the tail firmly around the center of the bow 3 times to create the knot effect, then secure it at the back.
Assembly & Finishing Touches

Pro Tip: It is much easier to embroider the bunny’s facial details before attaching the head to the granny square.
- Embroider the Face: Using a yarn needle and black embroidery floss, stitch two small eyes and an “X” or “Y” shape for the nose and mouth onto the white bunny face.
- Add Blush: Optional but adorable—use a tiny bit of real makeup pink blush or a pink fabric marker to gently color the bunny’s cheeks.
- Attach Components: Centering the bunny head onto your finished granny square base, secure it down using fabric glue or by stitching it in place with a yarn needle.
- Attach the Bow: Glue or sew the accent bow right below the bunny’s chin or next to one of its ears for a festive touch!
