
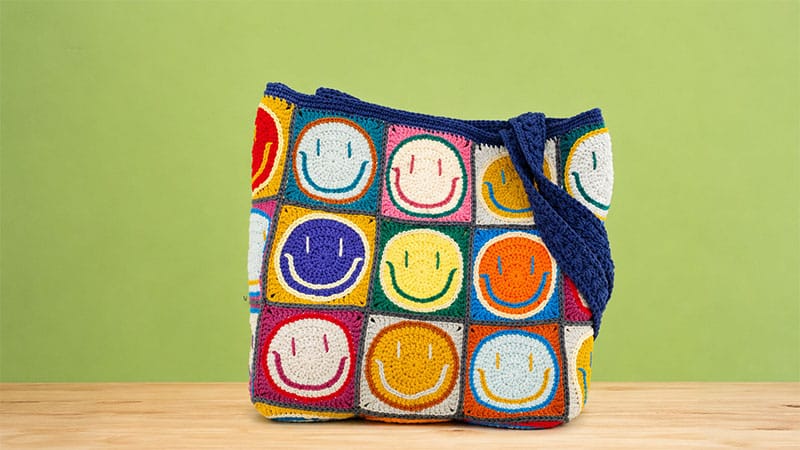
Bring a burst of retro optimism to your accessory collection with this Smiley Face Granny Square Tote Bag. This cheerful project combines classic crochet techniques with a modern, playful aesthetic.
By crafting 27 individual character squares and joining them into a sturdy, functional layout, you will create an eye-catching tote perfect for daily errands, beach trips, or yarn storage.
Materials & Specifications
- Yarn: Loopara 5-ply combed cotton (or any equivalent sport/weight 2 cotton yarn)
- Hook Size: 3.0 mm
- Notions: Stitch markers, scissors, and a blunt yarn needle
Abbreviations (US Crochet Terms)
- ch: Chain
- sl st: Slip stitch
- sc: Single crochet
- hdc: Half double crochet
- dc: Double crochet
- dc2tog: Double crochet two together (decrease)
- inc: Increase (2 stitches in the same space)
Step 1: The Smiley Face Granny Square
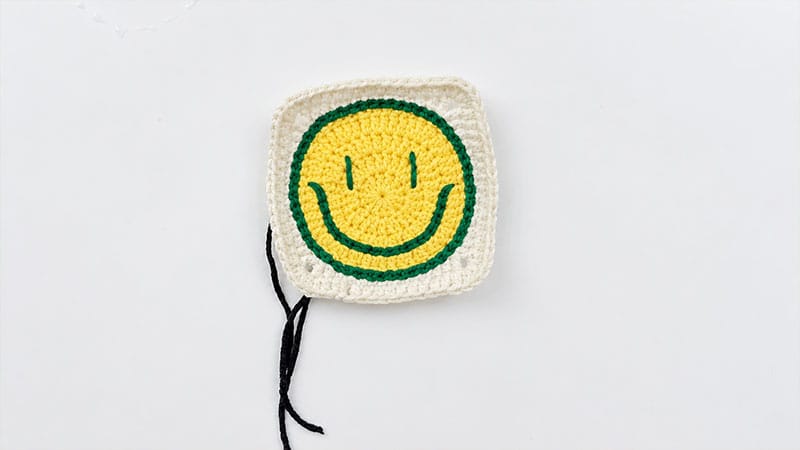
(Make 27 identical squares)
The Yellow Face Center
- Round 1: Form a magic ring. Chain 3 (counts as your first dc), work 12 double crochets into the ring. Pull the ring tight and join with a sl st to the top of the starting chain-3.
- Round 2: Chain 3 (counts as a dc), work another dc into that same stitch. Work a double crochet increase (2 dc) into every remaining stitch around. Join with a sl st to the top of the chain-3.
- Round 3: Chain 3 (counts as a dc), work a dc into the same stitch. Work 1 dc in the next stitch, followed by an increase (2 dc) in the next. Repeat from * to * all the way around. Join with a sl st to the top of the chain-3.
- Round 4: Chain 3 (counts as a dc), work 1 dc into the next stitch. Work an increase (2 dc) in the next stitch, followed by 1 dc in each of the next 2 stitches. Repeat from * to * around, ending with an increase. Join with a sl st to the top of the chain-3. Fasten off the yellow yarn.
Squaring Off (Background Color)
- Round 5: Attach your background color to any stitch. Chain 1. Work 1 sc in each of the next 8 stitches, 1 hdc in each of the next 2 stitches, create a corner by working (1 dc, ch 2, 1 dc) all in the next stitch, then work 1 hdc in each of the next 2 stitches. Repeat from * to * 3 more times to create four flat sides. Join with a sl st to the first sc.
- Round 6: Chain 2 (counts as an hdc). Work 1 hdc into each of the next 10 stitches. In the corner chain space, work 3 hdc. Work 14 hdc evenly along the flat edge, then 3 hdc in the next corner space. Repeat from * to * around to finish framing the square. Join with a sl st and fasten off.
Adding the Facial Features
- The Outline: Attach your contrast/face color yarn and work a round of surface slip stitches completely around the edge of Round 4 to give the face a crisp border.
- The Smile: Using the surface slip stitch method, trace a wide semi-circle across the bottom half of Round 3.
- The Eyes: Thread your yarn needle with black or contrasting yarn. Embroider two thick, vertical sleepy or straight eyes spanning across Rounds 1 to 3, keeping them symmetrical above the smile.
Tip: Keep your stitching tension uniform so your squares don’t warp. Gently block your finished squares before assembly to ensure they are perfectly uniform in size.
Step 2: Bag Assembly & Structure
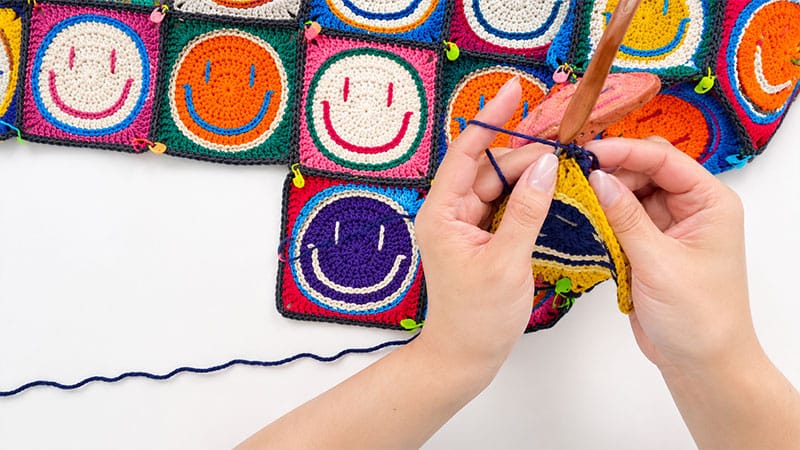
Flat Layout & Seaming
- Arrange: Lay out your 27 completed squares flat on a table in a traditional T-shape configuration (this standard layout establishes the sides, front, back, and bottom base of your tote). Use stitch markers to pin the edges together.
- Horizontal Joins: Using a slip-stitch joining method, seam your horizontal rows together. Insert your hook through the inner loops of opposite squares, keeping your working yarn underneath your piece for a clean, flat ridge.
- Vertical Joins: Once the horizontal lines are secured, complete the vertical joins using the same slip-stitch technique, working fluidly from one square boundary to the next.
Shaping the Body
- Fold: Fold your flat, assembled piece inside out so the right sides face each other. Match up the remaining open side and bottom edges, securing them tightly with stitch markers.
- Side Seams: Slip stitch along the designated side and bottom seam lines to transform the flat fabric into a 3D bag body.
- Top Border: Turn the tote bag right side out. Attach your yarn to the top opening and work 3 complete rounds of single crochet all the way around the rim to create a clean, durable border. Fasten off and weave in all loose ends securely.
Step 3: Crafting & Attaching the Straps
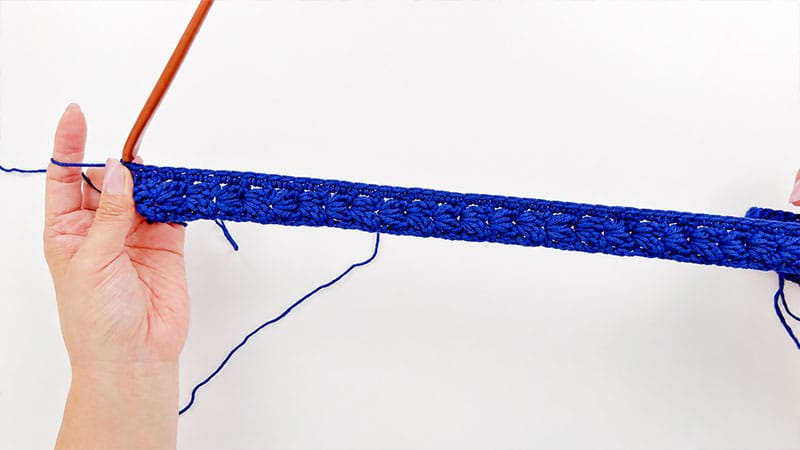
(Make 2)
- Foundation: Leave a 30cm long tail for sewing later. Chain 6. Work 1 sc into the second chain from your hook and in each remaining chain across (5 sc total).
- Texture Rows: Chain 3 and turn your work. Skip the first 2 stitches. In the next stitch, work a cluster:
(dc2tog, ch 1, dc2tog). Skip 1 stitch, then place 1 dc into the last stitch. Chain 3 and turn. - Repeat: Repeat this texture pattern row 54 times to reach the ideal strap length.
- Finishing Row: Work a row consisting of
(dc2tog, ch 1, dc2tog), followed by a final dc. Chain 1, turn, and work 5 sc evenly across the top edge. - Border: Do not fasten off. Work a loose single crochet border entirely around the raw edges of the strap (placing 2 sc into each side chain space) to prevent stretching. Leave a 30cm tail and fasten off.
- Attachment: Use your yarn needle and the long yarn tails to securely stitch the handles to the inner front and back rim of your tote bag, reinforcing your stitches with an “X” pattern for maximum carrying strength.
Care and Maintenance
- Spot Cleaning: Shake out loose debris regularly. Treat minor marks immediately with a damp cloth and mild soap to keep the cotton bright.
- Washing: When a full clean is required, hand-wash the tote in cool water with gentle detergent. Gently squeeze out excess water—never wring or twist the crochet fabric.
- Drying & Storage: Lay the bag completely flat on a fresh towel to air dry, reshaping the square corners while damp. Store the bag flat or gently stuffed with tissue paper inside a breathable cotton pillowcase to prevent the straps from stretching out over time.
