
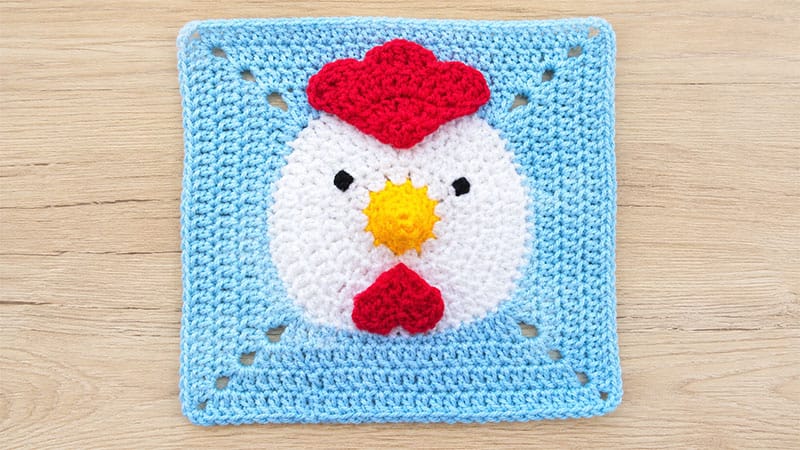
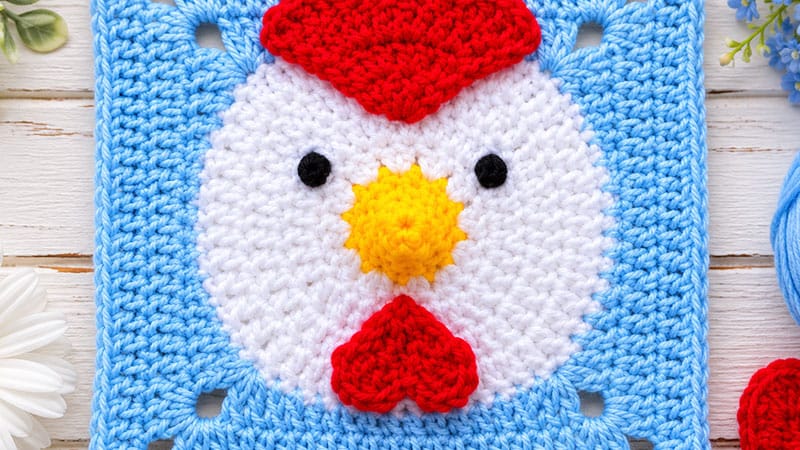
Celebrate the zodiac or add a whimsical touch to your next blanket project with this delightful animal-themed crochet square.
This intermediate-level pattern works beautifully as an individual washcloth or as a repeating block for blankets, pillows, and tote bags.
Project Specifications & Supplies
- Finished Dimensions: Approximately 6.1″ x 6.1″ (15.5 cm x 15.5 cm)
- Gauge: 20 stitches and 11 rows = 4″ x 4″ (10 cm x 10 cm) worked in double crochet
- Total Yardage: 62–65 yards (57–60 meters)
Required Tools & Materials
- Yarn: Light-weight/DK acrylic yarn (approx. 50g / 164 yards per skein) in four distinct shades: Bright Yellow, White, Pale Yellow, and Red.
- Hook Size: US 7 (4.5 mm) crochet hook
- Notions: Tapestry needle for assembly and weaving in loose ends; safety eyes or black embroidery floss.
Crochet Terminology (US Standards)
- ch: chain
- st(s): stitch(es)
- sl st: slip stitch
- sc: single crochet
- hdc: half double crochet
- dc: double crochet
- tr: treble crochet
Detailed Step-by-Step Instructions
Part 1: The Main Block
The Center (Using Bright Yellow)
- Round 1: Create an adjustable magic loop. Chain 1, then work 6 single crochets directly into the ring. Pull the loop tight and join with a slip stitch into the first chain. (6 sts)
- Round 2: Chain 1. Work 1 single crochet into every stitch around. Join with a slip stitch to the initial chain. (6 sts)
- Round 3: Chain 1. Work 2 single crochets into every stitch around to double your count. Join with a slip stitch to the initial chain. (12 sts)
- Round 4: Chain 1. Work 1 single crochet into every stitch around. Join with a slip stitch, fasten off the bright yellow yarn, and secure the end. (12 sts)
The Face Circle (Using White)
- Round 5: Secure your white yarn with a slip knot. You can begin with either a standing double crochet or by chaining 3 in any stitch from the previous round (this counts as your first double crochet). Work a second double crochet into that same stitch. Continue around, placing 2 double crochets into every single crochet stitch. Join with a slip stitch to the top of your opening stitch. (24 sts)
- Round 6: Chain 3. In the next stitch, work 2 double crochets. In the following stitch, work 1 double crochet. Repeat the pattern between the asterisks 11 times. End with 2 double crochets in the final stitch, then slip stitch to the top of the starting chain-3. (36 sts)
- Round 7: Chain 3, then double crochet into the next stitch. Work 2 double crochets into the following stitch, then 1 double crochet into each of the next 2 stitches. Repeat from * around 11 times. End with 2 double crochets in the last stitch, then slip stitch to the top of the chain-3. (48 sts)
- Round 8: Chain 3, then double crochet into each of the next 2 stitches. Work 2 double crochets into the next stitch, followed by 1 double crochet into each of the next 3 stitches. Repeat from * around 11 times. End the round with 2 double crochets in the final stitch. Slip stitch to the top of the chain-3, fasten off, and weave in your ends. (60 sts)
Transforming the Circle into a Square (Using Pale Yellow)
- Round 9: Attach the pale yellow yarn to the last stitch of Round 8 using a slip knot. Chain 3 (or make a standing double crochet), then double crochet into the next 2 stitches.
- Establish the sides and corners: Work 1 half double crochet into each of the next 2 stitches, then 1 single crochet into each of the next 4 stitches, followed by 1 half double crochet into each of the next 2 stitches. Now, work 1 double crochet into each of the next 3 stitches.
- Create the corner: In the very next stitch, work the corner cluster: (2 treble crochets, chain 3, 2 treble crochets).
- Repeat the sequence: Work 1 double crochet into each of the next 3 stitches, then repeat the entire sequence from * two more times.
- Final side: Work 2 half double crochets, 4 single crochets, 2 half double crochets, and construct the final corner cluster (2 tr, ch 3, 2 tr) in the last stitch. Secure with a slip stitch to your starting stitch.
- Rounds 10, 11, and 12: Chain 3. Double crochet across into every stitch until you reach the corner chain-3 space. Inside the chain space, work your corner increase: (2 treble crochets, chain 3, 2 treble crochets). Repeat this pattern for all four sides and corners. Complete the round by double crocheting to the end of the side, then slip stitch to the top of the starting chain-3. Fasten off and cleanly weave in all remaining yarn tails.
Part 2: Facial Features & Accents
The Eyes
Identify the exact horizontal midpoint of your white face circle. Count out 6 stitches to the left and 6 stitches to the right from this center marker. Securely attach your safety eyes or embroider two black eyes at these balanced points.
The Top Comb (Using Red)
- Start by chaining 4.
- Row 1 (Right Side): Place 3 double crochets into the fourth chain from your hook. Turn your work.
- Row 2: Chain 3, work a double crochet into the base of that chain. Place 2 double crochets into every remaining stitch across. Turn. (8 sts)
- Row 3: Chain 3, work a double crochet into the base of that chain. Work 1 double crochet into the next stitch, followed by 2 double crochets in the subsequent stitch. Repeat this sequence 2 more times, finishing with a final double crochet in the last stitch. Turn. (12 sts)
- Row 4 (Wavy Edge): Chain 2. In the first stitch work 1 double crochet, 1 treble crochet, and 1 double crochet. Chain 2, then slip stitch into the next stitch. Repeat this scalloped sequence 2 more times to create the comb definition. Fasten off, leaving a 6-inch tail for sewing.
The Bottom Wattles/Comb (Using Red)
- Start by chaining 4.
- Row 1 (Right Side): Place 3 double crochets into the fourth chain from your hook. Turn your work.
- Row 2: Chain 2, then work 1 double crochet and 1 treble crochet into the first stitch. Chain 2 and slip stitch into the next stitch. Chain 2, work 1 treble crochet and 1 double crochet into the following stitch, then chain 2 and slip stitch directly into that same final stitch. Fasten off, leaving a 4-inch tail for assembly.
Assembly
Position the top comb squarely at the upper edge of the white face circle, aligning it with the bright yellow center. Place the lower wattles directly underneath the yellow beak center.
Using your tapestry needle and the leftover yarn tails, neatly sew both red accents onto the square, making sure your stitches are invisible from the back side. Trim and weave in any remaining threads.
