
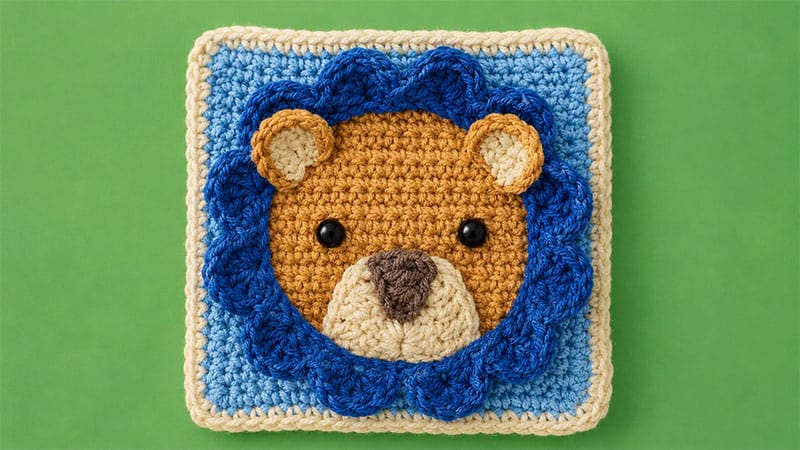
This pattern creates a solid square base topped with a layered lion face. You will crochet the pieces individually and stitch them down at the end.
- Yarn: Medium-weight (Worsted/Category 4) acrylic yarn. You’ll need four distinct colors:
- Main Color (Gold): For the background square and ears.
- Mane Color (Orange/Carrot): For the scalloped mane.
- Snout & Border Color (Light Yellow/Cornmeal): For the muzzle and the final framing round.
- Nose Color (Brown): A small scrap for the triangular nose.
- Hook Size: 5.0 mm (Size H-8)
- Extras: Two 12mm black safety eyes (or black yarn to embroider the eyes), a tapestry needle for assembly, and scissors.
Part 1: The Main Background Square
The base is a dense, solid square made primarily of single crochet stitches.
- Foundation: Using your Gold yarn, leave a small tail and create a starting chain of 21.
- Row 1: Insert your hook into the second chain from your hook. Work 1 single crochet (sc). Work 1 sc into every remaining chain stitch across. (20 stitches total). Chain 1 and turn your work.
- Rows 2–23: Work 1 sc into each stitch across the row. At the end of every row, chain 1 and turn.
- Squaring the Edges: Once you finish Row 23, do not fasten off. You will now work a single crochet border evenly around the raw sides of the piece to clean them up. Work 1 sc down the edges, placing exactly 2 sc in each of the four corners to keep the square flat.
- The Contrast Border: Drop the gold yarn and join your Light Yellow yarn. Work 1 sc into every stitch around all four sides of the square, again placing 2 sc in each corner to maintain a sharp shape. Fasten off and weave in these ends.
Tension Check: Everyone crochets a bit differently! Before cutting your yarn on Row 23, measure your piece. If it looks more like a rectangle than a perfect square, add or subtract a row or two until the width and height match.
Part 2: The Facial Features
1. The Scalloped Mane
This piece frames the lion’s head and creates a dimensional, ruffled look.
- Using Orange yarn, chain 49.
- The Scallop Repeat: Skip the first two chains. In the 3rd chain from your hook, work 6 double crochets (dc) all into that single loop. Skip the next chain, slip stitch into the next chain, skip another chain, and then work 6 dc into the next loop.
- Repeat this sequence all the way down the foundation chain. You will end up with exactly 12 distinct scalloped shells.
- Fasten off, ensuring you leave a very long yarn tail for sewing later.
2. The Snout (Muzzle)
- Using Light Yellow yarn, start with a Magic Ring (or chain 3 and slip stitch to form a small ring).
- Row 1: Chain 2 (this acts as your first stitch replacement) and place 10 dc into the center of the ring. Do not join in a circle. Chain 2 and turn your work.
- Row 2: Work 1 dc into each of the first 3 stitches. Work 2 dc into each of the next 4 stitches (this creates the wider bottom curve). Work 1 dc into each of the final 3 stitches.
- Fasten off, leaving a long sewing tail.
3. The Nose
- Using Brown yarn, chain 5.
- Starting in the second chain from your hook, work 1 sc.
- In the next chain, work 1 half double crochet (hdc).
- In the final two chains, work 1 dc into each. This creates a small, flat triangle. Fasten off with a long tail.
4. The Ears (Make 2)
- Using Gold yarn, create a Magic Ring.
- Row 1: Chain 1, work 6 sc into the ring. Do not join. Chain 1 and turn.
- Row 2: Work 2 sc into every single stitch across the row (12 stitches total). Fasten off and leave a long tail.
Part 3: Assembling the Lion
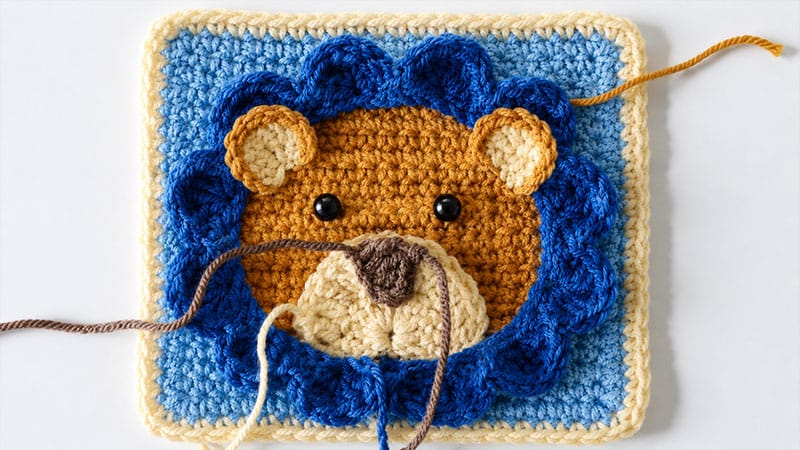
Before sewing anything permanently, arrange all your pieces on top of the gold background to ensure proper spacing.
- The Mane: Take your orange scalloped strip and curve it into a perfect circle right in the center of your gold square. Use pins to hold it in place. Using your tapestry needle and the long orange tail, whipstitch the inner edge of the circle down to the square.
- The Snout: Position the light yellow snout at the bottom-center of the inner mane circle. The wider curved edge should point downwards. Sew it down securely around the edges.
- The Nose: Place the brown triangular nose right at the top center of the snout, pointing downwards. Stitch it into place.
- The Eyes: If using plastic safety eyes, push them through the gold background just above the snout, spacing them evenly inside the mane. Secure the backings. (Alternative: Use black yarn to embroider two small closed eyes or French knots if making this for an infant).
- The Ears: Place the two gold half-circles on the inner edge of the mane, positioned at the upper left and upper right of the head. Sew the flat bottoms of the ears securely to the background.
Weave any remaining loose threads into the back of your square to hide them completely!
