
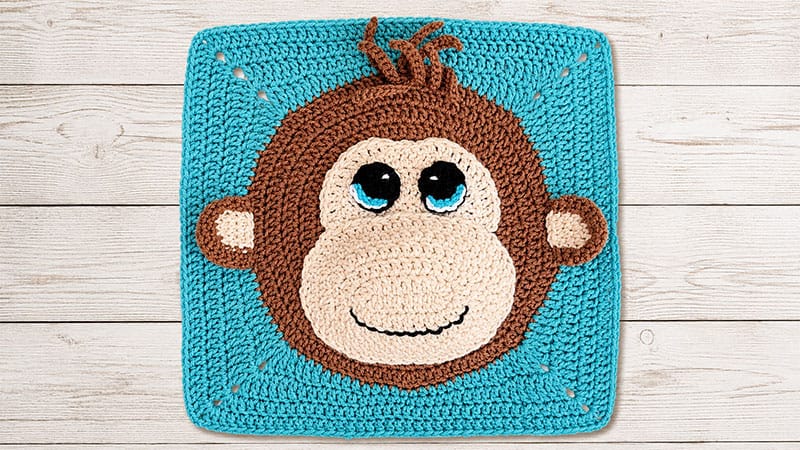
This adorable 14-inch square is perfect for character blankets, play mats, or statement throw pillows. It features a padded snout, expressive layered eyes, and a cute little tuft of hair.
Supplies Needed
- Yarn: Medium-weight (Category 4) 100% Acrylic yarn (e.g., Red Heart Super Saver)
- Main Face & Hair: Cocoa Brown (~115 yds)
- Square Background: Sage Green (~80 yds)
- Muzzle & Eye Base: Cream/Aran (~42 yds)
- Accents: Small amounts of Black (~11 yds), White (~6 yds), and Bright Blue (~1 yd)
- Hook Size: I-9 (5.5 mm)
- Notions: Polyester fiberfill (stuffing), tapestry needle, scissors, and optional stitch markers.
Dimensions & Gauge
- Finished Size: Approximately 14″ × 14″ square.
- Gauge: The first 4 rounds of the circle should measure 4 inches across. (4 double crochets = 1 inch).
Step-by-Step Pattern Instructions
Part 1: The Main Panel (Head & Background)
Note: The initial ch 3 at the start of any double-crochet round counts as your first stitch.
The Brown Face Circle
Using your Brown yarn, form a magic ring (MC).
- Round 1: Ch 3, work 11 dc into the ring. Join with a sl st to the top of the beginning ch-3. Pull the ring closed tightly. (12 sts)
- Round 2: Ch 3, 1 dc in the same space. Work 2 dc into every stitch around. Join with a sl st to the starting ch-3. (24 sts)
- Round 3: Ch 3, 1 dc in the same space, 1 dc in the next st. Work 2 dc in the next st, then 1 dc in the following st. Repeat from * to * around. Join with a sl st. (36 sts)
- Round 4: Ch 3, 2 dc in the next st. Work 1 dc in each of the next 2 sts, then 2 dc in the following st. Repeat from * to * until 1 stitch remains, 1 dc in the last st. Join with a sl st. (48 sts)
- Round 5: Ch 3, 1 dc in the same space, 1 dc in each of the next 3 sts. Work 2 dc in the next st, then 1 dc in each of the next 3 sts. Repeat from * to * around. Join with a sl st. (60 sts)
- Round 6: Ch 3, 1 dc in the next st, 2 dc in the next st. Work 1 dc in each of the next 4 sts, then 2 dc in the following st. Repeat from * to * until 2 stitches remain, 1 dc in each of the last 2 sts. Join with a sl st. (72 sts)
- Round 7: Ch 3, 1 dc in the same space, 1 dc in each of the next 5 sts. Work 2 dc in the next st, then 1 dc in each of the next 5 sts. Repeat from * to * around. Join with a sl st. (84 sts)
- Round 8: Ch 3, 1 dc in the next 2 sts, 2 dc in the next st. Work 1 dc in each of the next 6 sts, then 2 dc in the following st. Repeat from * to * until 3 stitches remain, 1 dc in each of the last 3 sts. Join with a sl st. (96 sts)
- Round 9: Ch 3, 1 dc in the same space, 1 dc in each of the next 7 sts. Work 2 dc in the next st, then 1 dc in each of the next 7 sts. Repeat from * to * around. Join with a sl st to the very first stitch. (108 sts) Fasten off the brown yarn.
Squaring the Circle (Green Border)
- Round 10: Attach Green yarn to the first stitch. Ch 1, sc in same st, sc in next st, hdc in next 4 sts, dc in next 4 sts, tr in next 4 sts. *(2 tr, ch 2, 2 tr) in the next st to create a corner. Tr in next 4 sts, dc in next 4 sts, hdc in next 4 sts, sc in next 2 sts, hdc in next 4 sts, dc in next 4 sts, tr in next 4 sts.* Repeat from * to * two more times. Work your final corner: (2 tr, ch 2, 2 tr) in the next st, then tr in next 4 sts, dc in next 4 sts, hdc in next 4 sts. Sl st to the first sc to close. (120 sts + four ch-2 corner spaces)
- Round 11: Ch 1, sc in the same st, sc in next st, hdc in next 4 sts, dc in next 6 sts, tr in next 4 sts. *(2 tr, ch 2, 2 tr) right into the corner space. Tr in next 4 sts, dc in next 6 sts, hdc in next 4 sts, sc in next 2 sts, hdc in next 4 sts, dc in next 6 sts, tr in next 4 sts.\keys Repeat from * to * two more times. Create the final corner: (2 tr, ch 2, 2 tr) in the corner space, then tr in next 4 sts, dc in next 6 sts, hdc in next 4 sts. Sl st to close. (136 sts + corners)
- Rounds 12 & 13: Ch 3 (counts as a stitch). Double crochet in every stitch across to the corner gap, then work (2 dc, ch 2, 2 dc) inside the ch-2 space. Repeat from * to * around the entire square, finishing with a sl st into the top of the initial ch-3. (152 sts for Round 12; 168 sts for Round 13). Break yarn and weave in your background tails.
Part 2: Facial Appliqués
The Ears (Make 2)
- Round 1 (RS): Using Brown, start with a magic ring, ch 1, and place 6 sc into the ring. (6)
- Round 2: 2 sc in every stitch around. (12)
- Round 3: 2 sc in the next st, 1 sc in the following st. Repeat around. (18)
- Round 4: 1 sc in the next 3 sts; change to Cream, 1 sc in the next 3 sts; change back to Brown, 1 sc in the remaining 12 sts. (18)
- Round 5: 1 sc in the next 2 sts; switch to Cream, 1 sc in the next 5 sts; switch to Brown, 1 sc in the remaining 11 sts. (18)
- Rounds 6–7: Repeat the stitch sequence from Round 5. Cut yarn, leaving a long strand for sewing.
The Eyes (Make 2)
- Round 1: Start with Black in a magic ring. Ch 3, work 10 dc into the loop. Sl st to the top of the ch-3 to join. Securely close the ring. (11) Tie off the black yarn, leaving a sewing tail.
- Row 2 (Iris Accent): Connect Blue to the first stitch of Round 1. Slip stitch across the next 5 stitches only. Fasten off.
- Row 3 (Eye Highlight): Join White to the first stitch of Round 1, positioning your hook behind the blue slip stitches you just made. Slip stitch across the next 5 stitches. Fasten off, leaving a long white tail. Use this remaining white strand to stitch a small sparkle highlight directly into the black center of the eye.
The Muzzle (Snout)
Using Cream yarn, chain 10.
- Round 1: Put 2 dc into the 4th chain from your hook (the skipped chains count as a dc). DC in the next 5 chains. In the very last chain, work 6 dc to round the corner. Pivot your work to crochet along the unworked bottom loops of the chain: dc in the next 5 loops, and finish with 3 dc in the final loop. Sl st to join. (22)
- Round 2: Ch 3, 1 dc in same space, 2 dc in next st, dc across 8 sts, 2 dc in each of the next 3 sts, dc across 8 sts, 2 dc in the last st. Sl st to join. (28)
- Round 3: Ch 3, 1 dc in same space, 2 dc in each of the next 2 sts, dc across 9 sts, 2 dc in each of the next 5 sts, dc across 9 sts, 2 dc in each of the final 2 sts. Sl st to join. (38)
- Round 4: Ch 3, 1 dc in same space,
(1 dc, 2 dc)twice, dc across 11 sts,(2 dc, 1 dc)4 times, 2 dc in next st, dc across 9 sts,(2 dc, 1 dc)twice. Sl st to join. (48) - Round 5: Ch 3, 1 dc in same space,
(2 dc, 2 dc in next st)twice, dc across 13 sts,(2 dc in next st, 2 dc)4 times, 2 dc in next st, dc across 9 sts,(2 dc in next st, 2 dc)twice. Sl st to join. (58) - Fasten off, ensuring you leave a very long tail for assembly.
- Details: Take a strand of Black yarn and embroider a wide, cheerful smile onto the snout, placing it between Rows 2 and 3.
The Eye Backdrop
Using Cream yarn, create a magic ring.
- Row 1 (RS): Ch 3, work 5 dc into the ring. Pull tight, but do not join. Turn your work. (6)
- Row 2: Ch 3, 1 dc in the same space, work 2 dc into every remaining stitch across. Turn. (12)
- Row 3: Ch 3, 1 dc in the same space. 1 dc in the next st, 2 dc in the following st. Repeat from * to * 4 times total, then 1 dc in the last st. Turn. (18)
- Row 4: Ch 3, 1 dc in the same space. 1 dc in the next 2 sts, 2 dc in the following st. Repeat from * to * 4 times total, then 1 dc in each of the last 2 sts. Turn. (24)
- Row 5: Ch 3, 1 dc in the same space.
(1 dc in next 3 sts, 2 dc in next st)twice. Dc in the next st, sl st across the next 4 sts, dc in the next 2 sts, 2 dc in the next st,(1 dc in next 3 sts, 2 dc in next st)twice, dc in the final 3 sts. Fasten off.
The Hair Tuft (Fur)
Using Brown yarn, chain 10.
- Row 1: Sl st into the 2nd chain from your hook. *Chain 10, sl st into the 2nd chain from the hook and down every remaining chain loop, then sl st into the next base chain st.* Repeat from * to * 7 more times until you have 8 wiggly fringe pieces. Fasten off, keeping a long strand for sewing.
Assembly Guide
Tip: Secure your pieces with straight pins before sewing to make sure the face looks symmetrical!
- Assemble the Eyes: Using their respective yarn tails, sew the two black/blue/white eyeballs onto the Cream Eye Backdrop.
- Attach the Eye Base: Position the eye backdrop onto the upper half of the Brown Face Circle and sew it flat.
- Attach the Snout: Place the Muzzle on the lower half of the face, slightly overlapping the bottom of the eye backdrop. Begin sewing it down using your long yarn tail. Right before you close the seam completely, stuff a small handful of polyfil inside to make it pop out three-dimensionally, then finish stitching it shut.
- Attach the Ears: Sew the ears to the left and right sides of the head. Allow them to cup forward slightly to give them a natural shape.
- Add the Hair: Gather the outer ends of the Hair Tuft slightly to bunch it together, then sew it right at the top center of the monkey’s head.
- Finishing Touches: Weave in any remaining loose yarn tails on the back of your panel. Your Monkey Granny Square is complete!
