
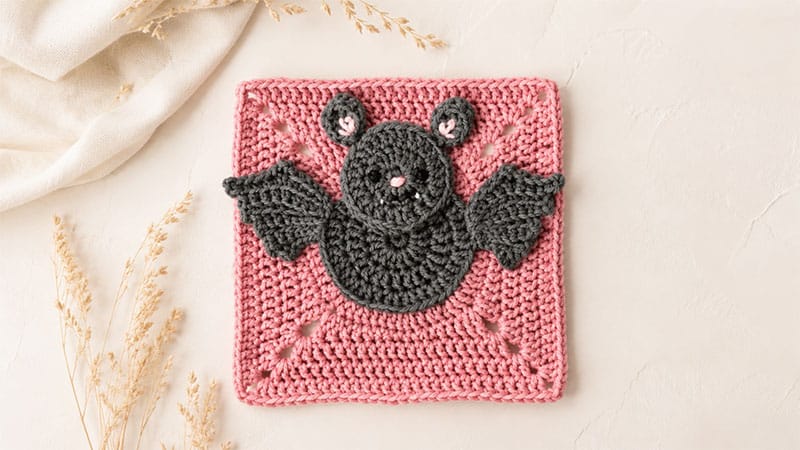
This project is worked in two main phases: first, you will crochet a solid circular body that transitions into a crisp, square border; second, you will crochet the individual facial features and wings to sew on top.
Tools & Yarn
- Hook Size: C-2 (2.75 mm) crochet hook.
- Yarn Type: DK weight (8-ply) 100% cotton yarn.
- Color Palette: Charcoal/Grey (main bat features), Deep Purple (background square), and Light Pink (inner ear/nose details).
- Accents: Small amounts of black and white embroidery floss or yarn for the facial expressions.
- Notions: Yarn needle for assembly and a stitch marker.
Project Note: The completed motif measures approximately 13cm (5.1 inches) across, making it perfectly sized to mix and match with other standard animal granny squares.
Phase 1: The Main Backdrop & Bat Body
The Center Body (Grey Yarn)
- Round 1: Create a magic ring, place 6 single crochets inside, and pull tight. Slip stitch to join. (6 stitches)
- Round 2: Chain 3 (counts as your first double crochet here and throughout). Work 3 double crochets into each of the next 5 stitches, then place 2 final double crochets into the base of your starting chain. Join with a slip stitch. (18 stitches)
- Round 3: Chain 3, then double crochet into the next stitch. Complete a sequence of [1 double crochet, 2 double crochets in the next stitch] a total of 8 times around. Join with a slip stitch. (26 stitches)
- Round 4: Chain 3. Follow a pattern of [2 double crochets in the next stitch, 2 double crochets in the following stitch, 1 double crochet], repeating 8 times total. End the round by placing 3 double crochets into the final stitch. Secure with an invisible join and cut your yarn. (44 stitches)
Squaring Off the Background (Switch to Purple Yarn)
- Round 5 (Back Loops Only): Join your purple yarn to any back loop using a standing double crochet. Work 2 double crochets into each of the next 2 stitches, followed by 1 double crochet in each of the next 2 stitches. Repeat this sequence 10 times around. Finish with a double crochet in the final 3 stitches, then slip stitch to join. (64 stitches)
- Round 6 (Creating the Corners): Chain 5 (this serves as your first treble crochet plus a chain-2 space), then work another treble crochet into the exact same stitch.
- Side Pattern: Treble crochet in the next stitch, double crochet in the next 2 stitches, half-double crochet in the next 2 stitches, single crochet across the next 5 stitches, half-double crochet in the next 2 stitches, double crochet in the next 2 stitches, treble crochet in the next stitch.
- Corner: In the next stitch, work [1 treble crochet, chain 2, 1 treble crochet].
- Repeat this side and corner sequence around, joining with a slip stitch into the third chain of your starting loop. (68 stitches + 4 corner spaces)
- Round 7: Slip stitch into the corner space. Chain 3, then work [1 double crochet, chain 2, 2 double crochets] all inside that same corner space. Double crochet down the side into the next 17 stitches. Repeat this corner-and-side layout around, joining with a slip stitch. (84 stitches + 4 corner spaces)
- Round 8: Chain 3, double crochet in the next stitch. In the corner space, work [2 double crochets, chain 3, 2 double crochets]. Double crochet down the side into the next 21 stitches. Repeat this pattern around and slip stitch to join. (100 stitches + 4 corner spaces)
- Round 9: Chain 3, double crochet in the next 3 stitches. In the corner space, work [2 double crochets, chain 3, 2 double crochets]. Double crochet down the side into the next 25 stitches. Repeat around, fasten off using an invisible join, and weave in your ends. (116 stitches)
Phase 2: Applique Pieces
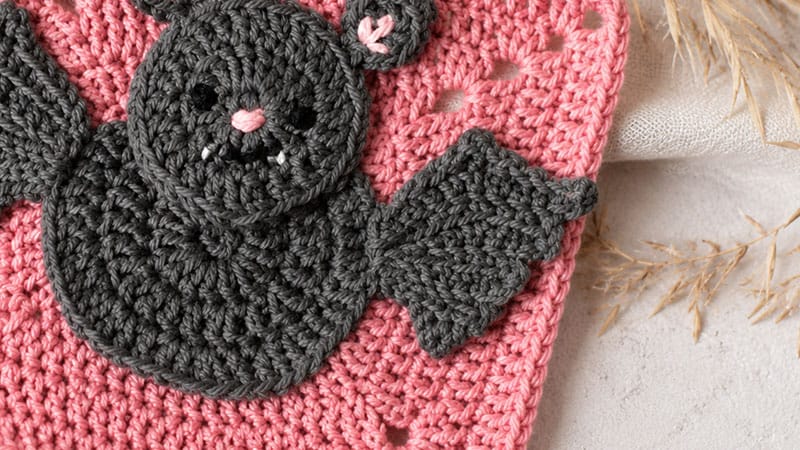
1. The Head (Grey Yarn)
- Round 1: Start with a magic ring and work 6 single crochets. Slip stitch to join. (6 stitches)
- Round 2: Chain 3, work 3 double crochets into the next 5 stitches, and 2 double crochets in the last stitch. Slip stitch to join. (18 stitches)
- Round 3: Chain 3, double crochet into the same stitch. Repeat a sequence of [1 double crochet, 2 double crochets in the next stitch] 8 times. Fasten off with an invisible join. (26 stitches)
2. The Wings (Grey Yarn — Make 2)
The texturing of the wings relies on alternating between the front and back loops of your stitches.
- Left Wing:
- Row 1: Chain 13. Turning your work to use the back bumps of the chain, single crochet in the first 5 chains. Skip 2 chains, then single crochet in the remaining 5 chains. (10 stitches)
- Row 2 (Front Loops Only): Chain 1, turn. Single crochet 4, skip 1, single crochet 4, leaving the last stitch unworked. (8 stitches)
- Row 3 (Back Loops Only): Chain 1, turn. Single crochet 5, then slip stitch in the last 3 stitches. (8 stitches)
- Row 4 (Front Loops Only): Chain 1, turn. Slip stitch 3, single crochet 4, skip the final stitch. (7 stitches)
- Row 5 (Back Loops Only): Chain 1, turn. Single crochet 3, slip stitch 4. (7 stitches)
- Row 6 (Front Loops Only): Chain 1, turn. Slip stitch 4, single crochet 2. (6 stitches)
- Row 7 (Back Loops Only): Chain 1, turn. Single crochet 1. In the next stitch, create a scalloped point by working [1 single crochet, a Picot stitch (chain 2, slip stitch into the second chain from hook), 1 single crochet]. Slip stitch in the remaining 3 stitches. Fasten off.
- Right Wing: Follow the same instructions as the left wing, but invert the loops: change every Front Loop Only (FLO) row to Back Loops Only (BLO), and vice versa.
3. The Ears (Grey Yarn — Make 2)
Inside a magic ring, work the following sequence altogether: 1 single crochet, 2 half-double crochets, 1 double crochet, chain 1, 1 double crochet, 2 half-double crochets, and 1 single crochet. Pull the ring tightly closed and fasten off, leaving a tail for sewing.
Phase 3: Assembly & Embroidery
      /\     /\      <-- Ears (with pink embroidery)
     /  \___/  \
    (  [o] [o]  )    <-- Head (with eyes, nose, and fangs)
   / \   ___   / \
  /   \ (___) /   \  <-- Wings attached to the sides of the body
 /     \     /     \
- Ear & Nose Details: Use your pink yarn to embroider small triangular accents onto the centers of the ears, and a small pink nose onto the center of the head.
- Attach Ears: Stitch the two pointed ears securely to the top of the head piece.
- Facial Features: Using black thread or yarn, stitch on closed or open eyes and a tiny mouth line. With your white yarn, add two tiny, inverted V-shapes along the mouth line to give the bat its signature fangs.
- Final Stitching: Center and sew the head piece onto the upper middle section of the main grey body circle. Pin the wings to the left and right sides of the body so they flare out elegantly across the purple background, then sew them down securely.
- Finishing Touches: Weave in any remaining yarn tails on the back of the square. For clean, crisp edges and flat corners, gently steam block your finished granny square.
