
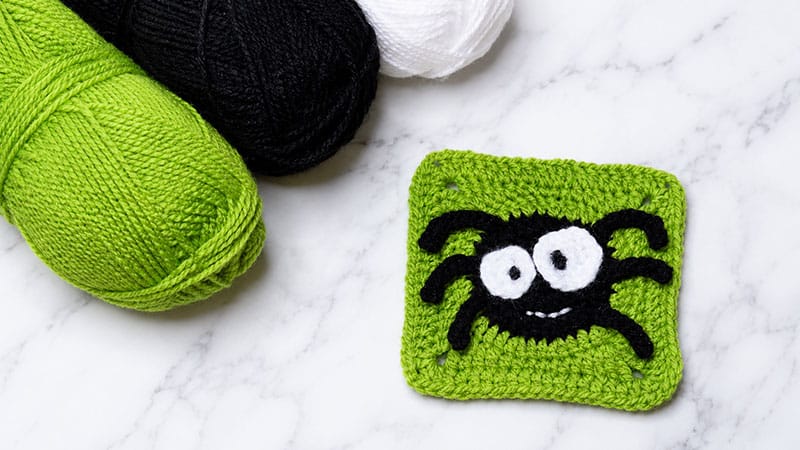
Granny squares are the ultimate crochet chameleon—with just a handful of them, you can piece together everything from a festive Halloween tote bag to a cozy, gothic-chic blanket.
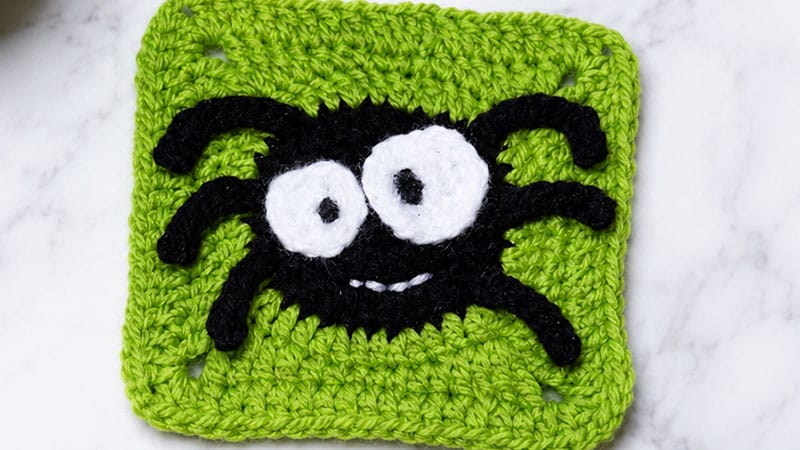
This particular pattern features a plump, midnight-black spider sitting at the center of a vibrant orange backdrop, finished with mismatched cartoonish eyes for that perfect balance of eerie and adorable.
Materials Needed
- Yarn: Lightweight acrylic yarn (Weight 3) in Black, Orange, and White
- Hook: 4.0 mm (G/6) crochet hook
- Tools: Yarn needle, sharp scissors
- Embellishments: Black felt scraps (with fabric glue) OR a black Sharpie for the pupils
Stitch Abbreviations
- MR: Magic Ring (Magic Circle)
- Ch: Chain
- Sl St: Slip Stitch
- Sc: Single Crochet
- Hdc: Half Double Crochet
- Dc: Double Crochet
- Tc: Triple (Treble) Crochet
- Inc: Regular Increase (2 sc in the same stitch)
- Dc Inc: Double Crochet Increase (2 dc in the same stitch)
Important Pattern Notes:
- The starting ch-2 of each round is used just to gain height; it does not count as a stitch.
- When finishing a round, always slip stitch directly into the very first actual double crochet of that round.
- The numbers in parentheses
( )at the end of each round/row indicate your final stitch count.
Step-by-Step Pattern Instructions
1. The Main Square
The Black Spider Body
- Round 1: Begin with an MR using black yarn. Ch-2, then work 12 dc into the center of the ring. Pull the tail tight to close the center hole. Sl st into the first dc to join.
(12) - Round 2: Ch-2. Work a dc inc (2 dc) into every single stitch around. Sl st to join.
(24) - Round 3: $Ch-2$. Repeat the sequence
*1 dc, 1 dc inc*all the way around the circle. Sl st to join.(36)
Color Change Tip: Cut your black yarn and fasten off using an invisible join for a seamless edge, then attach your orange yarn to any stitch. Alternatively, pull the orange yarn through on your final slip stitch of Round 3.
The Orange Background
- Round 4: Using orange yarn, ch-2. Repeat the sequence
*2 dc, 1 dc inc*all the way around. Sl st to join.(48) - Round 5 (Squaring Circle): Ch-1 We will now turn this circle into a square by creating corners. Repeat the following sequence 4 times around:
*3 sc, 2 hdc, 2 dc, [2 tc + ch-2 + 2 tc] in the next stitch to form the corner, 2 dc, 2 hdc*. Sl st to join.(68) - Round 6: Ch-2. Work 1 dc into every stitch along the straight edges. When you reach the ch-2 corner spaces, work
[2 dc + ch-2 + 2 dc]directly into the chain space. Sl st to join.(84) - Fasten off and weave in your orange and black yarn tails.
2. The Googly Eyes
Note: The eyes are worked in a continuous, spiral round without joining.
Small Eye
- Round 1: Using white yarn, start with an MR. Ch-1, work 6 sc into the ring.
(6) - Round 2: Work 1 inc into every stitch around.
(12) - Sl st to the next stitch to even out the circle, fasten off, and leave a long tail for sewing.
Big Eye
- Round 1 & 2: Repeat the exact steps used for the Small Eye.
(12) - Round 3: Repeat the sequence
*1 sc, 1 inc*all the way around.(18) - Sl st to the next stitch, fasten off, and leave a long tail for sewing.
3. The Spider Legs
To prevent the legs from curling incorrectly, we craft distinct left and right versions so the “right side” of your crochet stitches always faces upward.
Long Front Legs
- Right Leg: Sl knot, ch-11. Turn and work back down the chain, starting in the second chain from the hook: 2 sl st, 1 sc, then 7 sl st down the remaining chains.
(10) - Left Leg: Sl knot, ch-11. Turn and work back down the chain, starting in the second chain from the hook: 7sl st, 1 sc, then 2sl st down the remaining chains.
(10)
Short Back Legs (Make 2 Right, 2 Left)
- Right Short Leg: Sl knot, ch-8. Starting in the second chain from the hook: 1 sl st,1 sc, then 5 sl st.
(7) - Left Short Leg: Sl knot, ch-8. Starting in the second chain from the hook: 5 sl st, 1 sc, then 1 sl st.
(7)
Assembly & Finishing Touches
      /\  /\    (Short Legs)
    [  Big  ] [Small]  (Eyes)
   /                \
  /                  \  (Long Legs)
- Placement: Position the two white eyes near the upper-middle section of the black circle (Round 2-3 area). Block out your 8 legs—four on each side—clandestinely tucked slightly under the black spider body perimeter.
- Sewing: Using your yarn needle and the leftover white yarn tails, stitch the eyes securely onto the black body. Use the black yarn tails to stitch the legs down onto the orange border so they stay spread out.
- The Pupils: Cut two small circles out of black felt and fabric-glue them onto the white eyes, or simply draw them on using a black permanent Sharpie marker. Giving them mismatched pupil sizes heightens the cute, kooky factor!
- The Smile: Thread a small piece of white yarn onto your needle and stitch a simple, tiny “V” shaped mouth right below the eyes.
Your Spooky-Cute Spider Granny Square is complete and ready to be blocked and joined into your next project!
