
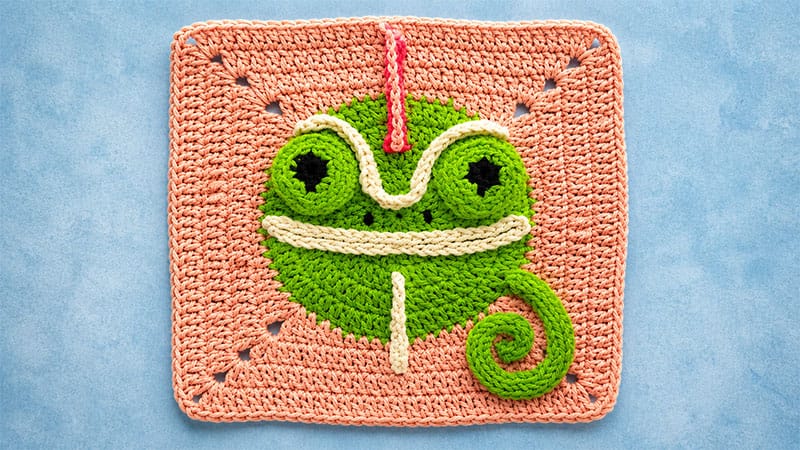
Bring a touch of whimsical wildlife to your next crochet project with this adorable chameleon granny square! Perfect for animal-themed baby blankets, playful pillows, or tote bags, this design captures the chameleon’s most iconic features.
Special care has been taken to give this little reptile a friendly, amused expression rather than a grumpy look, complete with its signature bulging, independently moving eyes and a cute curled tail.
It pairs beautifully with other animal squares and is a fantastic way to practice shaping and 3D appliqué assembly.
Pattern Overview
- Skill Level: Intermediate
- Terminology: US Crochet Terms
- Finished Size: Approx. 6″ x 6″ (15 cm x 15 cm)
- Gauge: 22 sts and 12 rounds = 4″ x 4″ (10 cm x 10 cm) in double crochet.
- Yardage Required: 50–52 yards (45–47 meters) total.
Materials Needed
- Yarn: Light category 3 (DK/Light Worsted) cotton yarn (Suggested: D.M.C Happy Cotton, 20g/47yds per skein).
- Main Color: Green (1 skein)
- Background Color: Light Brown (1 skein)
- Accent Colors: Small amounts (a few yards each) of Beige, Light Peach, Dark Peach, and Black.
- Hook: Size D/3 (3.00 mm) crochet hook
- Notions: Tapestry needle for assembly and weaving in ends, scissors.
Step-by-Step Instructions
Part 1: The Granny Square Base
Note on Turning/Starting Chains: The initial ch-1 counts as a single crochet, and the initial ch-3 counts as a double crochet throughout the base.
The Green Animal Face (Rounds 1–6)
Using your green yarn, begin by forming a magic circle.
- Round 1: Ch 1 (counts as first sc), work 7 sc into the magic circle. Join with a sl st to the top of the beginning ch-1. (8 sts)
- Round 2: Ch 1 and sc into the same stitch as joining. Work 2 sc into every remaining stitch around. Join with a sl st to the beginning ch-1. (16 sts)
- Round 3: Ch 3 (counts as first dc) and work 1 dc into the same stitch as joining. Work 1 dc in the next stitch. *Work 2 dc in the following stitch, then 1 dc in the next stitch. Repeat from * all the way around. Join with a sl st to the 3rd chain of your starting ch-3. (24 sts)
- Round 4: Repeat the exact increase pattern from Round 3. (36 sts)
- Round 5: Ch 3 and work 1 dc into the same stitch as joining. Work 1 dc into each of the next 2 stitches. *Work 2 dc in the next stitch, followed by 1 dc into each of the next 2 stitches. Repeat from * all the way around. Join with a sl st to the 3rd chain of the starting ch-3. (48 sts)
- Round 6: Ch 3 and work 1 dc into the same stitch as joining. Work 1 dc into each of the next 3 stitches. *Work 2 dc in the next stitch, followed by 1 dc into each of the next 3 stitches. Repeat from * around. Join with a sl st to the 3rd chain of the starting ch-3. (60 sts)
- Fasten off the green yarn and cleanly weave in your loose ends.
Squaring Off the Circle (Rounds 7–10)
Count 8 stitches to the left of where you just fastened off Round 6. Attach your light brown yarn to this 8th stitch with a slip knot.
- Round 7 (The Squaring Round): In the very first stitch, work (ch 4, tr, ch 2, tr 2) to create your first corner.
- *Work 1 tr in the next st, 1 dc in each of the next 2 sts, 1 hdc in each of the next 3 sts, 1 sc in each of the next 2 sts, 1 hdc in each of the next 3 sts, 1 dc in each of the next 2 sts, 1 tr in the next st.
- In the next stitch, create the corner: (tr 2, ch 2, tr 2).
- Repeat from * a total of 3 times. On the final repeat, finish the sequence of side stitches, then join with a sl st to the 4th chain of your starting ch-4.
- Round 8: Ch 3, dc into the next stitch.
- *In the ch-2 corner space, work: (dc, tr, ch 2, tr, dc). Work 1 dc into every stitch across the side until you reach the next corner space.
- Repeat from * 3 more times. On the final side, dc in each remaining stitch to the end of the round. Join with a sl st to the 3rd chain of the starting ch-3.
- Rounds 9 & 10: Ch 3, dc into each stitch until you reach the first corner space.
- *In the ch-2 corner space, work: (dc 2, ch 2, dc 2). Work 1 dc into every stitch across the side to the next corner.
- Repeat from * 3 more times. DC in each remaining stitch to the end of the round. Join with a sl st to the 3rd chain of the starting ch-3.
- Fasten off the light brown yarn and weave in your ends.
Part 2: The Face Elements & Accents
Bulging Eyes (Make 2)
Using black yarn, start with a magic circle.
- Round 1: Ch 1, work 6 sc into the ring. Join with a sl st to the first ch. Fasten off black yarn and weave in ends. (6 sts)
- Round 2: Join green yarn with a slip knot to any stitch. Work 2 sc into that same stitch and 2 sc into every stitch around. Join with a sl st to the first sc. (12 sts)
- Round 3 (BLO): Note: Work into the Back Loops Only for this and the next round to create a distinct ridge. Ch 1, sc in the first stitch, sc in the next stitch. *Work 2 sc in the next stitch, then 1 sc in the following stitch. Repeat from * around. Join with a sl st to the first stitch. (18 sts)
- Round 4 (BLO): Ch 1, sc in the first stitch, sc in each of the next 2 stitches. *Work 2 sc in the next stitch, then 1 sc in each of the next 2 stitches. Repeat from * around. Join with a sl st to the first stitch. (24 sts)
- Fasten off, leaving a 6″ (15 cm) long tail for sewing.
Curled Tail
Using green yarn, cast on to work an I-cord.
- Create a 3-stitch I-cord that measures exactly 6″ (15 cm) long.
- Fasten off, leaving a 6″ (15 cm) tail to secure it to the square.
Eyebrows Line
Using beige yarn, create a slip knot.
- Ch 28. Starting in the second chain from your hook, work: 1 hdc into each of the next 10 chains, 1 sc into each of the next 2 chains, 1 sl st into each of the next 3 chains, 1 sc into each of the next 2 chains, and 1 hdc into every remaining chain to the end.
- Fasten off, leaving a 6″ (15 cm) tail for assembly.
Smiling Mouth
Using beige yarn, create a slip knot.
- Ch 44.
- Fasten off, leaving a 4″ (10 cm) tail for sewing.
Upper Scale Line
Using light peach yarn, create a slip knot.
- Row 1: Ch 10. Starting in the second chain from the hook, sc across every chain to the end. Fasten off and weave in ends.
- Row 2: Join dark peach yarn to the first stitch of Row 1 with a standing half double crochet (hdc). Work 1 hdc into every remaining stitch across.
- Fasten off, leaving a 4″ (10 cm) tail for assembly.
Lower Scale Line
Using beige yarn, create a slip knot.
- Ch 9. Starting in the second chain from your hook, work 1 hdc into every chain across to the end.
- Fasten off, leaving a 4″ (10 cm) tail for assembly.
Part 3: Assembly & Finishing Touch
To ensure your chameleon looks perfectly proportioned, arrange all the facial features onto the green circular base before sewing anything down permanently.
        [Upper Scale Line]
         /              \
    [Eye 1]  (Eyebrows)  [Eye 2]
       \       (Nostril)   /
        \                 /
         [---- Mouth ----]
                |
         [Lower Scale Line]
- Attach the Eyes: Position the two bulging eyes onto the upper half of the green circle. Sew them down securely using their yarn tails, passing your needle only through the back loops of Round 4. This keeps the edges clean and allows the eyes to pop out slightly.
- Attach the Eyebrows: Curve the beige eyebrow line over the top of the eyes and secure it flat against the green base using its yarn tail.
- Shape the Tail: Coil the green I-cord into a tight, neat spiral shape. Position it on the lower right or left corner background section of the granny square and stitch it down flat.
- Sew the Mouth: Shape the long chain-44 strand into a wide, cheerful, upward-curving smile across the lower half of the face. Sew along the chain length to fix it in place.
- Place the Scales: Sew the Upper Scale Line along the top ridge of the chameleon’s head (above the eyebrows), and the Lower Scale Line below the mouth structure. Sew them down so they sit flush against the face.
- Details: With a scrap of black yarn, embroider two tiny, delicate vertical lines or French knots just above the mouth line to form the nostrils.
- Finalize: Pull all yarn tails to the back of the square, knot them securely, weave in any remaining loose ends, and block your completed square to achieve clean, straight edges!
