
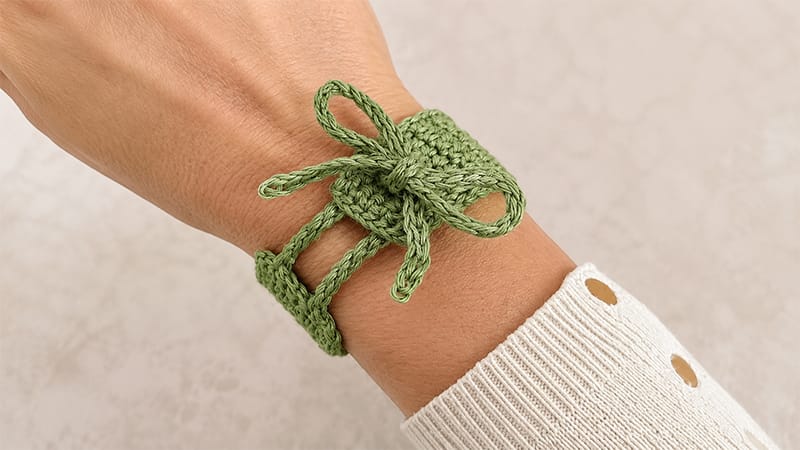
This stylish, lightweight bracelet pattern is perfect for crafters of all skill levels. It features a breathable, textured band with a dual-tie closure that makes it easily adjustable for both children and adults.
Why Linen Yarn is Ideal
- Exceptional Comfort: Linen starts smooth and becomes incredibly soft against the skin the more it is worn.
- Easy Maintenance: The finished piece is fully machine washable (best washed with similar colors at a maximum of 30°C).
- Zero Waste: Made from 100% natural linen, this accessory is entirely home-compostable once it reaches the end of its lifespan.
Project Specifications
Size Details
- Width: Approximately 1 inch (2.5 cm)
- Length: Adjustable. The standard 36-row count creates a band of roughly 5 inches (12.5 cm), excluding the tie closures. Note: The design is intended to leave a small gap on the wrist where only the ties meet.
Materials & Tools
- Yarn: 100% Linen (Lace weight / 2-ply)
- Hook Size: 2.3 mm (US B-1 / UK 14)
- Notions: Tapestry needle for weaving in tails, sharp scissors, and 2 stitch markers (optional, for marking tie holes).
Pattern Notes & Abbreviations
This pattern uses US Crochet Terms.
- Ch: Chain
- Sc: Single Crochet
- Ss: Slip Stitch
- St(s): Stitch(es)
- Ch sp: Chain Space
- [ ]: Repeat the sequence inside the brackets as directed.
- (#): The number at the end of a row indicates your total stitch count.
Gauge Reference: 10 sc x 10 rows = roughly 1.5” x 1.25” (4cm x 3.5cm)
Step-by-Step Instructions
The Main Band
To begin, create a slip knot and Ch 6.
- Row 1: Insert the hook into the 2nd chain from your hook and work 1 sc. Work 1 sc into each remaining chain across. (6)
- Row 2: Ch 1, turn your work. Work 1 sc into every stitch across. (6)
- Row 3 (Eyelet Row): Ch 1, turn. Sc in the first st. Ch 1, skip the next st. Sc into each of the next 2 sts. Ch 1, skip the next st. Sc into the very last st. (6)Note: This row creates two small gaps for your fastening ties. They will look tiny, but the linen yarn naturally stretches with use, so keep them small. Mark them with stitch markers if needed.
- Row 4: Ch 1, turn. Sc into the first st. Work 1 sc directly into the first ch-1 space. Sc into the next 2 sts. Work 1 sc into the second ch-1 space. Sc into the final st. (6)
- Rows 5–36: Repeat Row 2 continuously until your bracelet reaches your desired length. For the standard 5-inch size, repeat Row 2 for a total of 32 additional rows. Do not fasten off.
Border & Closure Ties
Step 1: The Clean Border
You will now work a slip-stitch border around the edges of the bracelet to give it a polished look.
- First Side: Working vertically down the long raw edge of your bracelet, place 1 ss into the edge of every row. (Tip: If the stitches are tight, gently open them up with your tapestry needle first.
- Bottom Corner: When you reach the starting slip knot, lay the yarn tail over your working yarn so it gets securely trapped inside your next stitch. Ch 1 to turn the corner.
- Bottom Edge: Work 1 ss across each of the foundation stitches. Ch 1 to turn the next corner.
- Second Side: Work 1 ss into the edge of each row going back up the other long side. Ch 1 at the final corner.
Step 2: Crafting the Adjustable Ties
- Work 1 ss into each of the first 2 sts along the top edge.
- First Tie: Ch 36. Working only into the back bumps of the chain, start at the 2nd chain from your hook and ss in every chain back down to the base. Ss into the same stitch where you started the chain to secure it.
- Work 1 ss into each of the next 3 sts across the top edge.
- Second Tie: Repeat the same tie process here ([Ch 36, ss back down, ss into the base stitch]).
- Work 1 ss into the last remaining stitch.
Finishing Up
Cut your working yarn, leaving a short tail. Pull the tail completely through the final loop and tug tightly to secure the knot.
Use your tapestry needle to neatly weave all remaining yarn ends into the back of the bracelet stitches. Thread the ties through the eyelets on Row 3 to wear!
