
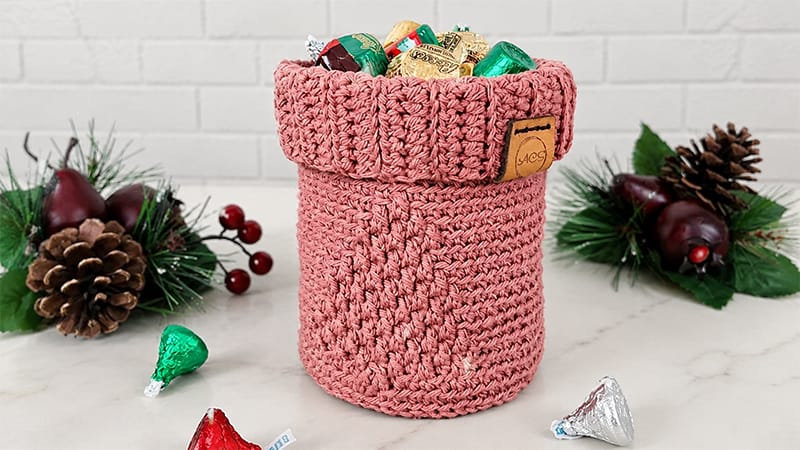
This charming crochet cozy features a beautifully textured, raised evergreen design that mimics a classic Christmas tree.
It is a highly versatile project that works up in just a couple of hours, making it an excellent last-minute holiday gift or a festive addition to your woodland-themed home decor.
Beyond dressing up a standard quart mason jar, it can easily function as a cozy sleeve for a large 22 oz jar candle or be used standalone as a small decorative holiday candy basket.
Materials & Tools
- Yarn: Approximately 110 yards of Worsted Weight (Weight 4) yarn. Both 100% acrylic (for soft elasticity) and 100% cotton (for a sturdy, structured finish) work beautifully.
- Hook Size: 4.00 mm (US G/6) or size needed to match the required gauge.
- Notions: A stitch marker (or a scrap piece of yarn) to track continuous rounds, and a tapestry needle to weave in your ends.
Sizing & Gauge
- Finished Dimensions: Fits a standard Quart Mason Jar or a 22 oz jar candle (Approx. 11.5″ circumference × 5″ height).
- Gauge Test: 6 single crochets in the back loop only (BLO sc) = 1.25 inches; 6 rounds = 1.25 inches.
Special Stitch Key
- Alternate Double Crochet (Alt-dc): A seamless alternative to a starting chain. Insert the hook into the very first stitch without chaining, catch the yarn and draw up a loop, yarn over, and pull through both loops. Then, insert your hook right between the vertical legs of that stitch, yarn over, draw up a loop, yarn over, pull through one loop, yarn over, and pull through the remaining loops.
- Back Post Single Crochet (bpsc): Insert your hook from the back of your work to the front, and then back out to the rear around the vertical body of the specified stitch. Yarn over, draw up a loop, yarn over, and pull through both loops.
- Double Crochet 2 Together in Front Loops (dc2tog): (Yarn over, insert hook into the front loop only (FLO) of the designated stitch two rounds below, pull up a loop, yarn over, pull through 2 loops) twice in the sequence. Yarn over and pull through all 3 remaining loops on your hook. (Note: This is used for textured detailing; it does not change your overall round stitch count.
Step-by-Step Written Pattern
Section 1: The Circular Base
Worked in joint rounds. Do not count starting chains as stitches.
- Round 1: Form a magic ring (or chain 3). Work 12 double crochets (dc) into the ring or the 3rd chain from your hook. Connect with a slip stitch (sl st) to your first dc. (12 sts — diameter should be ~1″)
- Round 2: Complete an Alt-dc in the very first stitch, then place 1 regular dc into that same stitch. Work 2 dc into every remaining stitch around. Join with a sl st. (24 sts — diameter should be ~1.8″)
- Round 3: Alt-dc in the first stitch, work another dc in the same stitch, then dc in the next stitch. *Work 2 dc in the following stitch, then 1 dc in the next.* Repeat from * to * around. Join with a sl st. (36 sts — diameter should be ~2.75″)
- Round 4: Alt-dc in the first stitch, work another dc in the same stitch, then dc in each of the next 2 stitches. *Work 2 dc in the following stitch, then 1 dc in each of the next 2 stitches.* Repeat from * to * around. Join with a sl st. (48 sts — diameter should be ~3.5″)
- Round 5: Ch 1. Place 2 single crochets (sc) into the first stitch, followed by 1 sc in each of the next 3 stitches. *Work 2 sc in the next stitch, then 1 sc in each of the next 3 stitches.* Repeat from * to * around. Join with a sl st. (60 sts — diameter should be ~4″)
Do not fasten off your yarn. Move directly into shaping the sides.
Section 2: Transitions & Low Sides
From this point forward, work in continuous spiral rounds. Do not join at the end of these rounds; use your stitch marker to follow the start of each row.
- Round 1: Ch 1. Work 1 bpsc around the post of every stitch from the previous round. (60 sts)
- Round 2: Work 1 sc into the back loop only (BLO) of every stitch around.
Section 3: The Raised Holiday Tree Graphic
All single crochets are worked in the back loops (BLO sc). All decorative double crochets (FLO dc or FLO dc2tog) are worked into the unused front loops of the stitches located exactly two rounds below your current position.
- Round 1: BLO sc in all 60 stitches around.
- Round 2 (Tree Trunk): BLO sc in the first 11 sts. Work an FLO dc2tog over the front loops of the next 2 sts from 2 rounds below (leaving exactly 1 unworked stitch directly behind it on your current row). BLO sc across the remaining 48 sts.
- Round 3 (Lower Branches): BLO sc in the first 6 sts. *Work 1 FLO dc 2 rounds below, then 1 BLO sc in the current round.* Repeat from * to * a total of 5 times. BLO sc in the remaining 43 sts.
- Round 4: BLO sc in the first 5 sts. *Work 1 FLO dc 2 rounds below, then 1 BLO sc in the current round.* Repeat from * to * a total of 6 times. BLO sc in the remaining 42 sts.
- Round 5: Repeat the exact stitch placement of Round 3.
- Round 6 (Mid Branches): BLO sc in the first 7 sts. *Work 1 FLO dc 2 rounds below, then 1 BLO sc in the current round.* Repeat from * to * a total of 4 times. BLO sc in the remaining 44 sts.
- Round 7: BLO sc in the first 8 sts. *Work 1 FLO dc 2 rounds below, then 1 BLO sc in the current round.* Repeat from * to * a total of 3 times. BLO sc in the remaining 45 sts.
- Round 8: Repeat the exact stitch placement of Round 6.
- Round 9: Repeat the exact stitch placement of Round 7.
- Round 10 (Upper Branches): BLO sc in the first 9 sts. *Work 1 FLO dc 2 rounds below, then 1 BLO sc in the current round.* Repeat from * to * a total of 2 times. BLO sc in the remaining 46 sts.
- Round 11: BLO sc in the first 10 sts. Work 1 FLO dc 2 rounds below, 1 BLO sc in the current round, 1 FLO dc 2 rounds below, then BLO sc in the final 47 sts.
- Round 12: Repeat the exact stitch placement of Round 10.
- Round 13: Repeat the exact stitch placement of Round 11.
- Round 14 (Tree Top): BLO sc in the first 11 sts, work 1 FLO dc 2 rounds below, then BLO sc in the final 48 sts.
- Rounds 15–16: BLO sc around all 60 sts.
At the very end of Round 16, anchor the spiral by working a slip stitch into the next stitch. Do not fasten off. (Your cozy should measure approximately 4″ tall here).
Section 4: The Ribbed Top Cuff
This border is worked perpendicularly to the body in rows, attaching to the top rim as you go.
- Row 1: Chain 13. Working strictly into the back bumps of the chain path, half double crochet (hdc) in the 2nd chain from your hook and in the next 10 chains. Hdc2tog across the final chain loop and the same slip-stitched base stitch where your chain started. (12 sts)
- Row 2: Slip stitch into the next two available edge stitches along the top rim of the cozy body. Turn your work. For the return row, BLO hdc across all 12 stitches. Turn.
- Row 3: Ch 1. BLO hdc across the first 11 stitches. Work a BLO hdc2tog using the last stitch of your row and the next unworked edge stitch along the cozy rim. Turn.
- Rows 4–39: Alternatingly repeat Rows 2 and 3 all the way around the rim perimeter.
Finishing Touches
Bring the first and final rows of your ribbing together so they overlap cleanly. Seam the cuff closed by working a slip stitch through both loops of your final row and the remaining back loop of your starting chain row across all 12 stitches.
Fasten off your yarn, weave in any remaining loose ends securely on the inside, and your holiday cozy is complete!
