
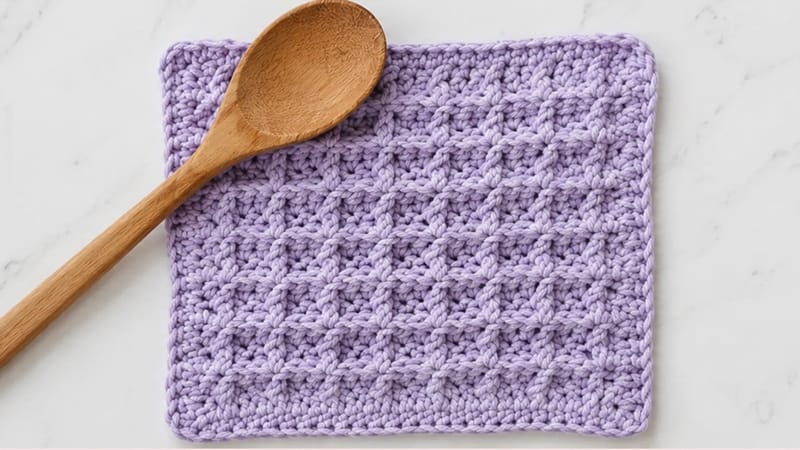
Add both style and high-end functionality to your kitchen with this classic waffle-weave dishcloth. The raised ridges create an excellent scrubbing texture that tackles tough kitchen messes with ease, while the recessed pockets absorb water beautifully. This pattern includes instructions for both a compact small size and a generous large size.
Project Overview & Materials
- Yarn: Worst-weight (Category 4) 100% cotton yarn. Cotton is highly recommended because it is durable, incredibly absorbent, and holds up well to frequent washing. You will need 1 skein (approx. 100g / 190 yards).
- Hook: 5.0 mm (US Size H-8) crochet hook.
- Extras: Tapestry needle for weaving in yarn tails and scissors.
Sizing & Gauge
- Small Size: Approximately 5″ x 5″ (16 cm x 16 cm)
- Large Size: Approximately 8.25″ x 8.25″ (21 cm x 21 cm)
- Note: Gauge is roughly 16.5 stitches and 16.5 rows per 4″ (10 cm) square in the waffle pattern, though exact gauge is not critical for this project.
Key Terms & Stitch Guide (US Terminology)
- Ch: Chain
- St / Sts: Stitch / Stitches
- Sl St: Slip Stitch
- Sc: Single Crochet
- Hdc: Half Double Crochet
- Dc: Double Crochet
- Fpdc (Front Post Double Crochet): Yarn over, insert your hook from the front of your work to the back, and back out to the front around the vertical post of the designated double crochet from the row below. Yarn over, pull up a loop, and finish the stitch like a regular double crochet.
Pattern Note: The turning chains at the start of rows do not count as active stitches. Instructions inside brackets [ ] should be repeated across the row as directed.
Step-by-Step Pattern Instructions
The waffle design requires a stitch foundation that is a multiple of 3, plus an extra 2 chains for the turning foundation.
The Main Body
Using your 5.0 mm hook, generate a starting chain of 26 for the small size OR 32 for the large size.
- Row 1 (Foundation): Insert the hook into the 3rd chain from your hook and place a dc. Work 1 dc into every remaining chain across to the end. Turn your work.
<24 (30) total stitches> - Row 2 (Setting the Ridges): Ch 2. Dc into the very first stitch.
[Work 1 fpdc around the next post, then work 1 dc into each of the next 2 stitches]. Repeat the sequence inside the brackets until you have only 2 stitches left on the row. Fpdc around the next-to-last post, then place a standard dc into the final stitch. Turn your work. - Row 3 (Filling the Grid): Ch 2. Dc into the first stitch.
[Work 1 dc into the next stitch, then work 1 fpdc around each of the next 2 posts]. Repeat the sequence inside the brackets until you have 2 stitches left on the row. Place 1 dc into each of the last 2 stitches. Turn your work.
To Progress: Keep repeating Row 2 and Row 3 in alternating sequence until your fabric measures approximately 14.5 cm (for small) or 18 cm (for large). Ensure that your final row is a Row 2 repeat. Do not fasten off.
Finishing with the Border
Without cutting your yarn, you will now transition into working in rounds along the outer perimeter to clean up the edges.
- Round 1 (All Sizes): Ch 1. Work hdc stitches evenly all the way around the outside edge of the square. (Tip: Place 2 hdc stitches into the side edge of every row down the flanks). When you reach a corner, work 2 hdc into the same space to help it turn smoothly. Connect the end of the round to your starting hdc with a sl st.
- Round 2 (Large Size Only): Ch 1. Work 1 hdc into every stitch around the border. When you reach the corners, place 2 hdc into each of the two corner stitches created in the previous round. Connect with a sl st to the first stitch.
Final Steps
Snip your yarn, pull it through the final loop to secure, and use your tapestry needle to carefully weave in the loose ends. For the absolute best results, wet-block your finished dishcloth to relax the cotton fibers, straighten the border edges, and really make that beautiful geometric waffle texture pop!
