
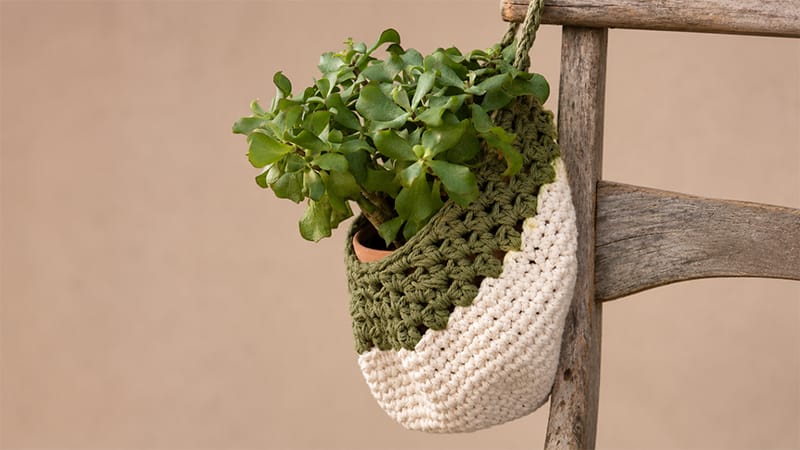
This charming, teardrop-shaped hanging basket is the perfect weekend organization project. Designed to strike a balance between storage and style, it is neither too bulky nor too small.
By holding two strands of worsted-weight cotton yarn together, the basket works up incredibly fast and creates a sturdy, durable fabric.
It is ideal for clearing up clutter all over your home. Use it in the kitchen for onions and garlic, in the nursery for plush toys, in the living room for stray remotes, or as a beautiful wall-hanging planter for your favorite greenery.
Pattern Details
Materials Needed
- Yarn: Approximately 220–250 yards of Medium/Worsted Weight (Size 4) 100% Cotton Yarn (e.g., Lily Sugar ‘n Cream). Note: You will be holding 2 strands together simultaneously.
- Hook: US K/10.5 (6.5 mm) crochet hook
- Notions: Tapestry needle, scissors, and a few stitch markers
Sizing & Gauge
- Finished Size: Approximately 13 inches long by 9 inches wide.
- Gauge: 12 single crochet (sc) x 12 rows = 4″ square. (Exact gauge is not critical for this project).
- Skill Level: Intermediate
Abbreviations (US Terms)
- ch(s): chain(s)
- st(s): stitch(es)
- sp(s): space(s)
- sl st: slip stitch
- sc: single crochet
- hdc: half double crochet
- sc2tog: single crochet two stitches together (decrease)
- FO: fasten off
Special Stitches
- Sc Cluster: Work 2 single crochets into the same stitch or space.
- Hdc Cluster: Work 2 half double crochets into the same stitch or space.
- Hdc Cluster Dec (Decrease): Work 1 hdc into the current space, work a half double crochet two together (hdc2tog) across the current space and the next space, then work 1 more hdc into that same second space.
Important Pattern Notes
- Two Strands: Remember to hold two strands of yarn together as one throughout the entire project.
- Working in Rounds: Rounds 1 through 19 are worked in a continuous spiral. Use a stitch marker to note the first stitch of each round and move it up as you go.
- Chains: The starting chain counts as a stitch only on the half double crochet rounds. Otherwise, slip stitches and starting chains do not count as stitches.
- Parentheses: Instructions inside
( )mean you should work all of those stitches into the single specified stitch or space. - Brackets: Instructions inside
[ ]should be repeated the exact number of times stated.
Step-by-Step Instructions
Step 1: Creating the Flat Circular Base
- Round 1: Form a magic circle, ch 1, work 6 sc into the ring. Do not join. (6 sts)
- Round 2: Work 2 sc into every stitch around. (12 sts)
- Round 3: [1 sc in the next st, 2 sc in the following st] repeat 6 times. (18 sts)
- Round 4: [1 sc in each of the next 2 sts, 2 sc in the following st] Repeat 6 times. (24 sts)
- Round 5: [1 sc in each of the next 3 sts, 2 sc in the following st] Repeat 6 times. (30 sts)
- Round 6: [1 sc in each of the next 4 sts, 2 sc in the following st] Repeat 6 times. (36 sts)
- Round 7: [1 sc in each of the next 5 sts, 2 sc in the following st] Repeat 6 times. (42 sts)
- Round 8: [1 sc in each of the next 6 sts, 2 sc in the following st] repeat 6 times. (48 sts)
- Round 9: [1 sc in each of the next 7 sts, 2 sc in the following st] repeat 6 times. (54 sts)
- Round 10: [1 sc in each of the next 8 sts, 2 sc in the following st] repeat 6 times. (60 sts)
- Round 11: [1 sc in each of the next 9 sts, 2 sc in the following st] repeat 6 times. (66 sts)
- Round 12: [1 sc in each of the next 10 sts, 2 sc in the following st] repeat 6 times. (72 sts)
Step 2: Building the Basket Sides
- Rounds 13–19: Work 1 sc into every stitch around. (72 sts per round for 7 rounds). At the very end of Round 19, slip stitch into the next stitch to close the continuous spiral.
- Round 20: (Ch 2 + 1 hdc) into the same stitch (this serves as your first hdc cluster). Skip the next 2 sts.
[Work an hdc cluster in the next st, skip the next 2 sts]repeat 23 times. Sl st to the top of the initial ch-2 to close the round. (24 hdc clusters)
Note: For the remaining rounds, you will be inserting your hook directly into the spaces between the cluster groups rather than into the loops of the stitches themselves.
- Round 21: Sl st into the next stitch and into the first space between clusters. (Ch 2 + 1 hdc) in that same space. Work 1 hdc cluster into every space around. Sl st to the top of the initial ch-2 to close. (24 hdc clusters)
- Round 22: Sl st into the next stitch and into the first space between clusters. (Ch 2 + 1 hdc) in that same space. Work an HDC cluster into each of the next 5 spaces. Work an hdc cluster dec across the next spaces a total of 6 times. Work an HDC cluster into each of the final 6 spaces. Sl st to the top of the initial ch-2 to close. (12 hdc clusters, 6 hdc cluster decreases)
- Round 23: Sl st into the next stitch and into the first space between clusters. (Ch 2 + 1 hdc) in that same space. Work an HDC cluster into each of the next 15 spaces. In the next space work: (1 hdc cluster + ch 1). Sc2tog across the current space and the following space. In that same second space work: (ch 1 + 1 hdc cluster). Sl st to the top of the initial ch-2 to close. (18 hdc clusters, 2 ch-1 spaces, 1 sc). Tip: Place a stitch marker in both of the ch-1 spaces you just made.
Step 3: The Rim and Hanging Loop
- Round 24: Sl st into the next stitch and into the first space between clusters, ch 1. Work an sc cluster into that same space and into each of the next 15 spaces. Work an sc cluster directly into the marked ch-1 space. Chain 20 loosely (this forms your hanging loop). Work an sc cluster into the second marked ch-1 space, and an sc cluster into the final space. Sl st to the first stitch to close. (19 sc clusters, 20 chains)
- Round 25: Slip stitch loosely into every single stitch and chain all the way around the rim and the loop. Sl st to join. (54 sl sts total)
Finishing
Cut your yarn, fasten off securely, and weave in all loose ends with your tapestry needle. Shape your teardrop basket with your hands, hang it up, and fill it with your favorite items!
