
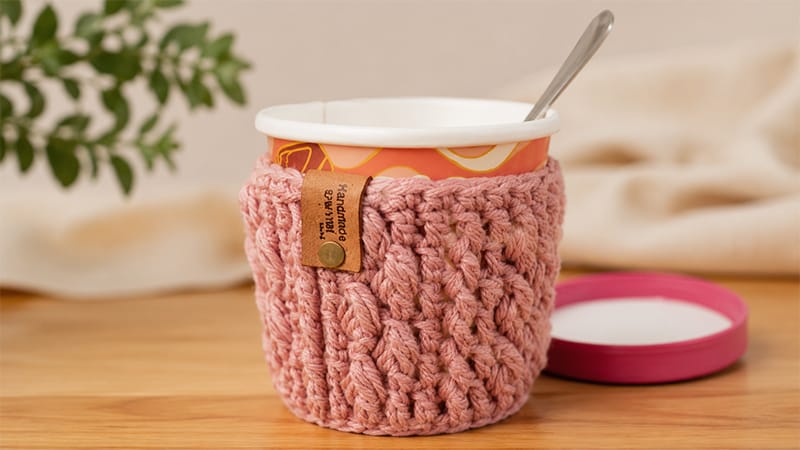
Keep your fingers warm and your favorite pint of ice cream perfectly chilled with this heavily textured cozy.
Named for its unique stitch pattern that mimics the appearance of drifting smoke, this quick-to-make accessory is an excellent project for using up leftover medium-weight yarn.
It fits standard pint containers and makes an excellent, practical gift for any ice cream lover.
Project Overview
- Skill Level: Advanced Beginner
- Finished Dimensions: Approximately 4.5 inches wide by 3.5 inches tall when laid flat.
- Stitch Count: 30 stitches per round throughout the project.
Required Materials & Tools
- Yarn: 30 to 40 yards of Worsted Weight (#4) yarn. Note: 100% cotton (such as Lily Sugar ‘n Cream) or sturdy acrylic works best. If using a highly elastic yarn, consider dropping down a hook size for a snugger fit.
- Crochet Hook: Size H/8 (5.0 mm), or the size required to meet gauge.
- Notions: Tapestry needle for weaving in ends, scissors, and a measuring tape.
Gauge & Key Techniques
Gauge Settings
- 13.5 double crochets × 7 rows = 4 inches × 4 inches.
- Tip: Circumference is the most important factor. If your stitch width matches but your height is off, you can easily add or subtract rounds to reach your desired length.
Special Stitches & Terminology (US Terms)
- ch / slst: Chain / Slip stitch
- sc/dc: Single crochet / Double crochet
- fsc: Foundation single crochet
- fpdc (Front Post Double Crochet): Yarn over, insert hook from front to back to front around the post of the indicated stitch below, yarn over, pull up a loop, and finish like a standard double crochet.
- dfpdc (Double Front Post Double Crochet): A variation of the post stitch that adds extra depth. Yarn over twice, insert hook from front to back to front around the post of the indicated stitch, and complete as you would a treble post stitch.
The Invisible Slip Stitch Join: To keep your seam tidy and pulled to the inside: Drop the loop from your hook at the end of the round.
Insert your hook from back to front through the very first stitch of that round. Grab the dropped loop and pull it through to the back of your work. Chain and begin your next round.
Detailed Pattern Instructions
Pattern Notes
- The turning chains at the start of each round do not count as a stitch.
- Always place your first stitch of the round into the same stitch as your starting chain.
- Close every round by slip stitching into the top of the first actual stitch, not the chain.
Step-by-Step Directions
Round 1: Leave a long starting tail for seaming. Work 30 fsc, OR chain 31 and work 1 sc into the second chain from your hook and in each remaining chain across (30 sc). Taking care not to twist the row, form a ring by using the Invisible Slip Stitch Join to connect to the first stitch. (Note: You will have a tiny gap at the base of this round, which you will sew closed at the very end.
Round 2: Ch 1. Work 1 dc into every stitch around. Complete the round using the Invisible Slip Stitch Join. (30 dc)
Round 3: Ch 2. *Work 1 fpdc around the next post, 1 dc in each of the next 2 stitches, 1 dfpdc around the next post, 1 dc in the next stitch.* Repeat from * to * all the way around. Join with an Invisible Slip Stitch. (30 sts)
Round 4: Ch 2. *Work 1 fpdc around the next post, 1 dc in the next stitch, 1 dfpdc around the next post, 1 dc in each of the next 2 stitches.* Repeat from * to * all the way around. Join with an Invisible Slip Stitch. (30 sts)
Texture Alignment Guide: The regular fpdc stitches will always stack directly on top of the fpdc from the previous round. The standard dc stitches will also line up, while the shifting dfpdc creates the diagonal “smoke” texture.
Rounds 5 through 7: Alternating the pattern, repeat Round 3 and Round 4 sequentially. (Measurement Check: Before finishing, your piece should measure roughly 3.25 inches tall. If your tension is tight, you can add an extra repeating row here).
Round 8: Ch 1. Work 1 sc into every stitch around. Join with a standard slip stitch to the first single crochet of the round. (30 sc)
Finishing Touches
- Fasten off your yarn, leaving a short tail.
- Thread your initial starting tail onto a tapestry needle and use it to neatly sew together the small gap left at the base of Round 1.
- Securely weave in all remaining loose ends on the inside of the cozy. Turn it right-side out, slip it onto your favorite pint, and enjoy!
