
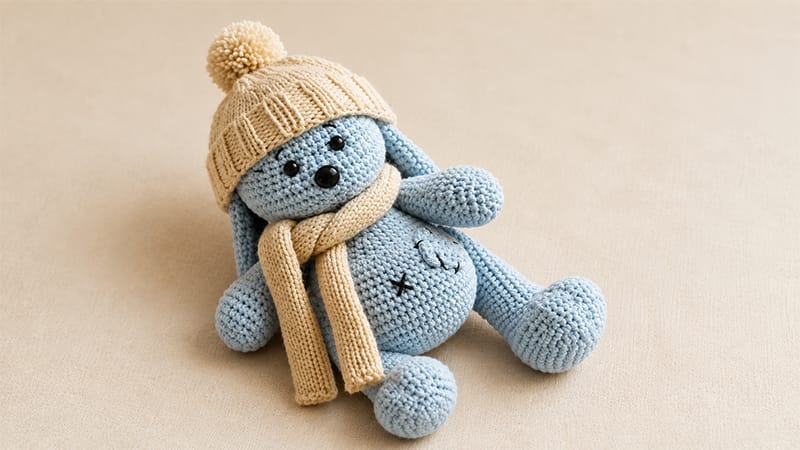
Bring a charming, hand-crafted heirloom to life with this comprehensive amigurumi tutorial!
Perfect for intermediate crafters, this soft bunny features delightful color-blocked paw details, cozy knit accessories, and classic stitched patches that give it a warm, nostalgic character.
This structured approach, created by assembling individual pieces, makes assembling your stuffed companion simple and manageable.
Grab your favorite yarn, warm up your hooks and needles, and settle in for a relaxing crafting journey.
By the time you loop your final stitch, you’ll have a lovable, huggable friend ready to be gifted or kept!
Project Materials & Abbreviations
Required Materials
- Yarn: Cotton/Acrylic Blend (Beige, Pink, Gray, Brown), DK Weight Yellow Yarn, Thin Black Thread
- Tools: 2.0 mm Crochet Hook, 2.5 mm Knitting Needles, Tapestry Needle
- Extras: Fiberfill Stuffing, 5 mm Safety Eyes, 9 mm Triangular Safety Nose
Stitch Key
- MR: Magic Ring
- sc: Single Crochet
- inc: Increase (2 sc in same st)
- dec: Decrease (sc 2 together)
- ch: Chain
- st: Stitch
- FLO / BLO: Front / Back Loop Only
Pattern Instructions
Head
Work with beige yarn. Stuff firmly as you build.
- Rnd 1: 6 sc into MR (6)
- Rnd 2: inc in every st (12)
- Rnd 3: (1 sc, inc) × 6 (18)
- Rnd 4: (2 sc, inc) × 6 (24)
- Rnd 5: (3 sc, inc) × 6 (30)
- Rnd 6: (4 sc, inc) × 6 (36)
- Rnd 7: (5 sc, inc) × 6 (42)
- Rnd 8: (6 sc, inc) × 6 (48)
- Rnd 9: (7 sc, inc) × 6 (54)
- Rnds 10–15: sc in each st around (54)
- Rnd 16: (1 sc, inc) × 10, 34 sc (64)
- Rnds 17–19: sc in each st around (64)
- Rnd 20: (1 dec, 1 sc) × 10, 34 sc (54)
- Rnd 21: (7 sc, dec) × 6 (48)
Placement Note: Position the safety nose centered between Rnds 16 and 17 where the cheek shaping occurs. Attach safety eyes between Rnds 13 and 14, keeping 6 stitches between them.
- Rnd 22: (6 sc, dec) × 6 (42)
- Rnd 23: (5 sc, dec) × 6 (36)
- Rnd 24: (4 sc, dec) × 6 (30)
- Rnd 25: (3 sc, dec) × 6 (24)
Fasten off, secure, and weave in ends.
Body
Work with beige yarn. Stuff thoroughly.
- Rnd 1: 8 sc into MR (8)
- Rnd 2: inc in every st (16)
- Rnd 3: (1 sc, inc) × 8 (24)
- Rnd 4: (2 sc, inc) × 8 (32)
- Rnd 5: (3 sc, inc) × 8 (40)
- Rnd 6: (4 sc, inc) × 8 (48)
- Rnd 7: (5 sc, inc) × 8 (56)
- Rnd 8: (6 sc, inc) × 8 (64)
- Rnd 9: (7 sc, inc) × 8 (72)
- Rnds 10–14: sc in each st around (72)
- Rnd 15: (7 sc, dec) × 8 (64)
- Rnds 16–18: sc in each st around (64)
- Rnd 19: 14 dec, 36 sc (50)
- Rnd 20: 1 dec, 10 sc, 1 dec, 36 sc (48)
- Rnds 21–22: sc in each st around (48)
- Rnd 23: (6 sc, dec) × 6 (42)
- Rnds 24–25: sc in each st around (42)
- Rnd 26: (5 sc, dec) × 6 (36)
- Rnd 27: sc in each st around (36)
- Rnd 28: (4 sc, dec) × 6 (30)
- Rnd 29: sc in each st around (30)
- Rnd 30: (3 sc, dec) × 6 (24)
Fasten off, leaving a long strand for attachment.
Arms (Make 2)
Alternate between Beige (B) and Pink (P) for two-tone paws.
- Rnd 1: (B) 6 sc in MR (6)
- Rnd 2: (B) inc in every st (12)
- Rnd 3: (B) (1 sc, inc) × 6 (18)
- Rnd 4: (B) 2 sc, (P) inc, 2 sc, (B) inc, (2 sc, inc) × 4 (24)
- Rnd 5: (B) 2 sc, (P) 1 sc, inc, 2 sc, (B) 1 sc, inc, (3 sc, inc) × 4 (30)
- Rnds 6–7: (B) 2 sc, (P) 5 sc, (B) 23 sc (30)
- Rnd 8: (B) 2 sc, (P) 1 sc, dec, 2 sc, (B) 1 sc, dec, (3 sc, dec) × 4 (24)
- Rnd 9: (B) 2 sc, (P) 4 sc, (B) 18 sc (24)
- Rnd 10: (B) 2 sc, (P) dec, 2 sc, (B) dec, (2 sc, dec) × 4 (18)
- Rnds 11–14: (B) 18 sc (add 2 extra sc at the end of Rnd 14 to realign the marker) (18)
- Rnd 15: 1 dec, 16 sc (17)
- Rnd 16: 1 dec, 15 sc (16)
- Rnd 17: 1 dec, 14 sc (15)
- Rnd 18: 1 dec, 13 sc (14)
- Rnd 19: 1 dec, 12 sc (13)
- Rnd 20: 1 dec, 11 sc (12)
- Rnd 21: sc in each st around (12)
- Rnd 22: 6 dec (6)
Cinch opening closed and weave in tail.
Legs (Make 2)
Start in Pink, swap to Beige.
- Foundation: Ch 10. Start in 2nd ch from hook.
- Rnd 1: inc, 7 sc, 4 sc in last ch st; rotate to bottom of chain: 7 sc, inc (22)
- Rnd 2: 2 inc, 7 sc, 4 inc, 7 sc, 2 inc (30)
- Rnd 3: 2 sc, 3 sc in next st, 10 sc, (inc, 1 sc) × 3, 9 sc, 3 sc in next st, 1 sc (37)
- Rnd 4: 3 sc, 3 sc in next st, 13 sc, inc, 2 sc, inc, 13 sc, 3 sc in next st, 2 sc (43)
- Rnd 5: 3 sc, (inc, 1 sc) × 2, 14 sc, inc, 14 sc, (1 sc, inc) × 2, 3 sc (48)
Switch to Beige yarn.
- Rnd 6: sc in each st around (48)
- Rnd 7: BLO sc in each st around (48)
- Rnds 8–9: sc in each st around (48)
- Rnd 10: 2 sc, 4 dec, 12 sc, 2 dec, 12 sc, 4 dec, 2 sc (38)
- Rnd 11: 4 dec, 22 sc, 4 dec (30)
- Rnd 12: 3 dec, 18 sc, 3 dec (24)
- Rnd 13: sc in each st around (24)
- Rnd 14: 1 sc, dec, 18 sc, dec, 1 sc (22)
- Rnds 15–24: sc in each st around (22)
- Rnd 25: 9 sc, dec, 9 sc (20)
- Rnd 26: 8 sc, dec, 8 sc (18)
- Rnd 27: (1 sc, dec) × 6 (12)
- Rnd 28: 6 dec (6)
Cinch opening closed and hide yarn end.
Ears (Make 2) & Tail
Work in Beige yarn.
Ears
- Rnd 1: 8 sc in MR (8)
- Rnd 2: inc in every st (16)
- Rnd 3: (1 sc, inc) × 8 (24)
- Rnd 4: (2 sc, inc) × 8 (32)
- Rnd 5: (3 sc, inc) × 8 (40)
- Rnds 6–7: sc in each st around (40)
- Rnd 8: (4 sc, inc) × 8 (48)
- Rnds 9–12: sc in each st around (48)
- Rnd 13: (6 sc, dec) × 6 (42)
- Rnds 14–15: sc in each st around (42)
- Rnd 16: (5 sc, dec) × 6 (36)
- Rnds 17–18: sc in each st around (36)
- Rnd 19: (4 sc, dec) × 6 (30)
- Rnds 20–22: sc in each st around (30)
- Rnd 23: (3 sc, dec) × 6 (24)
- Rnds 24–26: sc in each st around (24)
- Rnd 27: (2 sc, dec) × 6 (18)
- Rnds 28–30: sc in each st around (18)
Press top edges flat together and join with 8 sc across. Cut, leaving a long thread for sewing.
Tail
- Rnd 1: 6 sc in MR (6)
- Rnd 2: 6 inc (12)
- Rnd 3: (1 sc, inc) × 6 (18)
- Rnd 4: (2 sc, inc) × 6 (24)
- Rnds 5–6: sc in each st around (24)
- Rnd 7: (2 sc, dec) × 6 (18)
Stuff lightly and leave a tail for attachment.
Fabric Patches (Make 3)
Work flat in rows using gray yarn.
- Row 1: Chain 6. Starting in 2nd ch, work 5 sc, ch 1, turn (5)
- Rows 2–5: 5 sc, ch 1, turn (5)
- Border: Single crochet around all four sides, working (2 sc) into corner stitches for crisp edges. Leave a long end for sewing.
Accessories
Scarf
Crochet flat using yellow yarn.
- Chain 12 stitches.
- Row 1: Slip the first stitch onto your hook without working it, then crochet across.
- Repeat this edge technique for 165 total rows (or adjust until desired wrap length is reached).
Knitted Beanie
Worked on 2.5 mm knitting needles.
- Cast on 60 stitches.
- Rows 1–10: Work in a 2×2 ribbing pattern (K2, P2).
- Rows 11–15: Work in stockinette stitch (Knit RS, Purl WS).
- Row 16: (K2tog, K13) × 4 (56)
- Row 17: (K2tog, K12) × 4 (52)
- Row 18: Purl across (52)
- Row 19: (K2tog, K11) × 4 (48)
- Rows 20–21: Work stockinette (48)
- Row 22: (K2tog, K10) × 4 (44)
- Row 23: Purl across (44)
- Row 24: (K2tog, K9) × 4 (40)
- Row 25: (K2tog, K8) × 4 (36)
- Row 26: K2tog, K5, K2tog (26)
- Row 27: K2tog, K1, K2tog (18)
Thread yarn through remaining stitches, pull tight to close top. Attach a fluffy yarn pom-pom to the peak, pulling ends inside to secure.
Final Assembly & Details
- Head & Ears: Attach head securely to the torso, aligning center curves. Position ears onto the back of the head over Rows 9–10, spaced roughly 7 stitches apart.
- Limb Attachment: Connect arms and legs using a thread-jointing technique (passing yarn completely through the torso from side to side) so the limbs lie flush and remain movable.
- Paw Sculpting:
- Paws: Wrap heavy thread tightly over the pink palm sections around Row 4 to pull three distinct finger indents; repeat twice for strength.
- Feet: Draw thread between Row 3 and Row 9 three times across the toes to sculpt four defined foot digits.
- Embellishments:
- Stitch gray patches onto the belly, top of head, and back of one ear. Use black thread to embroider decorative outer hatch lines around each patch.
- Embroider delicate eyebrows and a tiny mouth line using black thread.
- Cross-stitch a small brown “X” between Rows 13–15 on the lower tummy for a belly button.
- Stitch the tail centrally onto the lower back spanning Rows 7–12.
