
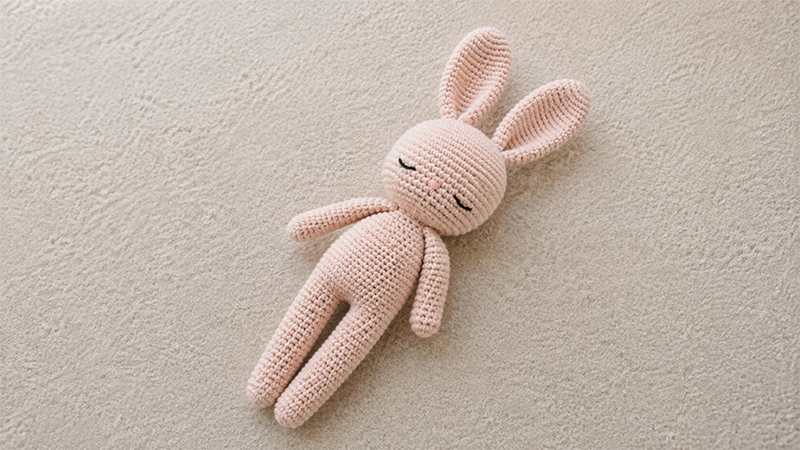
The adorable Pinky Bunny is a fun and beginner-friendly crochet project that makes a lovely handmade companion for children.
With its soft shape, cute floppy ears, and cuddly design, this bunny is perfect as a comforting bedtime friend, nursery decoration, or thoughtful baby shower gift.
This pattern uses basic crochet stitches and simple shaping, making it easy to follow even if you are relatively new to amigurumi.
You can customize your bunny with soft pastel shades, classic white, or cheerful bright colors to create a unique handmade toy.
Follow the instructions below to crochet each piece and assemble your own charming Pinky Bunny.
Materials & Crochet Abbreviations
Abbreviations
- MR: Magic Ring
- sc: Single Crochet
- inc: Increase — crochet two single crochets into the same stitch
- dec: Decrease — crochet two stitches together
- ch: Chain
- (…) × n: Repeat the instructions inside the parentheses the indicated number of times
Step-by-Step Pinky Bunny Crochet Pattern
1. Head
Crochet the head in continuous rounds without joining at the end of each round. Use a stitch marker to identify the beginning of each round and help maintain accurate stitch counts.
- Round 1: Crochet 6 sc into a Magic Ring (6)
- Round 2: (inc) × 6 (12)
- Round 3: (1 sc, 1 inc) × 6 (18)
- Round 4: (2 sc, 1 inc) × 6 (24)
- Round 5: (3 sc, 1 inc) × 6 (30)
- Round 6: (4 sc, 1 inc) × 6 (36)
- Round 7: (5 sc, 1 inc) × 6 (42)
- Round 8: (6 sc, 1 inc) × 6 (48)
- Round 9: (7 sc, 1 inc) × 6 (54)
- Rounds 10–18: 54 sc around (54)
- Round 19: (7 sc, 1 dec) × 6 (48)
- Round 20: (6 sc, 1 dec) × 6 (42)
- Round 21: (5 sc, 1 dec) × 6 (36)
- Round 22: (4 sc, 1 dec) × 6 (30)
- Round 23: (3 sc, 1 dec) × 6 (24)
- Round 24: (2 sc, 1 dec) × 6 (18)
Fasten off and leave a long yarn tail. This tail will be used to sew the completed head securely to the body.
2. Legs — Make 2
Crochet two identical legs using the following instructions:
- Round 1: Crochet 6 sc into a Magic Ring (6)
- Round 2: (inc) × 6 (12)
- Round 3: (3 sc, 1 inc) × 3 (15)
- Rounds 4–24: 15 sc around (15)
Assembly tip: When finishing the first leg, fasten off and secure the yarn. For the second leg, keep the yarn attached.
The remaining working yarn will be used to connect the two legs and continue directly into the body.
Create a 3-chain bridge between the legs to join them before beginning the body rounds.
3. Body
Once the two legs have been joined, continue crocheting around the connected leg structure.
- Rounds 1–15: 36 sc around the joined legs (36)
- Round 16: (7 sc, 1 dec) × 4 (32)
- Round 17: 3 sc, 1 dec, (6 sc, 1 dec) × 3, 3 sc (28)
- Round 18: (5 sc, 1 dec) × 4 (24)
- Round 19: 2 sc, 1 dec, (4 sc, 1 dec) × 3, 2 sc (20)
- Round 20: (8 sc, 1 dec) × 2 (18)
Fasten off and leave a short yarn tail. Weave the remaining end securely inside the body.
4. Arms — Make 2
Make two matching arms following these instructions:
- Round 1: Crochet 6 sc into a Magic Ring (6)
- Round 2: (inc) × 6 (12)
- Rounds 3–15: 12 sc around (12)
To finish each arm, flatten the opening so the two sides line up evenly. Crochet through both layers across all 6 stitches using sc to close the top securely.
Leave enough yarn for attaching the arms to the body if needed.
5. Ears — Make 2
The long ears give Pinky Bunny its signature cute and cuddly appearance. Crochet two identical ears as follows:
- Round 1: Crochet 6 sc into a Magic Ring (6)
- Round 2: (1 sc, 1 inc) × 3 (9)
- Round 3: (2 sc, 1 inc) × 3 (12)
- Round 4: (3 sc, 1 inc) × 3 (15)
- Round 5: (4 sc, 1 inc) × 3 (18)
- Rounds 6–20: 18 sc around (18)
Fasten off and leave a long yarn tail. Use the tail to sew each ear firmly to the upper sides of the head.
Finishing Your Pinky Bunny
After crocheting all the individual pieces, carefully position the head, arms, and ears before sewing them permanently into place.
Take your time with the placement to achieve a balanced and symmetrical appearance.
Once everything is securely attached, weave in any remaining yarn ends. You can personalize your finished bunny with your preferred colors and additional details to create a one-of-a-kind handmade companion.
This ** Pinky Bunny amigurumi crochet pattern** is a sweet project for beginners and experienced crocheters alike. It is quick to customize, enjoyable to make, and perfect for gifting to someone special.
