
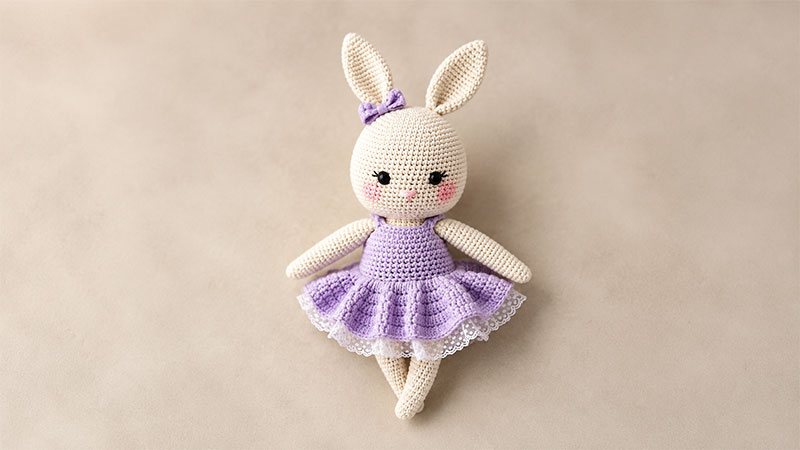
Bring a little handmade charm to your crochet collection with this adorable Mrs. Cute Crochet Bunny Amigurumi!
This sweet bunny features soft floppy ears, rosy cheeks, a pretty ruffled dress, and a tiny bow tucked onto one ear.
Her cute expression and charming outfit make her a wonderful handmade gift, nursery decoration, or cuddly addition to an amigurumi collection.
This free crochet bunny pattern walks you through making each part separately, including the head, cheeks, legs, body, ears, arms, bow, and dress.
Once the individual pieces are completed, they can be assembled into one lovable little bunny.
Choose your favorite yarn colors and get your crochet hook ready—Mrs. Cute is waiting to come to life!
Materials You’ll Need
Before starting, gather the following supplies:
- Yarn in your preferred main color for the bunny
- Contrasting yarn for the underpants or dress
- Accent-colored yarn for decorative details
- Crochet hook appropriate for your yarn weight
- 3.00 mm crochet hook for the dress
- Safety eyes
- Polyester fiberfill stuffing
- Tapestry needle
- Scissors
- Stitch markers
Crochet Abbreviations
- sc: Single crochet
- inc: Increase
- dec: Decrease
- tr: Treble/triple crochet
- TRinc: Two treble crochets worked into the same stitch
- dc: Double crochet
- hdc: Half double crochet
- sl-st: Slip stitch
- ch: Chain
- st/sts: Stitch/stitches
- FLO: Front loop only
- BLO: Back loop only
- BL (Bobble Stitch): Yarn over, insert the hook into the stitch, pull up a loop, yarn over and pull through 2 loops. Repeat in the same stitch until 5 loops are on the hook, then yarn over and pull through all 5 loops together.
Mrs. Cute Bunny Crochet Pattern
1. Crochet the Head
Begin by crocheting the bunny’s head in the main yarn color.
- Round 1: Make a magic ring and crochet 6 sc into it. (6 sts)
- Round 2: Inc in each stitch around. (12 sts)
- Round 3: Repeat (1 sc, inc) 6 times. (18 sts)
- Round 4: Repeat (2 sc, inc) 6 times. (24 sts)
- Round 5: Repeat (3 sc, inc) 6 times. (30 sts)
- Round 6: Repeat (4 sc, inc) 6 times. (36 sts)
- Round 7: Repeat (5 sc, inc) 6 times. (42 sts)
- Round 8: Repeat (6 sc, inc) 6 times. (48 sts)
- Round 9: Sc evenly around. (48 sts)
- Round 10: Repeat (7 sc, inc) 6 times. (54 sts)
- Round 11: Repeat (8 sc, inc) 6 times. (60 sts)
- Rounds 12–18: Sc evenly around for 7 rounds. (60 sts)
- Round 19: Repeat (9 sc, inc) 6 times. (66 sts)
- Rounds 20–24: Sc evenly around for 5 rounds. (66 sts)
- Round 25: Repeat (10 sc, inc) 6 times. (72 sts)
- Round 26: Sc evenly around. (72 sts)
- Round 27: Repeat (10 sc, dec) 6 times. (66 sts)
- Round 28: Repeat (9 sc, dec) 6 times. (60 sts)
- Round 29: Repeat (8 sc, dec) 6 times. (54 sts)
- Round 30: Repeat (7 sc, dec) 6 times. (48 sts)
- Round 31: Work 24 decreases around. (24 sts)
Fasten off and leave a long yarn tail for sewing.
Place the safety eyes between Rounds 21 and 22, leaving approximately 10 stitches between them. Embroider the bunny’s nose centered between the eyes, covering approximately 3 stitches.
2. Make the Cheeks
Make 2 cheeks using your chosen accent yarn.
- Round 1: Make a magic ring and crochet 4 sc into it. (4 sts)
- Round 2: Inc in every stitch around. (8 sts)
- Round 3: Repeat (1 sc, inc) 4 times. (12 sts)
- Round 4: Repeat (2 sc, inc) 4 times. (16 sts)
Fasten off and leave a long tail for sewing. Attach the cheeks to the head between Rounds 24 and 29. Alternatively, you can add a little craft blush for a softer rosy-cheeked look.
3. Crochet the Legs
Make 2 legs.
- Round 1: Make a magic ring and crochet 6 sc. (6 sts)
- Round 2: Repeat (2 sc, inc) 2 times. (8 sts)
- Round 3: Repeat (3 sc, inc) 2 times. (10 sts)
- Round 4: Sc evenly around. (10 sts)
- Round 5: Repeat (4 sc, inc) 2 times. (12 sts)
- Rounds 6–7: Sc evenly around. (12 sts)
- Round 8: Repeat (5 sc, inc) 2 times. (14 sts)
- Rounds 9–10: Sc evenly around. (14 sts)
- Round 11: Repeat (6 sc, inc) 2 times. (16 sts)
- Rounds 12–13: Sc evenly around. (16 sts)
- Round 14: Repeat (7 sc, inc) 2 times. (18 sts)
- Rounds 15–16: Sc evenly around. (18 sts)
- Round 17: Repeat (8 sc, inc) 2 times. (20 sts)
- Rounds 18–19: Sc evenly around. (20 sts)
- Round 20: Repeat (9 sc, inc) 2 times. (22 sts)
- Rounds 21–22: Sc evenly around. (22 sts)
- Round 23: Repeat (10 sc, inc) 2 times. (24 sts)
- Rounds 24–27: Sc evenly around for 4 rounds. (24 sts)
Stuff each leg firmly as you crochet.
After finishing the second leg, do not fasten off. Continue directly into joining the legs and forming the body. You can change yarn colors at this point if you want to create the bunny’s underpants.
4. Join the Legs and Crochet the Body
Joining the Legs
- Round 1: Ch 2 and join to the first leg. Crochet 24 sc around the first leg, 2 sc across the chain bridge, 24 sc around the second leg, then 2 sc along the opposite side of the chain. (52 sts)
Continue shaping the body:
- Round 2: Repeat (12 sc, inc) 4 times. (56 sts)
- Rounds 3–10: Sc evenly around. (56 sts)
- Round 11: Repeat (12 sc, dec) 4 times. (52 sts)
- Rounds 12–15: Sc evenly around. (52 sts)
- Round 16: Repeat (11 sc, dec) 4 times. (48 sts)
- Rounds 17–18: Sc evenly around. (48 sts)
- Round 19: Repeat (10 sc, dec) 4 times. (44 sts)
- Round 20: Sc evenly around. (44 sts)
- Round 21: Repeat (9 sc, dec) 4 times. (40 sts)
- Round 22: Repeat (8 sc, dec) 4 times. (36 sts)
- Round 23: Sc evenly around. (36 sts)
- Round 24: Repeat (7 sc, dec) 4 times. (32 sts)
- Round 25: Repeat (6 sc, dec) 4 times. (28 sts)
- Round 26: Repeat (5 sc, dec) 4 times. (24 sts)
- Round 27: Sc evenly around. (24 sts)
Fasten off and leave a long yarn tail for attaching the head.
5. Make the Bunny Ears
Make 2 ears.
- Round 1: Make a magic ring and crochet 6 sc. (6 sts)
- Round 2: Repeat (1 sc, inc) 3 times. (9 sts)
- Round 3: Repeat (2 sc, inc) 3 times. (12 sts)
- Round 4: Sc evenly around. (12 sts)
- Round 5: Repeat (3 sc, inc) 3 times. (15 sts)
- Round 6: Sc evenly around. (15 sts)
- Round 7: Repeat (4 sc, inc) 3 times. (18 sts)
- Round 8: Sc evenly around. (18 sts)
- Round 9: Repeat (5 sc, inc) 3 times. (21 sts)
- Round 10: Repeat (6 sc, inc) 3 times. (24 sts)
- Rounds 11–16: Sc evenly around for 6 rounds. (24 sts)
- Round 17: Repeat (6 sc, dec) 3 times. (21 sts)
- Round 18: Repeat (5 sc, dec) 3 times. (18 sts)
- Round 19: Repeat (4 sc, dec) 3 times. (15 sts)
- Round 20: Repeat (3 sc, dec) 3 times. (12 sts)
Do not stuff the ears. Fasten off and leave a long tail for sewing. Position the ears on the head around Rounds 5–6 and sew them securely in place.
6. Crochet the Arms
Make 2 arms.
- Round 1: Make a magic ring and crochet 6 sc. (6 sts)
- Round 2: Sc evenly around. (6 sts)
- Round 3: Repeat (1 sc, inc) 3 times. (9 sts)
- Round 4: Sc evenly around. (9 sts)
- Round 5: Repeat (2 sc, inc) 3 times. (12 sts)
- Rounds 6–8: Sc evenly around. (12 sts)
- Round 9: Repeat (3 sc, inc) 3 times. (15 sts)
- Rounds 10–12: Sc evenly around. (15 sts)
- Round 13: Repeat (4 sc, inc) 3 times. (18 sts)
- Rounds 14–23: Sc evenly around for 10 rounds. (18 sts)
- Round 24: Repeat (4 sc, dec) 3 times. (15 sts)
- Round 25: Sc evenly around. (15 sts)
- Round 26: Repeat (3 sc, dec) 3 times. (12 sts)
- Round 27: Sc evenly around. (12 sts)
Lightly stuff the arms. Fasten off and leave a long yarn tail. Sew the arms onto the body around Round 26.
7. Make the Cute Bow
The little bow adds the perfect finishing touch to Mrs. Cute’s ear.
- Step 1: Ch 5. Working into the 5th chain from the hook, crochet 5 dc and finish with a slip stitch.
- Step 2: Ch 4.
- Step 3: Work another 5 dc into the same starting chain space and finish with a slip stitch.
Secure the yarn, fasten off, and weave in the loose ends. Sew or attach the bow to one of the bunny’s ears.
8. Crochet the Dress
For the dress, switch to a 3.00 mm crochet hook. At the end of each round, join with a slip stitch.
- Round 1: Ch 36 and join with a sl-st into the first chain to form a ring. (36 sts)
- Round 2: Sc evenly around. (36 sts)
- Round 3: Crochet 5 sc, ch 7 while skipping the next 7 sc for the first armhole, crochet 12 sc, ch 7 while skipping the next 7 sc for the second armhole, then crochet 5 sc. (36 sts)
- Rounds 4–7: Sc evenly around. (36 sts)
- Round 8: 7 sc, inc, 20 sc, inc, 7 sc. (38 sts)
- Round 9: Sc evenly around. (38 sts)
- Round 10: 7 sc, 2 inc, 20 sc, 2 inc, 7 sc. (42 sts)
- Round 11: Sc evenly around. (42 sts)
- Round 12: 9 sc, 2 inc, 20 sc, 2 inc, 9 sc. (46 sts)
- Rounds 13–14: Sc evenly around. (46 sts)
- Round 15: Ch 2, then work 1 dc into the same stitch. Continue with 2 dc in every stitch around. (92 sts)
- Round 16: Repeat (1 dc, dc inc) around. (138 sts)
- Round 17: Repeat (2 dc, dc inc) around. (184 sts)
- Round 18: Repeat (3 dc, dc inc) around. (230 sts)
- Round 19: Dc evenly around. (230 sts)
- Round 20: Change to white yarn. Ch 3, work 1 sc into the same stitch, 1 sc into the next stitch, then ch 3 and work 1 sc into the same stitch to create the decorative edging.
Fasten off and carefully weave in all remaining yarn ends.
Finishing Mrs. Cute Crochet Bunny
Once all the pieces are complete, carefully sew the head onto the body and attach the arms and ears securely.
Position the cheeks evenly, add the bow to one ear, and dress your bunny in her pretty crocheted outfit.
Take a moment to check that all embroidered details and safety eyes are firmly secured before gifting the finished bunny.
Your adorable Mrs. Cute Crochet Bunny Amigurumi is now ready for cuddles, display, or gifting!
Final Thoughts
This charming crochet bunny is a fun project for anyone who enjoys creating cute handmade amigurumi.
Her floppy ears, sweet cheeks, pretty dress, and tiny bow give her plenty of personality, while the detailed construction lets you practice a variety of basic crochet techniques.
Experiment with different yarn colors to create your own unique version of Mrs. Cute. Try soft pastels for a classic nursery look, bright colors for a playful design, or seasonal shades for a festive bunny.
Most importantly, enjoy every stitch and have fun bringing your handmade bunny to life!
