
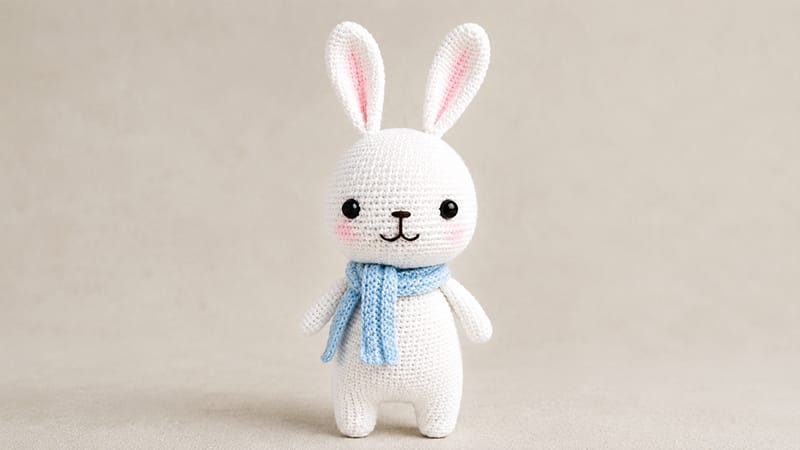
Welcome to the world of crochet amigurumi! If you’re looking for a sweet and beginner-friendly project, this adorable white bunny is a wonderful choice.
This charming crochet bunny features a simple body shape, long floppy ears, and a cute contrasting scarf for a touch of personality.
The pattern uses mostly white yarn and straightforward crochet techniques, making it a fun project for both beginners and experienced crocheters.
With its soft, cuddly appearance and simple construction, this bunny can make a lovely handmade gift, nursery decoration, or special keepsake.
Pattern Abbreviations
- sc: Single crochet
- inc: Increase — 2 sc in one stitch
- dec: Decrease — invisible or standard single crochet decrease
- hdc: Half double crochet
- ch: Chain
- st/sts: Stitch/stitches
- MR: Magic Ring
- BLO: Back Loop Only
1. Legs — Make 2
Begin by crocheting two matching legs with white yarn.
Round 1: Make 6 sc into a Magic Ring. (6)
Round 2: Increase in every stitch around. (12)
Round 3: Repeat (1 sc, 1 inc) 6 times. (18)
Fasten off the first leg.
For the second leg, do not fasten off. Chain 9 and connect it to the first leg. Work 9 sc across the chain, 18 sc around the first leg, then work 9 sc along the opposite side of the chain and 18 sc around the second leg. (54)
2. Body
Continue working upward from the joined legs to create the bunny’s body.
Rounds 1–27: Sc in every stitch around for 27 rounds. (54)
Round 28: Repeat (7 sc, 1 dec) 6 times. (48)
Round 29: Repeat (6 sc, 1 dec) 6 times. (42)
Round 30: Repeat (5 sc, 1 dec) 6 times. (36)
Round 31: Repeat (4 sc, 1 dec) 6 times. (30)
Round 32: Repeat (3 sc, 1 dec) 6 times. (24)
Round 33: Repeat (2 sc, 1 dec) 6 times. (18)
Fasten off, leaving a long yarn tail for attaching the body to the head.
3. Head
The head is crocheted separately, beginning with increases to create a rounded shape before gradually decreasing.
Round 1: 6 sc into a Magic Ring. (6)
Round 2: 6 inc. (12)
Round 3: Repeat (1 sc, 1 inc) 6 times. (18)
Round 4: Repeat (2 sc, 1 inc) 6 times. (24)
Round 5: Repeat (3 sc, 1 inc) 6 times. (30)
Round 6: Repeat (4 sc, 1 inc) 6 times. (36)
Round 7: Repeat (5 sc, 1 inc) 6 times. (42)
Round 8: Repeat (6 sc, 1 inc) 6 times. (48)
Round 9: Repeat (7 sc, 1 inc) 6 times. (54)
Round 10: Repeat (8 sc, 1 inc) 6 times. (60)
Round 11: Repeat (9 sc, 1 inc) 6 times. (66)
Round 12: Repeat (10 sc, 1 inc) 6 times. (72)
Round 13: Repeat (11 sc, 1 inc) 6 times. (78)
Rounds 14–22: Sc around for 9 rounds. (78)
Round 23: Repeat (12 sc, 1 inc) 6 times. (84)
Round 24: Repeat (13 sc, 1 inc) 6 times. (90)
Round 25: Repeat (14 sc, 1 inc) 6 times. (96)
Round 26: Sc around. (96)
Now begin shaping the head with decreases:
Round 27: Repeat (14 sc, 1 dec) 6 times. (90)
Round 28: Repeat (13 sc, 1 dec) 6 times. (84)
Round 29: Repeat (12 sc, 1 dec) 6 times. (78)
Round 30: Repeat (11 sc, 1 dec) 6 times. (72)
Round 31: Repeat (10 sc, 1 dec) 6 times. (66)
Round 32: Repeat (9 sc, 1 dec) 6 times. (60)
Round 33: Repeat (8 sc, 1 dec) 6 times. (54)
Round 34: Repeat (7 sc, 1 dec) 6 times. (48)
Round 35: Repeat (6 sc, 1 dec) 6 times. (42)
Round 36: Repeat (5 sc, 1 dec) 6 times. (36)
Round 37: Repeat (4 sc, 1 dec) 6 times. (30)
Round 38: Repeat (3 sc, 1 dec) 6 times. (24)
Round 39: Repeat (2 sc, 1 dec) 6 times. (18)
Fasten off and securely weave in the yarn end.
4. Ears — Make 2
These long ears give the bunny its cute, floppy appearance.
Round 1: Make 6 sc into a Magic Ring. (6)
Round 2: 6 inc. (12)
Round 3: Repeat (1 sc, 1 inc) 6 times. (18)
Round 4: Repeat (2 sc, 1 inc) 6 times. (24)
Rounds 5–10: Sc around for 6 rounds. (24)
Round 11: Repeat (10 sc, 1 dec) 2 times. (22)
Rounds 12–14: Sc around for 3 rounds. (22)
Round 15: Repeat (9 sc, 1 dec) 2 times. (20)
Rounds 16–17: Sc around for 2 rounds. (20)
Round 18: Repeat (8 sc, 1 dec) 2 times. (18)
Rounds 19–20: Sc around for 2 rounds. (18)
Round 21: Repeat (7 sc, 1 dec) 2 times. (16)
Rounds 22–23: Sc around for 2 rounds. (16)
Round 24: Repeat (6 sc, 1 dec) 2 times. (14)
Round 25: Sc around. (14)
Fasten off and leave a long tail for sewing the ears onto the head.
5. Hands — Make 2
Crochet two simple tube-shaped arms for the bunny.
Round 1: Make 6 sc into a Magic Ring. (6)
Round 2: 6 inc. (12)
Rounds 3–19: Sc around for 17 rounds. (12)
Fasten off and leave a yarn tail for attaching the hands to the body.
6. Scarf
Finish your bunny with a colorful handmade scarf. Choose any contrasting yarn color that complements the white body.
Step 1: Chain 87.
Step 2: Working in the Back Loop Only (BLO), crochet in the opposite direction. Starting in the third chain from the hook, work hdc across to the final stitch. (85)
Rows 3–4: Continue working in the BLO and make 85 hdc across each row. (85)
Fasten off and neatly weave in the loose ends.
Assembly
Once all the individual pieces are finished, it’s time to bring your bunny together.
- Firmly stuff the head, body, legs, and hands with polyester fiberfill.
- Center the head over the top of the body and sew it securely in place.
- Position both ears evenly on top of the head and stitch them firmly.
- Attach the hands to the sides of the upper body.
- Wrap the colorful scarf around the bunny’s neck.
- Secure the scarf with a small knot or a few discreet stitches.
Your adorable white crochet bunny is now complete! Its simple shape, floppy ears, and colorful scarf make it a charming handmade project for gifting, decorating a nursery, or adding to your amigurumi collection.
