
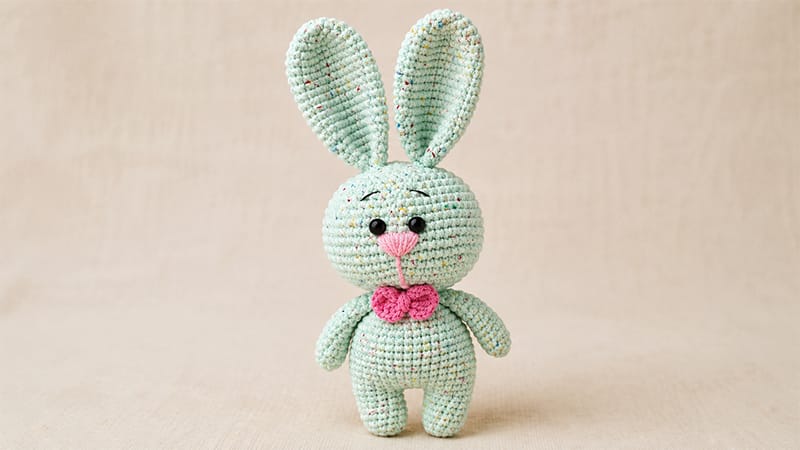
Crochet projects bring a unique charm, and this adorable 17 cm amigurumi bunny is a delight to make.
Designed for simplicity and maximum cuteness, it features a seamless body-to-head construction that cuts down on sewing time.
The finished plushie makes an excellent handmade gift, nursery accent, or cozy shelf decoration.
Because of its approachable size and straightforward stitches, beginner crafters can jump right into this project with confidence.
Grab your favorite cotton yarn, set up a comfortable workspace, and follow the step-by-step instructions below to bring your very own sweet bunny to life!
Materials & Tools
- Yarn: Sport weight yarn (e.g., beige/white for the body, accent color for the bow, pink for the nose)
- Crochet Hook: 2.0 mm
- Safety Eyes: 6 mm
- Stuffing: Fiberfill / Toy filling
- Notions: Tapestry needle, sewing pins, stitch marker, embroidery thread
Stitch Guide & Abbreviations
- MR: Magic Ring
- st / sts: Stitch / Stitches
- sc: Single Crochet
- inc: Increase (2 sc in the same stitch)
- dec: Decrease (sc 2 stitches together)
- dc: Double Crochet
- tr: Treble / Triple Crochet
- sl st: Slip Stitch
- ch: Chain
Pattern Instructions
1. Arms (Make 2)
Note: Work in continuous spirals without joining.
- R1: Work 5 sc into a MR (5)
- R2: [inc] in each st around (10)
- R3–R11: 1 sc in each st around (10) (9 rounds total)
- R12: [3 sc, dec] 2 times (8)
Finishing: Do not stuff. Press the top edges flat and work 3 sc across both sides to seal the opening. Fasten off and weave in the yarn end inside the arm using a needle.
2. Ears (Make 2)
- R1: Work 6 sc into a MR (6)
- R2: [inc] in each st around (12)
- R3: [1 sc, inc] 6 times (18)
- R4: [2 sc, inc] 6 times (24)
- R5–R14: 1 sc in each st around (24) (10 rounds total)
- R15: [10 sc, dec] 2 times (22)
- R16: [9 sc, dec] 2 times (20)
- R17: [8 sc, dec] 2 times (18)
- R18: [7 sc, dec] 2 times (16)
- R19: [6 sc, dec] 2 times (14)
Finishing: Fasten off, leaving a long thread for assembly. Pinch the base of the ear flat and stitch the bottom edge closed before attaching to the head later.
3. Legs & Body
(Legs are created separately and then joined to form the torso.)
First Leg:
- R1: Work 6 sc into a MR (6)
- R2: [inc] in each st around (12)
- R3–R8: 1 sc in each st around (12) (6 rounds total)
- Finish: Sl st into the next st, cut yarn, and stuff firmly.
Second Leg & Joining:
- Repeat R1–R8 as above, but do not cut the yarn.
- Ch 3, then sc directly into the first leg to connect them.
Body Assembly:
- R1: Work around both legs and the connecting chains: [4 sc, inc] 6 times (36)
- R2–R11: 1 sc in each st around (36). Tail Detail: On R5, center a 5-dc popcorn stitch at the back of the body to form a fluffy tail.
- R12: [4 sc, dec] 6 times (30)
- R13: [3 sc, dec] 6 times (24) (Begin stuffing the body)
- R14: [2 sc, dec] 6 times (18)
- R15: 1 sc in each st around (18) (Attach arms on opposite sides during this round using sc)
- R16: [1 sc, dec] 6 times (12) (Add remaining fiberfill)
Do not break yarn. Continue directly into the head.
4. Head
- R17: [1 sc, inc] 6 times (18)
- R18: [2 sc, inc] 6 times (24)
- R19: [3 sc, inc] 6 times (30)
- R20: [4 sc, inc] 6 times (36)
- R21: [5 sc, inc] 6 times (42)
- R22: [6 sc, inc] 6 times (48)
- R23: [7 sc, inc] 6 times (54)
- R24–R30: 1 sc in each st around (54) (7 rounds total)
- R31: [7 sc, dec] 6 times (48)
- R32: [6 sc, dec] 6 times (42)
Safety Eye Placement: Place 6 mm safety eyes between R29 and R30, spaced approximately 5 stitches apart.
- R33: [5 sc, dec] 6 times (36)
- R34: [4 sc, dec] 6 times (30) (Stuff the head firmly)
- R35: [3 sc, dec] 6 times (24)
- R36: [2 sc, dec] 6 times (18)
- R37: [1 sc, dec] 6 times (12) (Add final bits of stuffing)
- R38: [dec] 6 times (6)
Finishing: Cut yarn, draw the tail through the remaining front loops, pull tight to close the crown, and weave in the end.
5. Bow Accessory
- In a Magic Ring, work: (ch 3, 6 tr, ch 3, sl st) twice, then ch 1.
- Fasten off with a long tail.
- Wrap the central tail around the center of the bow several times to form the knot.
- Tie around the bunny’s neck, secure firmly, and weave the extra thread into the body.
Assembly & Finishing Touches
- Facial Features: Using pink yarn, stitch a small triangular nose centered between the eyes. Use white yarn to add white accents to the outer edges of the eyes, and brown/black thread for subtle eyebrows.
- Ears: Pin the ears symmetrically onto the top of the head near R31–R33 and sew securely.
- Optional Detail: Apply a touch of dry pastel or soft blush onto the cheeks for a sweet rosy effect.
