
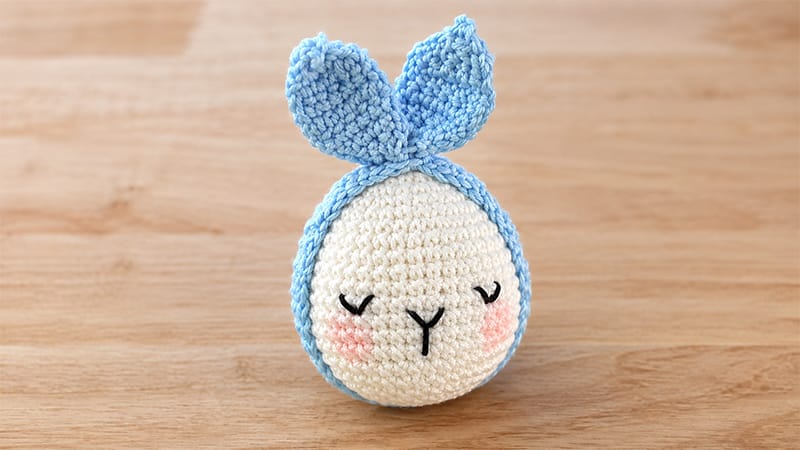
Celebrate the seasonal holidays with handcrafted charm by crocheting adorable Bunny Eggs.
This delightful amigurumi project seamlessly bridges Easter festivities and cozy Christmas decor, serving as a versatile ornament, baby shower gift, or festive table centerpiece.
Simple shapes and basic stitches make this beginner-friendly craft exceptionally fast to assemble.
Using custom colors, you can easily personalize an entire festive family of long-eared holiday eggs.
Materials Needed
- Cotton blend DK yarn (Main body, contrasting bow/headband color, black embroidery thread)
- 2.0 mm to 2.25 mm crochet hook
- Polyester fiberfill stuffing
- Yarn needle and scissors
Stitch Glossary
- MR: Magic Ring
- ch: Chain
- sc: Single Crochet
- hdc: Half Double Crochet
- inc: Increase (2 stitches into same stitch)
- dec: Decrease (Invisible decrease over 2 stitches)
- BLO: Back Loop Only
Egg Body
Work in continuous spirals without joining.
- Round 1: 6 sc into MR (6)
- Round 2: 6 inc (12)
- Round 3: (1 inc, 1 sc) × 6 (18)
- Round 4: (1 inc, 2 sc) × 6 (24)
- Round 5: 24 sc across (24)
- Round 6: (1 inc, 3 sc) × 6 (30)
- Round 7: 30 sc across (30)
- Round 8: (1 inc, 4 sc) × 6 (36)
- Round 9: 36 sc across (36)
- Round 10: (1 inc, 5 sc) × 6 (42)
- Rounds 11–17: 42 sc across (42)
- Round 18: (1 dec, 5 sc) × 6 (36)
- Round 19: (1 dec, 4 sc) × 6 (30)
- Round 20: (1 dec, 3 sc) × 6 (24)
- Round 21: (1 dec, 2 sc) × 6 (18) (Note: Ensure total count equals 18)
Firmly stuff the egg body with fiberfill.
- Round 22: (1 dec, 1 sc) × 6 (12)
- Round 23: 6 dec (6)
Fasten off, weave yarn through front loops, pull tight to close, and hide tail.
Headband
- Foundation: Chain 4. Begin working in the 3rd chain from the hook.
- Row 1: 2 hdc, turn (2)
- Rows 2–26: Working in BLO, ch 2, 2 hdc, turn (2)
Fasten off, leaving a long tail. Stitch short ends together to form a loop fit for the egg top.
Bow
Foundation: Chain 2. Work in 2nd chain from hook.
- Row 1: 1 inc, turn (2)
- Row 2: Ch 1, 2 inc, turn (4)
- Row 3: Ch 1, 1 inc, 2 sc, 1 inc, turn (6)
- Rows 4–6: Ch 1, 6 sc, turn (6)
- Row 7: Ch 1, 1 dec, 2 sc, 1 dec, turn (4)
- Row 8: Ch 1, 2 dec, turn (2)
- Row 9: Ch 1, 1 dec, turn (1)
- Row 10: Ch 1, 1 inc, turn (2)
- Row 11: Ch 1, 2 inc, turn (4)
- Row 12: Ch 1, 1 inc, 2 sc, 1 inc, turn (6)
- Rows 13–15: Ch 1, 6 sc, turn (6)
- Row 16: Ch 1, 1 dec, 2 sc, 1 dec, turn (4)
- Row 17: Ch 1, 2 dec, turn (2)
- Row 18: Ch 1, 1 dec (1)
Fasten off. Pinch middle section and wrap thread tightly to shape bow center.
Assembly & Embroidery
- Stitch delicate facial features onto the egg front: place eyes across rounds 13–14, and embroider a small nose spanning rounds 13–16.
- Securely sew the completed bow onto the seam of the headband band.
- Slide the headband snugly over the top of the egg body.
