
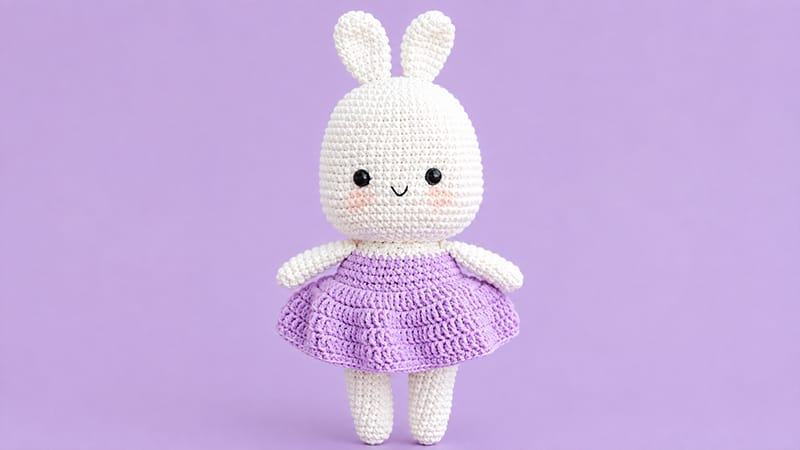
Meet Nina, an adorable amigurumi bunny crafted with soft, fiber-filled yarn to bring warmth and charm to any handmade collection.
Styled with a sweet, flared dress and delicate embroidered facial details, this plush bunny combines classic craft techniques with cute design elements.
Her legs and torso form a seamless base, topped by a textured skirt and gently curved ears that highlight her cheerful expression.
Perfect as a cozy nursery keepsake or a thoughtful gift, Nina offers a rewarding project for crocheters looking to build their technique while crafting a charming handmade heirloom.
Materials & Tools
- Yarn: Sport weight yarn (YarnArt Jeans or similar) in cream/off-white (body) and pink (dress)
- Hook: 2.0 mm crochet hook
- Safety Eyes: 8 mm black safety eyes (1 pair)
- Embroidery: Black thread for facial details
- Notions: Fiberfill stuffing, stitch marker, tapestry needle, scissors
Abbreviations
- MR: Magic Ring
- ch: Chain stitch
- sc: Single crochet
- dc: Double crochet
- inc: Increase (2 sc in same stitch)
- dec: Decrease (sc 2 together)
- slst: Slip stitch
- FLO / BLO: Front loop only / Back loop only
Pattern Instructions
Head
- Rnd 1: 6 sc in MR (6)
- Rnd 2: 6 inc (12)
- Rnd 3: (1 sc, inc) × 6 (18)
- Rnd 4: (1 sc, inc, 1 sc) × 6 (24)
- Rnd 5: (3 sc, inc) × 6 (30)
- Rnd 6: (2 sc, inc, 2 sc) × 6 (36)
- Rnd 7: (5 sc, inc) × 6 (42) (Corrected sequence from original text)
- Rnd 8: (3 sc, inc, 3 sc) × 6 (48)
- Rnd 9–11: 48 sc (3 rounds)
- Rnd 12: (11 sc, inc) × 4 (52)
- Rnd 13–15: 52 sc (3 rounds)
- Rnd 16: (6 sc, inc, 6 sc) × 4 (56)
- Rnd 17: 56 sc
- Rnd 18: 23 sc, place marker (eye 1), 9 sc, place marker (eye 2), 24 sc (56)
- Rnd 19: 12 sc, (2 sc, inc) × 4, 8 sc, (inc, 2 sc) × 4, 12 sc (64)
- Rnd 20–23: 64 sc (4 rounds)
- Rnd 24: (3 sc, dec, 1 sc) × 8 (56)
- Rnd 25: (5 sc, dec) × 8 (48)
- Rnd 26: (2 sc, dec, 2 sc) × 8 (40)
- Rnd 27: (3 sc, dec) × 8 (32)
- Rnd 28: (1 sc, dec, 1 sc) × 8 (24)
Insert 8 mm safety eyes at the marked spots in Rnd 18. Stuff firmly with fiberfill. Fasten off, leaving a long thread for assembly.
Legs (Make 2)
Leg 1:
- Rnd 1: 6 sc in MR (6)
- Rnd 2: 6 inc (12)
- Rnd 3–5: 12 sc (3 rounds)
- Rnd 6: 3 sc, (1 sc, inc) × 3, 3 sc (15)
- Rnd 7–13: 15 sc (7 rounds)
- Rnd 14: 3 sc, (1 sc, inc, 1 sc) × 3, 3 sc (18)
- Rnd 15–16: 18 sc
Switch to dress color:
- Rnd 17–18: 18 sc, slst. Fasten off. Stuff firmly.
Leg 2:
- Repeat Rnd 1–18 of Leg 1, but do not cut the yarn. Continue directly to the body.
Body
Chain 1 from the end of Leg 2 to connect the pieces.
- Rnd 19: 18 sc around Leg 1 (starting in its slst), 1 sc in the connecting ch, 1 8 sc around Leg 2, 1 sc in the opposite side of the ch (38)
- Rnd 20: (5 sc, inc) × 3, 1 sc, (5 sc, inc) × 3, 1 sc (44)
- Rnd 21: (3 sc, inc, 3 sc) × 3, 1 sc, (3 sc, inc, 3 sc) × 3, 1 sc (50)
- Rnd 22–24: 50 sc (3 rounds)
- Rnd 25: 1 sc, (2 sc, dec, 2 sc) × 8, 1 sc (42)
- Rnd 26: 42 sc
Switch back to body color:
- Rnd 27: BLO 42 sc
- Rnd 28: 42 sc
- Rnd 29: 1 sc, (3 sc, dec) × 8, 1 sc (34)
- Rnd 30–31: 34 sc (2 rounds)
- Rnd 32: 2 sc, (1 sc, dec) × 10, 2 sc (24)
- Rnd 33: 24 sc, slst.
Fasten off, leaving a long end for joining. Stuff the body firmly.
Dress Skirt
Attach the dress-colored yarn to the exposed front loops of Rnd 27 on the body:
- Rnd 1: FLO ch 3, (1 dc, 2 dc in same st) repeat around, slst to top of ch-3.
- Rnd 2: ch 3, (2 dc, 2 dc in same st) × 21, slst (84)
- Rnd 3–4: ch 3, 84 dc, slst (2 rounds)
- Rnd 5: ch 1, 84 sc, slst. Fasten off and weave in ends.
Arms (Make 2)
- Rnd 1: 5 sc in MR (5)
- Rnd 2: 5 inc (10)
- Rnd 3–5: 10 sc (3 rounds)
- Rnd 6: (4 sc, inc) × 2 (12)
- Rnd 7–10: 12 sc (4 rounds)
- Rnd 11: (1 sc, dec) × 4 (8)
Do not fill. Flatten the top opening and sc through both sides to seal. Fasten off with a long tail.
Ears (Make 2)
- Rnd 1: 5 sc in MR (5)
- Rnd 2: 5 inc (10)
- Rnd 3: (1 sc, inc) × 5 (15)
- Rnd 4–6: 15 sc (3 rounds)
- Rnd 7: (3 sc, dec) × 3 (12)
- Rnd 8–9: 12 sc (2 rounds)
- Rnd 10: (1 sc, dec) × 4 (8)
Do not fill. Flatten the top edge and sew closed across opposite stitches. Leave a long tail.
Assembly & Details
- Stitch the stuffed head securely onto the neck area using the long tail from the head.
- Position and attach the arms symmetrically on the upper body, just below the neck.
- Attach the ears near the top of the head around Rnd 4–5.
- Using black embroidery thread, stitch a small “Y” shape between the eyes to create the nose and mouth.
