
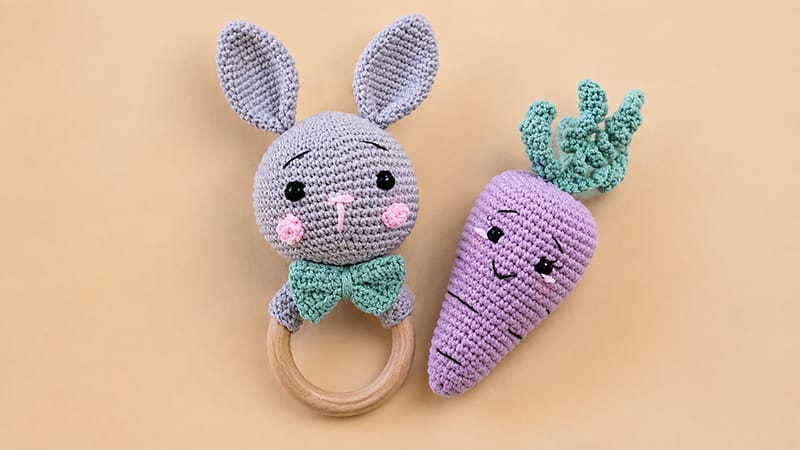
Welcome to this charming crochet project where you can bring to life a delightful bunny rattle accompanied by a sweet carrot!
Perfect for handmade baby shower gifts or nursery decor, this set is both beginner-friendly and quick to stitch up.
Using basic amigurumi techniques like working in continuous rounds, making magic rings, and basic increases or decreases, you’ll craft a plush, tactile toy set that little ones will love.
With a smooth wooden ring and soft cotton yarn, this project yields a lovely, durable keepsake. Let’s pick up our crochet hooks and start making this adorable duo!
Materials & Tools
- Yarn: 100% Cotton Yarn in Cream/White (Bunny Head & Ears), Orange (Carrot), Green (Leaves), Pink (Cheeks), and an accent color for the Bow Tie
- Crochet Hook: 2.5 mm
- Notions: Wooden rattle ring, bell/rattle insert (optional), fiberfill stuffing, tapestry needle, scissors
- Embroidery: Black yarn or embroidery floss for eyes and facial details
Abbreviations (US Terms)
| Abbreviation | Description |
|---|---|
| MR | Magic Ring |
| sc | Single crochet |
| inc | Single crochet increase (2 sc in same st) |
| dec | Single crochet decrease (sc2tog) |
| hdc | Half double crochet |
| sl st | Slip stitch |
| ch | Chain |
| st(s) | Stitch(es) |
Pattern Instructions
1. Bunny Head
Worked in continuous spirals. Insert your rattle box into the middle of the fiberfill as you stuff.
- Rnd 1: 6 sc into MR (6)
- Rnd 2: 6 inc (12)
- Rnd 3: (1 sc, inc) × 6 (18)
- Rnd 4: (2 sc, inc) × 6 (24)
- Rnd 5: (3 sc, inc) × 6 (30)
- Rnd 6: (4 sc, inc) × 6 (36)
- Rnd 7: (5 sc, inc) × 6 (42)
- Rnd 8: (6 sc, inc) × 6 (48)
- Rnd 9: (7 sc, inc) × 6 (54)
- Rnd 10: (8 sc, inc) × 6 (60)
- Rnds 11–18: sc in all 60 sts (60 — 8 rounds total)
- Rnd 19: (8 sc, dec) × 6 (54)
- Rnd 20: (7 sc, dec) × 6 (48)
- Rnd 21: (6 sc, dec) × 6 (42)
- Rnd 22: (5 sc, dec) × 6 (36)
- Rnd 23: (4 sc, dec) × 6 (30)
- Rnd 24: (3 sc, dec) × 6 (24)
- Rnd 25: (2 sc, dec) × 6 (18) — Stuff firmly with fiberfill and add rattle insert.
- Rnd 26: (1 sc, dec) × 6 (12)
- Rnd 27: 6 dec (6)
Fasten off, leave a short tail, and weave through front loops to pull opening closed.
2. Ears (Make 2)
Worked in continuous spirals. Do not stuff.
- Rnd 1: 6 sc into MR (6)
- Rnd 2: (1 sc, inc) × 3 (9)
- Rnd 3: (2 sc, inc) × 3 (12)
- Rnd 4: (3 sc, inc) × 3 (15)
- Rnd 5: (4 sc, inc) × 3 (18)
- Rnd 6: (5 sc, inc) × 3 (21)
- Rnds 7–17: sc in all 21 sts (21 — 11 rounds total)
Fasten off, leaving a long strand for attaching to the head.
3. Wooden Ring Cover
Worked in flat rows.
- Row 1: Ch 11. Starting in 2nd ch from hook, sc in each ch across, ch 1, turn (10 sc)
- Rows 2–11: sc across all 10 sts, ch 1, turn (10 sc)
Fasten off, leaving a long tail for seaming around the wooden ring.
4. Bow Tie
Worked in flat rows.
- Row 1: Ch 10. Starting in 2nd ch from hook, place 1 sc, then hdc in each remaining ch across, ch 1, turn (9 sts)
- Rows 2–8: hdc in each st across, ch 1, turn (9 sts)
Fasten off. Pinch the rectangle in the center and wrap yarn securely around to form the bow shape.
5. Cheeks (Make 2)
Using pink yarn:
- Rnd 1: 6 sc into MR, sl st to first st to join.
Fasten off, leaving a tail for sewing.
6. Amigurumi Carrot
Carrot Body
Using orange yarn, work in continuous spirals.
- Rnd 1: 6 sc into MR (6)
- Rnd 2: 6 inc (12)
- Rnd 3: sc in all 12 sts (12)
- Rnd 4: (1 sc, inc) × 6 (18)
- Rnds 5–7: sc in all 18 sts (18 — 3 rounds total)
- Rnd 8: (2 sc, inc) × 6 (24)
- Rnds 9–11: sc in all 24 sts (24 — 3 rounds total)
- Rnd 12: (3 sc, inc) × 6 (30)
- Rnd 13: sc in all 30 sts (30)
- Rnd 14: (4 sc, inc) × 6 (36)
- Rnds 15–24: sc in all 36 sts (36 — 10 rounds total)
- Rnd 25: (4 sc, dec) × 6 (30)
- Rnd 26: (3 sc, dec) × 6 (24)
- Rnd 27: (2 sc, dec) × 6 (18) — Stuff firmly.
- Rnd 28: (1 sc, dec) × 6 (12)
- Rnd 29: 6 dec (6)
Fasten off and pull opening tight.
Green Leaves
Using green yarn:
- Ch 27.
- Beginning in 2nd ch from hook, work 3 sc in every chain back down the row (this causes the strip to curl into a leaf).
- Repeat this process 3 more times directly on the stem to create 4 curled foliage strands in total.
- Fasten off and attach securely to the top center of the carrot.
Assembly & Finishing Details
- Ring Assembly: Wrap the crochet rectangle around the top segment of the wooden ring and whipstitch the edges together tightly.
- Face & Ears: Flatten the base of each ear and sew them to the top of the head. Stitch the pink cheeks to the sides of the face. Using black thread, embroider sleeping eyes, nose, and detail accent lines.
- Head to Ring: Sew the completed head firmly onto the middle of the ring cover. Attach the bow tie directly beneath the chin.
- Carrot Accents: Embroider small horizontal accent lines on the carrot body using black yarn for a realistic touch.
