
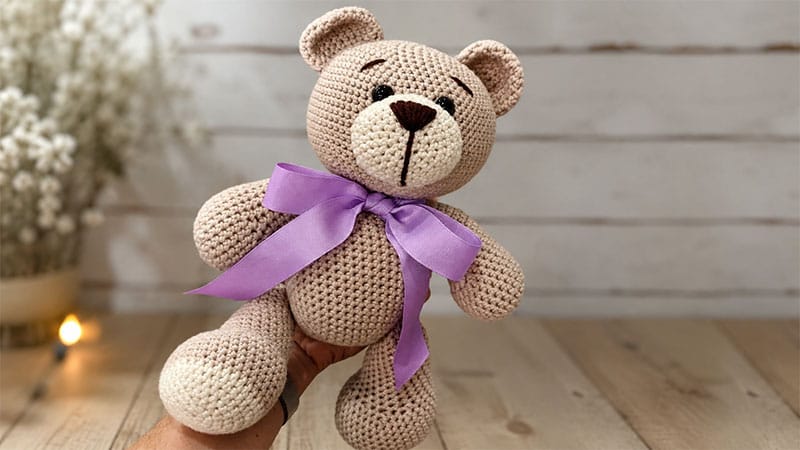
Bring a timeless companion to life with this classic crocheted teddy bear. Standing approximately 12 inches tall when fully completed, this heirloom-quality project features traditional proportions, a contrasting muzzle, and jointed-style legs that allow it to easily transition from a standing to a sitting position.
It is worked in continuous spiral rounds, making it a wonderful project for intermediate crocheters or confident beginners looking to practice shaping.
Project Specifications & Materials
| Component | Description |
|---|---|
| Finished Size | Approximately 12 inches (30.5 cm) tall when standing |
| Crochet Hook | Size G (4.00 mm) or size needed to obtain a tight gauge |
| Yarn Required | • Main Color (MC): 1 skein of Bernat Softee Baby Cotton in Tan • Accent Colors: Small amounts of Ecru/Cream and Dark Brown |
| Notions & Tools | Yarn needle, scissors, and a stitch marker to track rounds |
| Safety Eyes | 1 pair of plastic safety eyes (choose size based on preference) |
| Fill | Polyester fiberfill stuffing |
| Finishing | A short length of ribbon for an optional decorative bowtie |
Terminology & Abbreviations
- MR: Magic Ring (Magic Circle)
- Ch: Chain
- SC: Single crochet
- Inc: Increase (Work 2 single crochets into the same stitch)
- Dec: Single crochet decrease (Combine 2 stitches into one)
- Sl st: Slip stitch
- St(s): Stitch(es)
Note on Technique: Do not join rounds or chain at the beginning of rows unless explicitly instructed. Use your stitch marker to note the first stitch of every new round. For rows with an asterisk (*), repeat the sequence inside the asterisks all the way to the end of that round.
Step-by-Step Instructions
1. The Head
Using your Main Color (Tan) yarn.
- Setup: Create an MR, place 6 SC into the ring. (6 sts)
- Round 1: Inc in each st around. (12 sts)
- Round 2: Inc in the next st, SC in the following st. (18 sts)
- Round 3: Inc in the next st, SC in the next 2 sts. (24 sts)
- Round 4: Inc in the next st, SC in the next 3 sts. (30 sts)
- Round 5: Inc in the next st, SC in the next 4 sts. (36 sts)
- Round 6: Inc in the next st, SC in the next 5 sts. (42 sts)
- Round 7: Inc in the next st, SC in the next 6 sts. (48 sts)
- Round 8: Inc in the next st, SC in the next 7 sts. (54 sts)
- Round 9: Inc in the next st, SC in the next 8 sts. (60 sts)
- Round 10: Inc in the next st, SC in the next 19 sts. (63 sts)
- Round 11: Inc in the next st, SC in the next 20 sts. (66 sts)
- Rounds 12–22: SC evenly in every stitch around. (66 sts for 11 rounds)
- Round 23: Dec, SC in the next 20 sts. (63 sts)
- Round 24: Dec, SC in the next 19 sts. (60 sts)
- Round 25: Dec, SC in the next 8 sts. (54 sts)
- Round 26: Dec, SC in the next 7 sts. (48 sts)
- Round 27: Dec, SC in the next 6 sts. (42 sts)
- Round 28: Dec, SC in the next 5 sts. (36 sts)
- Round 29: Dec, SC in the next 4 sts. On the very last stitch of this round, Sl st into the first stitch to level the row. Fasten off and secure your yarn ends. (30 sts)
2. The Ears (Make Two)
Using your Main Color (Tan) yarn.
- Setup: Create an MR, place 6 SC into the ring. (6 sts)
- Round 1: Inc in each st around. (12 sts)
- Round 2: Inc in the next st, SC in the following st. (18 sts)
- Round 3: Inc in the next st, SC in the next 2 sts. (24 sts)
- Rounds 4–8: SC evenly around. After completing the final stitch of Round 8, Sl st into the first stitch. Fasten off, leaving a long yarn tail for sewing later. (24 sts)
3. The Muzzle
Using your Accent Color (Cream/Ecru) yarn.
- Setup: Create an MR, place 6 SC into the ring. (6 sts)
- Round 1: Inc in each st around. (12 sts)
- Round 2: Inc in the next st, SC in the following st. (18 sts)
- Round 3: Inc in the next st, SC in the next 2 sts. (24 sts)
- Round 4: Inc in the next st, SC in the next 3 sts. (30 sts)
- Round 5: Inc in the next st, SC in the next 4 sts. (36 sts)
- Rounds 6–7: SC evenly around. Sl st into the first stitch of the final round to finish. Fasten off, ensuring you leave a generous tail for facial attachment. (36 sts)
Facial Assembly Guide
- Embroider the Features: Thread your dark brown yarn onto a tapestry needle. Embroider a triangular nose onto the cream muzzle, adding a small vertical line underneath for a classic mouth expression. Secure your knots firmly on the interior side.
- Attach the Muzzle: Position the completed muzzle on the front lower half of the head. Sew it down securely using the cream yarn tail. Stop when you are 75% finished to firmly pack the muzzle with fiberfill, then sew the remaining edge shut.
- Place the Eyes: Position your safety eyes on the head just above the muzzle. Once you are happy with their symmetry, push the plastic washers onto the back posts until they click permanently into place.
- Attach the Ears: Flatten the ears slightly to shape them. Position them symmetrically on top of the head and sew them in place using the yarn tails.
- Stuff the Head: Generously fill the entire head structure with fiberfill until it is firm and holds a round shape.
4. The Arms (Make Two)
Using your Main Color (Tan) yarn. Add stuffing gradually as you build the piece.
- Setup: Create an MR, place 6 SC into the ring. (6 sts)
- Round 1: Inc in each st around. (12 sts)
- Round 2: Inc in the next st, SC in the following st. (18 sts)
- Round 3: Inc in the next st, SC in the next 2 sts. (24 sts)
- Rounds 4–8: SC evenly around. (24 sts)
- Round 9: Work 4 decreases in a row, then SC in all remaining stitches. (20 sts)
- Round 10: Work 2 decreases in a row, then SC in all remaining stitches. (18 sts)
- Rounds 11–14: SC evenly around. (18 sts)
- Round 15: SC in the next 4 sts, Dec. (15 sts)
- Rounds 16–17: SC evenly around. (15 sts)
- Round 18: SC in the next 3 sts, Dec. (12 sts)
- Round 19: SC evenly around. Sl st into the first stitch to close the spiral. Cut your yarn, leaving roughly 2 feet of tail. Finish stuffing the arm, then pinch the top opening flat and whipstitch the edges closed. Keep the remaining yarn tail intact for attaching to the torso.
5. The Legs (Make Two)
Begin with Accent Color (Cream/Ecru) yarn. Stuff as you progress.
- Setup: Create an MR, place 6 SC into the ring. (6 sts)
- Round 1: Inc in each st around. (12 sts)
- Round 2: Inc in the next st, SC in the following st. (18 sts)
- Round 3: Inc in the next st, SC in the next 2 sts. (24 sts)
- Round 4: Inc in the next st, SC in the next 3 sts. (30 sts)
- Round 5: Inc in the next st, SC in the next 4 sts. (36 sts)
- Round 6: SC evenly around. (36 sts)
- Round 7: Switch to Main Color (Tan) yarn; SC evenly around. (36 sts)
- Rounds 8–12: SC evenly around. (36 sts)
- Round 13: Dec, SC in the next 4 sts. (30 sts)
- Round 14: Repeat the sequence (Dec, SC) a total of 6 times, then SC in each remaining stitch of the round. (24 sts)
- Rounds 15–19: SC evenly around. (24 sts)
- Round 20: Dec, SC in the next 6 sts. (21 sts)
- Rounds 21–23: SC evenly around. (21 sts)
- Round 24: Dec, SC in the next 5 sts. (18 sts)
- Round 25: Dec, SC in the next single st. (12 sts)
- Round 26: SC evenly around. Sl st into the first stitch. Fasten off, leaving a 2-foot tail. Complete the stuffing process, flatten the upper opening so that the top seam aligns directly with the center line of the foot, and sew the opening closed.
6. The Torso (Main Body)
Using your Main Color (Tan) yarn.
- Setup: Create an MR, place 6 SC into the ring. (6 sts)
- Round 1: Inc in each st around. (12 sts)
- Round 2: Inc in the next st, SC in the following st. (18 sts)
- Round 3: Inc in the next st, SC in the next 2 sts. (24 sts)
- Round 4: Inc in the next st, SC in the next 3 sts. (30 sts)
- Round 5: Inc in the next st, SC in the next 4 sts. (36 sts)
- Round 6: Inc in the next st, SC in the next 5 sts. (42 sts)
- Round 7: Inc in the next st, SC in the next 6 sts. (48 sts)
- Round 8: Inc in the next st, SC in the next 7 sts. (54 sts)
- Rounds 9–19: SC evenly around. (54 sts)
- Round 20: Dec, SC in the next 16 sts. (51 sts)
- Round 21: Dec, SC in the next 15 sts. (48 sts)
- Round 22: Dec, SC in the next 14 sts. (45 sts)
- Round 23: Dec, SC in the next 13 sts. (42 sts)
- Round 24: Dec, SC in the next 12 sts. (39 sts)
- Round 25: Dec, SC in the next 11 sts. (36 sts)
- Round 26: Dec, SC in the next 10 sts. (33 sts)
- Round 27: Dec, SC in the next 9 sts. Sl st into the first stitch to finish. Fasten off and weave in the end. (30 sts) Fill the body firmly with fiberfill.
Final Assembly & Joining
Joining the Arms and Head
- Arms: Using the long yarn tails attached to the arms, sew them to the upper sides of the body right along the edge of the neck opening.
- Head: Line up the 30-stitch opening at the base of the head with the 30-stitch opening at the top of the body. Whipstitch the two pieces together securely, adding extra stuffing to the neck joint just before closing to prevent a floppy head.
Creating the Mobile Leg Joints
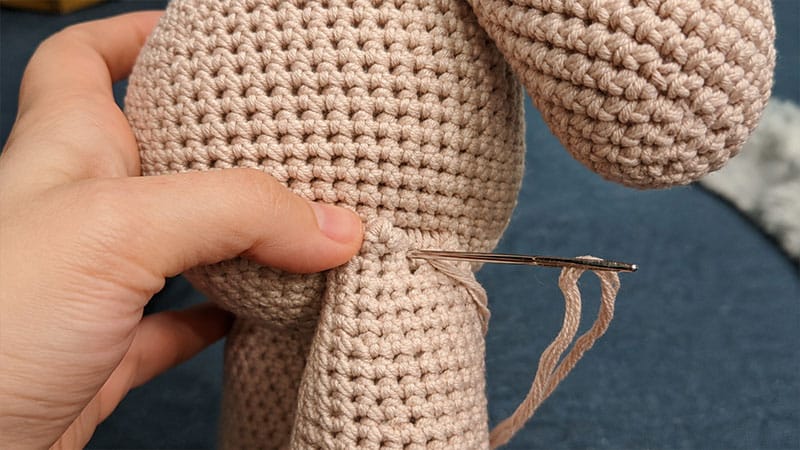
To give the legs a traditional, movable, jointed feel, follow this simple needle-sculpting method:
- Thread a very long strand of your main color yarn through your tapestry needle.
- Position the legs on either side of the lower body.
- Push the needle directly through the inner top center of the first leg, straight through the lower body, and out through the corresponding spot on the opposite side.
- Pass the needle through the top of the second leg, turn around, and push back through the body to the starting side.
- Repeat this back-and-forth process 3 to 4 times. Pull the yarn tight enough to pull the limbs snug against the body while still allowing them to rotate. Knot the yarn securely hidden under a leg, and weave in your loose ends.
Finishing Touches
Tie a colorful ribbon around your new teddy bear’s neck into a neat bowtie. Your classic handmade bear is ready to be loved!
