
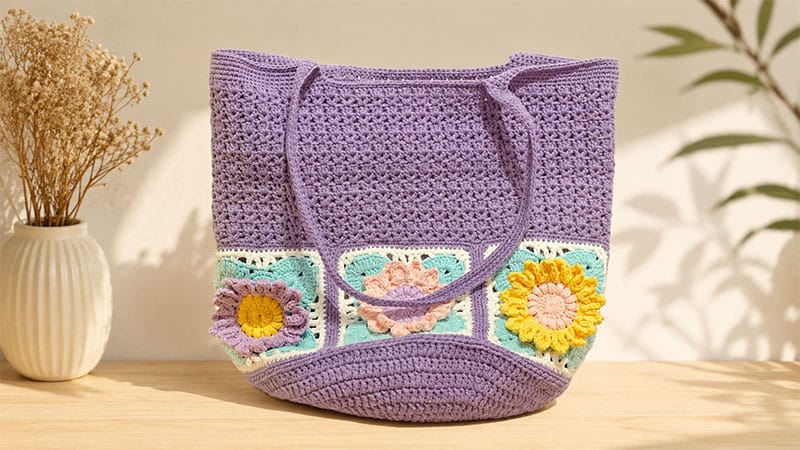
Here is a fresh, beautifully formatted, and detailed pattern for creating your own Sunflower Granny Square Bucket Bag.
This guide breaks down every step clearly to ensure your handmade accessory turns out structured, durable, and absolutely stunning.
Pattern Overview & Specifications
This project blends the vintage charm of intricate floral granny squares with a highly functional, modern bucket bag silhouette.
Final Dimensions
- Height: 13 inches (33 cm)
- Width: 10.6 inches (27 cm)
Materials & Tools
- Yarn: 5-ply combed milk cotton yarn (or any sturdy Level 3/Light Worsted weight cotton).
- Color A: Forest Green (Main body background, bag upper body, and straps)
- Color B: Soft Pink (Flower petals)
- Color C: Bright Yellow (Flower centers)
- Color D: Mint Green (Accent rounds)
- Hooks: 3.0 mm (for the squares and upper body) & 3.5 mm (for the sturdy base)
- Notions: Stitch markers, sharp scissors, and a blunt-tipped yarn needle.
Technical Abbreviations (US Terms)
- ch: chain
- sl st: slip stitch
- sc: single crochet
- hdc: half double crochet
- dc: double crochet
- tr: treble crochet
- inc/dec: increase/decrease
- picot: ch 4, sl st into the first ch
- Bobble st: A 3-dc cluster held together at the top loop
- dc2tog / dc3tog: double crochet 2 (or 3) stitches together
- sc3tog: single crochet 3 stitches together
Step-by-Step Instructions
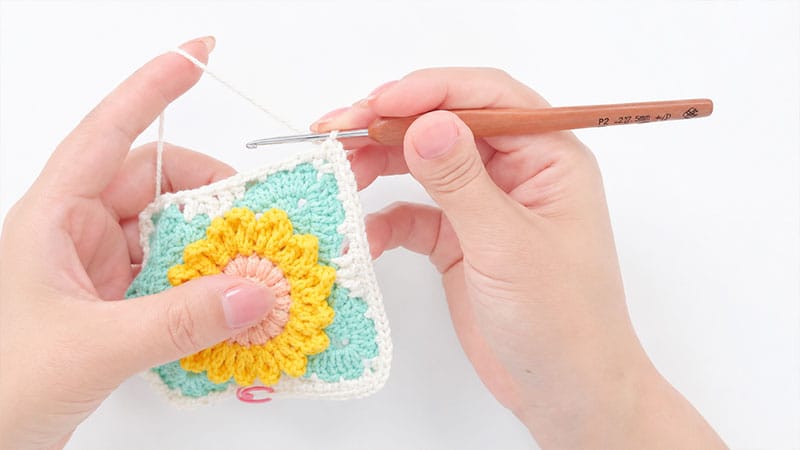
Part 1: The Sunflower Granny Squares (Make 6)
Use the 3.0 mm hook. Switch colors between rounds as desired to make the floral motif pop.
- Round 1 (Center): Form a magic ring. Ch 3 (counts as first dc), work 15 dc into the ring. Sl st to the top of the ch-3 to close. (16 dc)
- Round 2 (Inner Petals): Ch 2. In the same stitch, work a 2-dc bobble, ch 1. *In the next stitch, work a 3-dc bobble, ch 1.* Repeat from * to * around. Sl st to join. (16 bobbles)
- Round 3 (Detail Rim): Ch 1. *(Sc, ch 4 picot, sc) all into the next ch-1 space.* Repeat from * to * around. Sl st to join.
- Round 4 (Petal Points):[Ch1,intothenextpicotspacework:sc,hdc,2dc,ch2picot,2dc,hdc,sc],ch1,slstintothespacebetweenpicots. Repeat this sequence 16 times around.
- Round 5 (Squaring Backing): Ch 5 (counts as dc + ch 2). Working behind the petals, anchor your stitches into the back loops of Round 2’s bobbles. *Dc into the next bobble loop, ch 2.* Repeat around, sl st to the 3rd chain of your starting chain. (16 ch-spaces)
- Round 6 (Squaring Foundation): *Ch 1, sc inc, ch 2, sc, ch 2, (sc, ch 4 picot, sc) for the corner, ch 2, sc, ch 2.* Repeat from * to * 4 times around. Sl st to join.
- Round 7 (Squaring Extension): Ch 1. *2 sc, ch 2, sc into the next space. In the corner picot space, work: (5 dc, ch 2, 5 dc). Sc in the next space, ch 2.* Repeat from * to * 4 times. Sl st to join.
- Round 8 (Squaring Border): *2 sc, ch 2, dc2tog (skip 1 stitch in between), 3 dc inc. Into the corner chain space work: (2 dc, ch 2, 2 dc). 3 dc inc, dc3tog, ch 2.* Repeat from * to * 4 times. Sl st to join.
- Round 9 (Frame Round): Ch 5. *Tr, dc, ch 2 (skip 2), sc, ch 2 (skip 2), sl st, ch 2 (skip 2), (sc, ch 1, sc in corner), ch 2 (skip 2), sl st, ch 2 (skip 2), sc, ch 2 (skip 2), dc, tr, ch 1.* Repeat around to frame the square perfectly. Sl st to join.
- Round 10 (Solid Border 1): Ch 1. *Work 13 sc evenly along the side, 3 sc into the exact corner stitch, 10 sc along the remaining side.* Repeat 4 times. Sl st to join.
- Round 11 (Final Border): Ch 1. *Work 14 sc along the side, 3 sc into the corner stitch, 11 sc.* Repeat 4 times. Fasten off and weave in all loose ends.
Pro Tip: Block your 6 completed squares with a steam iron or blocking boards before assembly. This ensures they are uniform in size (10×10 cm) and square, making joining seamless.
Part 2: Assembling the Body Panel
- Layout: Arrange your 6 finished squares side-by-side in a single straight row.
- Joining: Place the first two squares facing right sides together. Using your 3.0 mm hook and Main Color yarn, insert your hook into the inner loops only (the back loop of the front square and the front loop of the back square).
- Slip stitch across the edge to join. Secure the first and last stitches with an extra slip stitch loop for durability.
- Repeat this process until all 6 squares are joined into one long strip, then slip stitch the first and last squares together to form a continuous circular ring.
Part 3: The Reinforced Bag Bottom
To prevent sagging, use a 3.5 mm hook and hold two strands of yarn together simultaneously.
- Round 1: Form a magic ring. Ch 3 (counts as dc), work 11 dc into the ring. Sl st to join. (12 dc)
- Round 2: Ch 3, dc in the same space. Work a dc inc (2 dc in each stitch) around. Sl st to join. (24 dc)
- Round 3: Ch 3, *dc inc, 1 dc*. Repeat from * to * around. Sl st to join. (36 dc)
- Round 4: Ch 3, *dc inc, 2 dc*. Repeat from * to * around. Sl st to join. (48 dc)
- Round 5: Ch 3, *dc inc, 3 dc*. Repeat from * to * around. Sl st to join. (60 dc)
- Round 6 to Round 12: Continue increasing the spacing between your double crochet increases by 1 stitch every round (e.g., Round 12 will be: *dc inc, 10 dc*). Your final round will conclude with 144 stitches. Fasten off, leaving a 24-inch tail for assembly.
Attaching the Bottom to the Body:
Turn the panel ring inside out. Align the circular base to the bottom edge of the square panels using stitch markers to distribute the fabric evenly.
Using your yarn needle and the long tail, whipstitch the inner loops of the bottom circle to the corresponding inner loops of the granny square panel. Fasten off securely.
Part 4: Crocheting the Upper Body & Straps
Switch back to the 3.0 mm hook and single-strand yarn. Attach yarn to the top edge of the square panels.
- Round 1: Ch 1, work a consistent round of sc, ensuring your total stitch count is a perfect multiple of 3. Sl st to join.
- Round 2 (Mesh Texture): Ch 3, *skip 2 stitches, (dc, ch 1, dc) in the next stitch*. Repeat from * to * around, ending with a dc, ch 1, and sl st to join.
- Round 3 (Cluster Round): Ch 3, work 3 dc into every ch-1 space around. Sl st to join.
- Rounds 4–17: Repeat the pattern sequence of alternating Round 2 and Round 3.
- Round 18: Ch 1, work 1 sc into every stitch around. Sl st to join.
Constructing the Integrated Straps:
Lay the bag completely flat. Place stitch markers at the exact left and right fold edges (centers). Count 5 pattern repeats outward to both the left and right of the centers to mark your 4 strap bases.
- Round 19: Ch 1, sc around to the first strap marker. Ch 120 (or your desired length for a shoulder strap). Skipping the section between the markers on this side, anchor the chain down at the next marker with an sc. Sc across the bag body to the opposite side’s markers, ch 120, anchor it down, and sc to the end of the round. Sl st to join.
- Round 20 & 21: Ch 1, sc in each stitch around the body and up over every individual chain of the straps. At the tight inside corners where the strap meets the bag body, execute a sc decrease to keep the transition sharp.
- Round 22: Ch 1, sc around. When reaching the inside corners of the straps, perform a clean sc3tog across the corner junction to reinforce the high-tension points. Sl st to join, fasten off, and weave in all ends.
Fabric Care & Maintenance
- Everyday Upkeep: Keep your bag away from rough surfaces to prevent the delicate flower petals from snagging. If the bag collects dirt, spot-clean immediately with a damp white microfiber cloth.
- Washing: Hand washes only. Submerge the bag in cold water mixed with a drop of delicate wool/cotton wash. Gently squeeze the soapy water through the fibers without twisting or wringing. Rinse until the water runs clear.
- Drying & Storage: Press the excess water out using a thick towel. Reshape the bucket base into a perfect circle and lay it flat on a dry towel out of direct sunlight. Once completely dry, store it stuffed lightly with white tissue paper inside a breathable cotton pillowcase to preserve its shape.
