
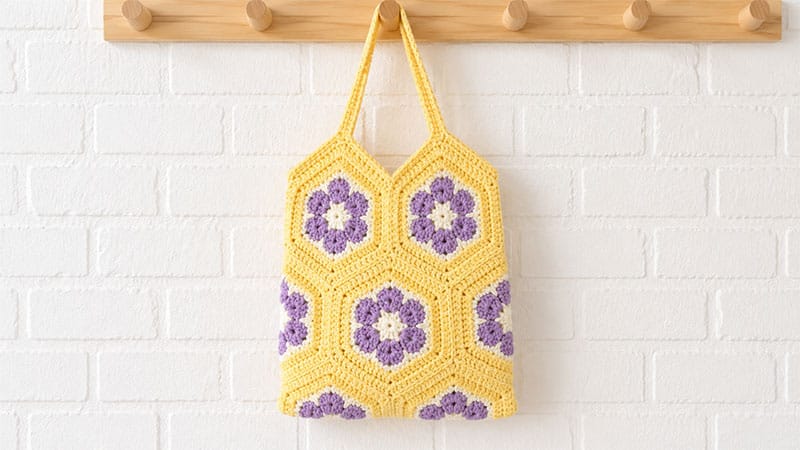
Add a splash of vintage elegance to your daily wardrobe with this striking geometric shoulder bag. Combining retro African-flower-inspired hexagons with a clean, contemporary silhouette, this compact tote is styled in dreamy sky blue, soft cream, and earthy terracotta.
It is just the right size for your phone, keys, wallet, and a paperback novel—making it your ultimate companion for farmers’ market runs or cozy coffee dates.
Let’s grab a hook and bring this floral magic to life!
Tools & Materials
- Yarn: Loopara 5-ply combed cotton (or any Category 2/Sport weight cotton yarn) in Sky Blue, Terracotta, and Off-White.
- Hook Size: 3.0 mm (US size C/2 or D/3, depending on your tension)
- Notions: Sharp scissors, locking stitch markers, and a blunt tapestry needle.
Stitch Key (US Terminology)
- ch – chain
- sc – single crochet
- dc – double crochet
- sl st – slip stitch
- MR – magic ring
- inc – increase (2 stitches worked into the same stitch/space)
- sp – space
Step-by-Step Motif Pattern (Make 10)
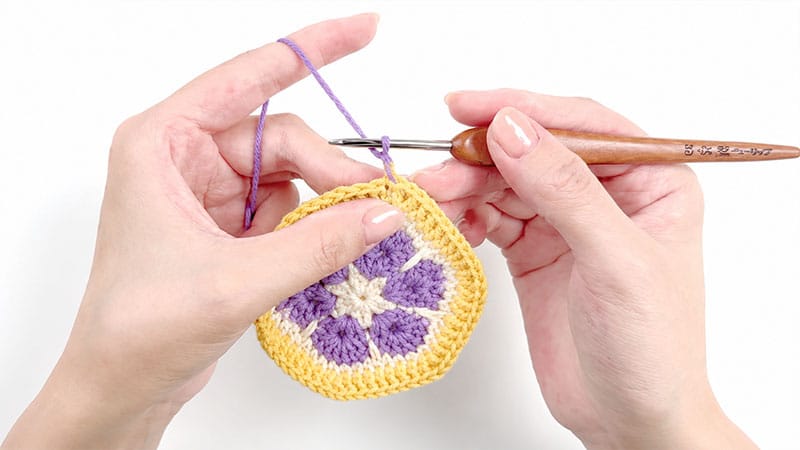
Pro Tip: Keep your tension uniform across all ten motifs so they line up perfectly during assembly. Use your stitch markers to mark the corner chain spaces if you have trouble spotting them!
Round 1
Form a magic ring. Inside the ring, work ch 2 (counts as your first dc) and 1 dc, followed by ch 1. Next, work [2 dc, ch 1] five times into the loop. Pull the tail to close the ring tight and join with a sl st to the top of your initial chain. (You will have 6 distinct clusters of 2-dc separated by ch-1 spaces).
Round 2
Sl st into the first ch-1 space. Ch 2 and work [1 dc, ch 1, 2 dc] directly into that same space. Into each of the remaining five ch-1 spaces around the ring, work [2 dc, ch 1, 2 dc]. Join the round with a sl st to the top of the beginning ch-2.
Round 3
Sl st across to the nearest ch-1 corner space. Ch 2 and work 6 dc into this space. For the next five ch-1 spaces, work 7 dc into each to create the rounded flower petals. Join with a sl st to the top of the starting ch-2.
Round 4
Ch 1. Work 1 sc into each of the next 7 dc stitches along the first petal. Next, work 1 elongated dc (spike stitch) deep down into the space between the petals from Round 2. Repeat this sequence of [7 sc, 1 dc] five more times around the perimeter. Join with a sl st.
Round 5
Ch 2, then work 1 dc into each of the next 6 stitches. In the following stitch (which forms your new corner), work a cluster of [1 dc, ch 1, 1 dc]. Proceed by working [1 dc into each of the next 7 stitches, then [1 dc, ch 1, 1 dc] in the corner stitch] five times around. Join with a sl st.
Round 6
Ch 2, then work 1 dc into each of the next 7 stitches. Inside the ch-1 corner space, work [1 dc, ch 1, 1 dc]. Continue with [1 dc into each of the next 9 stitches, then [1 dc, ch 1, 1 dc] in the corner space] five times. Finish the round by placing 1 dc into the very last remaining stitch, then join with a sl st. Fasten off and weave in your ends securely.
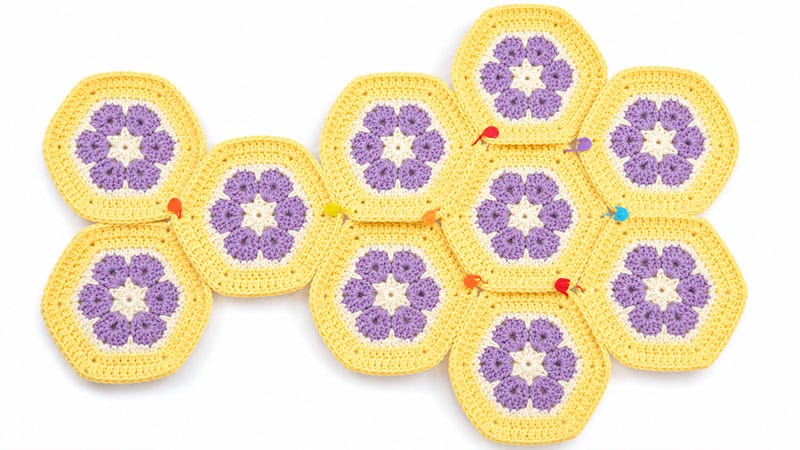
Assembling the Bag Body
   Layout Preview:
       /\  /\
      /  \/  \
     |    |   |
      \  /\  /
       \/  \/
1. The Layout & Folding
Lay your 10 completed hexagons flat on a clean surface, arranging them so the colors form a cohesive pattern. Use stitch markers to temporarily link the edges together.
Fold the arrangement in half along the center axis, then fold the outer side pieces inward. As you pin the remaining edges, you will see the flat fabric instantly pop into a 3D tote bag shape.
2. Joining the Seams
Thread your tapestry needle with a long strand of matching yarn. Align the stitches of two touching hexagons and join them using a clean whipstitch.
3. Securing the Points
To ensure your bag handles daily wear and tear, pass your needle back and forth two or three times at any three-way intersections or sharp corners.
Work your way around both the front and back seams, taking care not to pull your yarn too tightly to avoid puckering. Weave the remaining yarn tails into the inside of the bag and trim.
Crafting the Straps
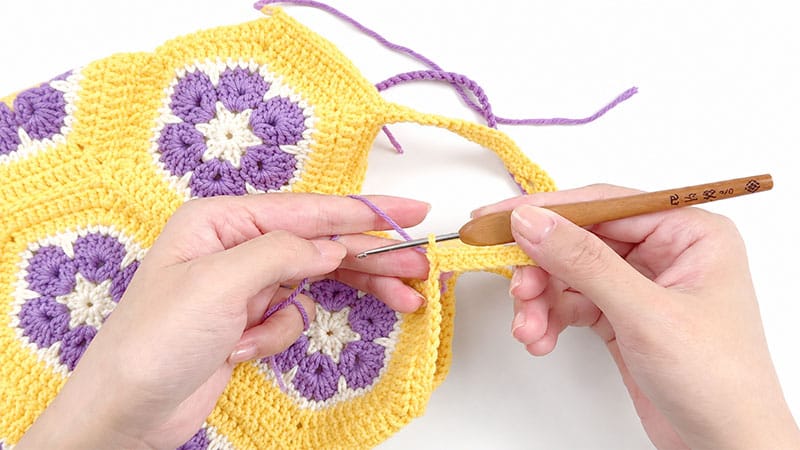
Step 1: The First Border & Handle
Attach your yarn with a slip knot to any corner stitch along the bag’s top opening. Ch 1, work a sc decrease across the first two stitches, and then sc evenly along the edge of the hexagon.
When you reach the peak where the strap should begin, chain 50 (or adjust this number if you prefer a longer crossbody strap). Anchor the chain to the opposite peak with a sl st, then continue to sc down the adjacent side.
Step 2: The Second Handle
Continue working sc stitches along the bag rim until you reach the opposite side’s peak. Chain another 50 stitches, secure it across the gap with a sl st, and finish the round with sc stitches back to your starting point. Join with a sl st and fasten off.
Step 3: Reinforcing the Inner Edges
To keep your straps from stretching out over time, attach your yarn to the inside edge where the strap meets the bag body.
Work sc stitches all along the underside of the chain and down into the bag’s dip. Work a sc decrease right in the “valleys” where the hexagons meet to keep the edge sitting flat. Repeat this process for the inner edge of the second strap.
Step 4: Final Polish
Tie your yarn to the outer perimeter for one final clean-up round. Work sc stitches around the entire outer border and handles, executing a sc decrease at any sharp inner corners or transition points. Sl st to join, fasten off, and use your tapestry needle to hide all remaining tails inside the stitches.
Longevity & Care Guide
- Daily Maintenance: Cotton is durable but loves dust. Give your bag a quick pass with a lint roller or a soft-bristled brush every few uses to keep the flower motifs crisp and clean.
- Washing: Skip the washing machine. If your bag gets stained, spot-clean it with a damp white cloth and a drop of mild detergent. For a full refresh, submerge it in cool, soapy water, gently squeezing it without wringing or twisting.
- Drying & Storage: Press out excess water by rolling the tote in a clean towel, reshape the hexagons while damp, and lay it completely flat to air dry away from direct sunlight. Store it flat or lightly stuffed with tissue paper inside a breathable cotton pillowcase to maintain its shape for years to come.
