
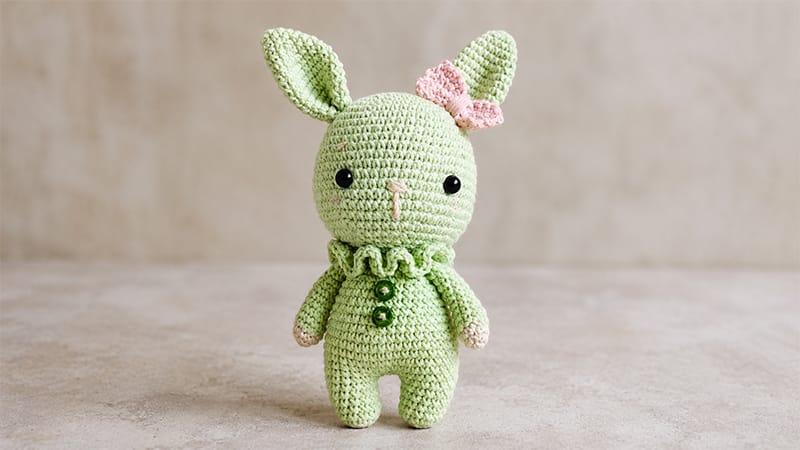
Meet Lilly Bunny, a charming amigurumi doll wearing sweet pajamas with ribbon details. This beginner-friendly project works up smoothly from top to bottom.
Using standard crochet stitches, you will create a soft, cuddly plushie featuring floppy ears and a seamless, shaped body.
Gather your favorite yarn, a matching hook, fiberfill, and a tapestry needle to get started.
Materials Needed
- Yarn: Fine / Sport weight (Category 2) or Light Worsted / DK weight (Category 3) yarn in your choice of main color for the body, plus contrast colors for the outfit/details.
- Crochet Hook: 2.0 mm – 2.5 mm hook (or a hook size appropriate for your yarn to achieve tight, gap-free stitches). Mumsy Makes Crochet – WordPress.com
- Safety Eyes: 6 mm – 8 mm safety eyes (or black embroidery floss for sewn eyes).
- Stuffing: Polyester fiberfill stuffing.
- Tapestry Needle: Large-eye yarn needle for assembling pieces and embroidering face details.
- Stitch Markers: To mark the start of rounds.
- Extras: Scissors, ribbon/yarn for ear bow or embellishments.
Abbreviations
- sc: Single crochet
- inc: Increase (2 sc in same stitch)
- dec: Decrease (sc 2 together)
- hdc: Half double crochet
- dc: Double crochet
- tr: Treble crochet
- ch: Chain
- st/sts: Stitch/stitches
- sl st: Slip stitch
- MR: Magic ring
Head Instructions
- R1: 8 sc into MR (8)
- R2: 2 sc in each st around (16)
- R3: (1 sc, 1 inc) × 8 (24)
- R4: (3 sc, 1 inc) × 6 (30)
- R5: (4 sc, 1 inc) × 6 (36)
- R6: (5 sc, 1 inc) × 6 (42)
- R7: (6 sc, 1 inc) × 6 (48)
- R8–11: 1 sc in each st across (48)
- R12: (7 sc, 1 inc) × 6 (54)
- R13–16: 1 sc in each st across (54)
- R17: (8 sc, 1 inc) × 6 (60)
- R18: 4 sc, 1 inc, (9 sc, 1 inc) × 5, 5 sc (66)
- R19: (9 sc, 1 dec) × 6 (60)
- R20: 4 sc, 1 dec, (8 sc, 1 dec) × 5, 4 sc (54)
- R21: (7 sc, 1 dec) × 6 (48)
- R22: (4 sc, 1 dec) × 8 (40)
- R23: (3 sc, 1 dec) × 8 (32)
- R24: (2 sc, 1 dec) × 8 (24)
- R25: (2 sc, 1 dec) × 6 (18)
Fasten off, leaving a long thread for assembly. Stuff firmly.
Ears (Make 2)
- R1: 6 sc into MR (6)
- R2: (1 sc, 1 inc) × 3 (9)
- R3: (2 sc, 1 inc) × 3 (12)
- R4: Sc around (12)
- R5: (2 sc, 1 inc) × 4 (16)
- R6: Sc around (16)
- R7: (3 sc, 1 inc) × 4 (20)
- R8–15: Sc in all sts (20)
Fasten off with a long tail. Do not stuff.
Legs & Body
Left Leg:
- R1: 6 sc into MR (6)
- R2: (1 sc, 1 inc) × 3 (9)
- R3: (2 sc, 1 inc) × 3 (12)
- R4–5: Sc around (12)
- R6: 5 sc, 1 inc, 6 sc (13)
- R7: Sc around (13)
- R8: 6 sc, 1 inc, 6 sc (14)
- R9: Sc around (14)
Fasten off left leg.
Right Leg:
- Work R1–7 same as left leg.
- R8: 5 sc, 1 inc, 7 sc (14)
- R9: Sc around (14)
Do not cut yarn. Ch 3 and connect to left leg to begin body.
Body:
- R1: 14 sc around left leg, 3 sc along chain, 14 sc around right leg, 3 sc along chain (34)
- R2: 14 sc, 3 inc, 14 sc, 3 inc (40)
- R3–8: Sc in each st (40)
- R9: (8 sc, 1 dec) × 4 (36)
- R10–11: Sc in each st (36)
- R12: 4 sc, 1 dec, (7 sc, 1 dec) × 3, 3 sc (32)
- R13: Sc around (32)
- R14: (6 sc, 1 dec) × 4 (28)
- R15: Sc around (28)
- R16: 3 sc, 1 dec, (5 sc, 1 dec) × 3, 2 sc (24)
- R17: (4 sc, 1 dec) × 4 (20)
- R18: (8 sc, 1 dec) × 2 (18)
- R19–20: Sc around (18)
Fasten off, stuff the body tightly, and attach the head and ears securely.
