
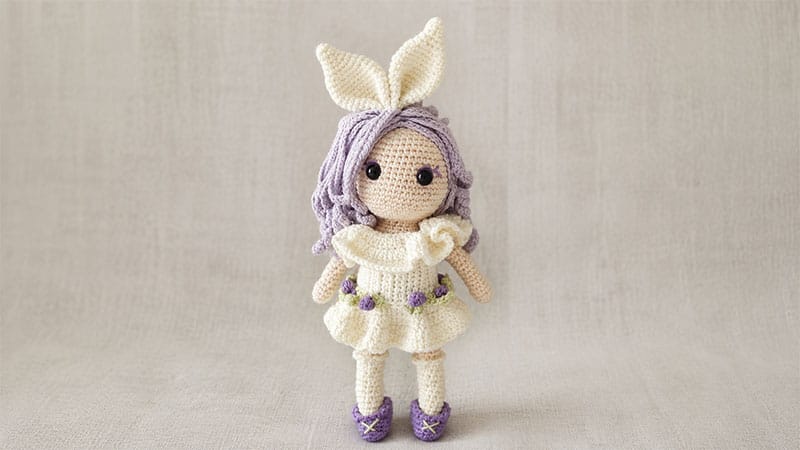
Welcome to your next favorite crochet adventure! If you adore handmade dolls with whimsical charm, you will fall head over heels for the Rubby Bunny Girl.
This delightful amigurumi pattern features an adorable bunny companion complete with soft floppy ears, a sweet expression, and a beautifully layered dress accented by vibrant purple details and handmade ivy trims.
Whether you are a confident beginner looking to expand your skills or an experienced crafter searching for a rewarding weekend project, this comprehensive, step-by-step guide will walk you through creating every single piece from head to toe.
Grab your hook, choose your favorite yarn colors, and let us bring this charming bunny girl to life together!
Materials & Tools Checklist
- Yarn (Yarnart Jeans): Skin Color (Code 73), Lilac (Code 19), Cream (Code 03), Green (Code 11), and Purple (Code 72).
- Hook: 2.5 mm crochet hook.
- Eyes: 12 mm purple safety eyes.
- Notions: Polyester fiberfill stuffing, tapestry needle for sewing, and sewing pins.
Abbreviations Guide
- sc: Single crochet
- inc: Single crochet increase
- dec: Single crochet decrease
- hdc: Half double crochet
- dc: Double crochet
- tr: Treble/triple stitch
- DCinc: Double crochet increase
- sl-st: Slip stitch
- ch: Chain
- FLO: Front loops only
- BLO: Back loops only
- st/sts: Stitch/stitches
- (…) x … times: Repeat instructions in parentheses the specified number of times
- (…): Total number of stitches at the end of the round or row
Step 1: Lower Extremities (Legs & Socks)
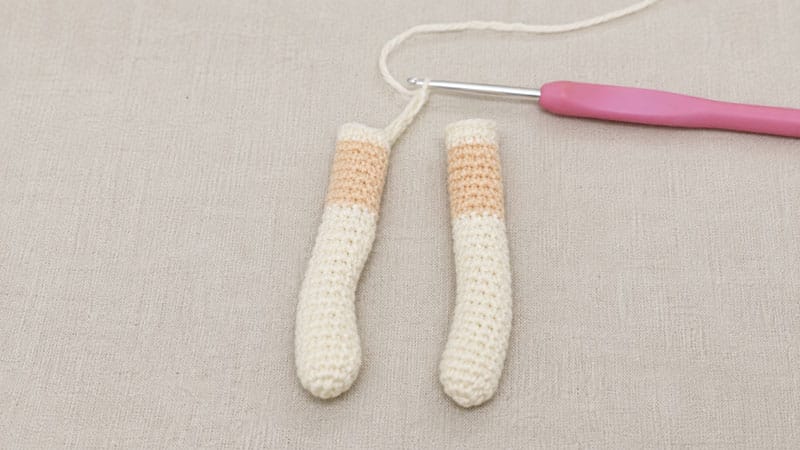
Make two identical legs using the cream-colored yarn.
- Rnd 1: Work 6 single crochets inside a magic ring [6].
- Rnd 2: Work an increase in every stitch around [12].
- Rnd 3 to 11: Work one single crochet in each stitch around [12].
- Rnd 12: Work two decreases, single crochet in the next 3 stitches, two increases, single crochet in the next 3 stitches [12].
- Rnd 13: Work one single crochet in each stitch around [12].
- Rnd 14: Work two decreases, single crochet in the next 3 stitches, two increases, single crochet in the next 3 stitches [12].
- Rnd 15 to 16: Work one single crochet in each stitch around [12].
- Rnd 17: Working entirely in the back loops only (BLO), single crochet in each stitch around [12].
- Transition: Switch to the skin-colored yarn.
- Rnd 18 to 24: Work one single crochet in each stitch around [12].
- Transition: Switch back to the cream-colored yarn.
- Rnd 25 to 26: Work one single crochet in each stitch around [12].
Note: Fasten off the first leg. For the second leg, repeat the same steps, but crochet 2 additional single crochets after completing Round 26. Do not cut the yarn on the second leg, as you will use it to join both legs together for the body. Stuff both legs firmly.
Sock Ruffles
To create the decorative sock cuffs, attach your cream-colored yarn to the unused front loops left from Round 17 on each leg. Work (chain 1, single crochet in the next stitch) 12 times around, then fasten off.
Step 2: Torso & Body Construction
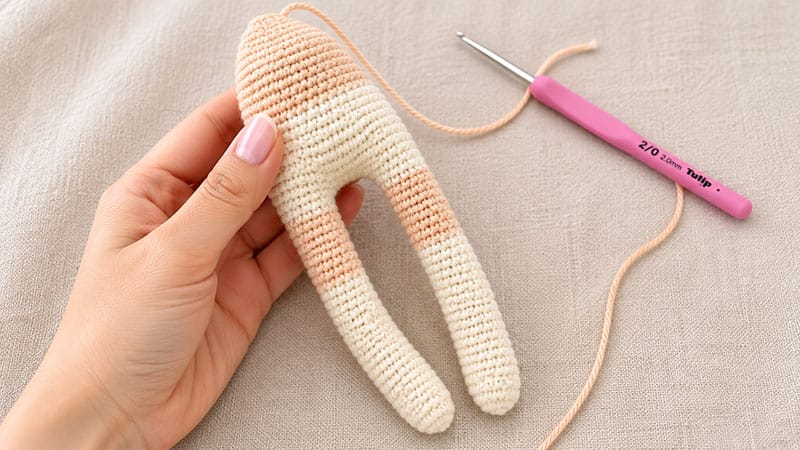
Using the continuous yarn from the second leg:
- Joining: Chain 6. Position both legs side-by-side with the toes pointing straight forward.
- Rnd 27: Single crochet into the 12 stitches of the first leg, single crochet into the 6 chain stitches, single crochet into the 12 stitches of the second leg, and single crochet along the opposite side of the 6 chain stitches [36].
- Rnd 28 to 34: Work one single crochet in each stitch around [36].
- Transition: Switch to the skin-colored yarn.
- Rnd 35 to 40: Work one single crochet in each stitch around [36].
- Rnd 41: (Single crochet in the next 4 stitches, decrease) repeat 6 times [30].
- Rnd 42 to 43: Work one single crochet in each stitch around [30].
- Rnd 44: (Single crochet in the next 3 stitches, decrease) repeat 6 times [24].
- Rnd 45: Work one single crochet in each stitch around [24].
- Rnd 46: (Single crochet in the next 2 stitches, decrease) repeat 6 times [18].
- Rnd 47 to 49: Work one single crochet in each stitch around [18].
Important: Stuff the body firmly with fiberfill before proceeding. Do not cut your yarn; you will transition directly into crocheting the head.
Step 3: Head
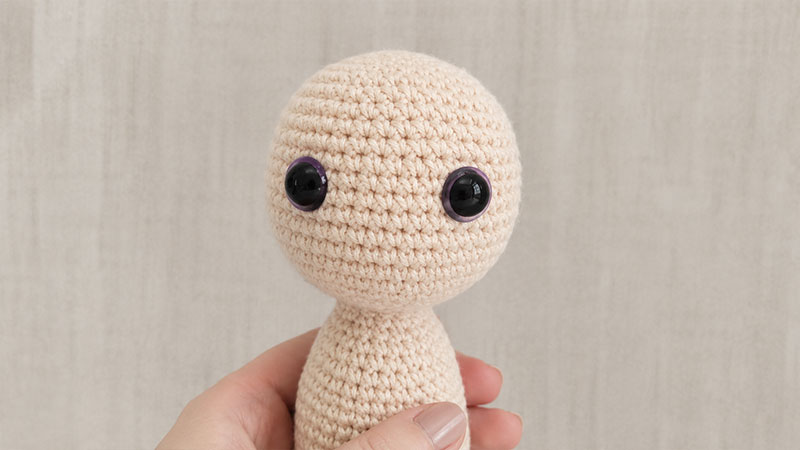
Continue directly from the final round of the body using the skin-colored yarn.
- Rnd 50: (Single crochet in the next 2 stitches, increase) repeat 6 times [24].
- Rnd 51: (Single crochet in the next 3 stitches, increase) repeat 6 times [30].
- Rnd 52: (Single crochet in the next 4 stitches, increase) repeat 6 times [36].
- Rnd 53: (Single crochet in the next 5 stitches, increase) repeat 6 times [42].
- Rnd 54: (Single crochet in the next 6 stitches, increase) repeat 6 times [48].
- Rnd 55: (Single crochet in the next 7 stitches, increase) repeat 6 times [54].
- Rnd 56 to 60: Work one single crochet in each stitch around [54].
- Rnd 61: (Single crochet in the next 7 stitches, decrease) repeat 6 times [48].
- Rnd 62 to 66: Work one single crochet in each stitch around [48].
- Rnd 67: (Single crochet in the next 6 stitches, decrease) repeat 6 times [42].
- Rnd 68: (Single crochet in the next 5 stitches, decrease) repeat 6 times [36].
- Rnd 69: (Single crochet in the next 4 stitches, decrease) repeat 6 times [30].
- Rnd 70: (Single crochet in the next 3 stitches, decrease) repeat 6 times [24].
- Rnd 71: (Single crochet in the next 2 stitches, decrease) repeat 6 times [18].
- Rnd 72: (Single crochet in the next stitch, decrease) repeat 6 times [12].
- Rnd 73: Work a decrease in each stitch around to close [6]. Fasten off and weave in the ends.
Eye Placement & Finishing
- Insert the 12 mm purple safety eyes securely between Round 60 and Round 61, leaving approximately 6 stitches of space between them.
- Stuff the head firmly with fiberfill before fully closing the final stitches.
- Use purple yarn to delicately embroider eyelashes and cute facial freckles if desired.
Step 4: Upper Extremities (Arms)
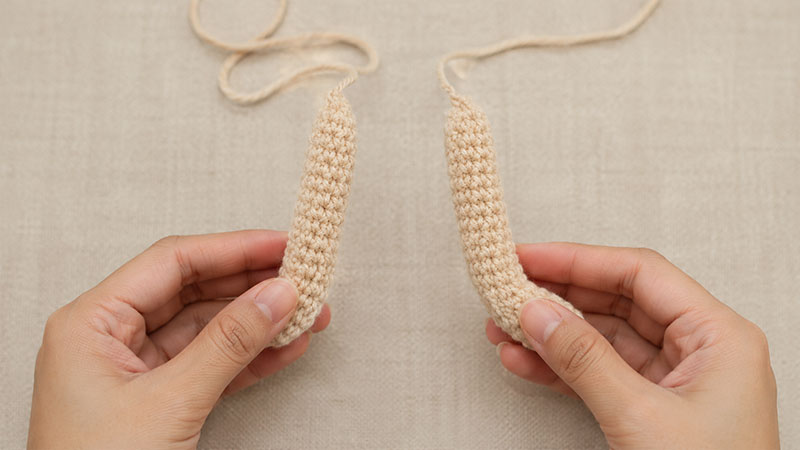
Make two identical arms using skin-colored yarn.
- Rnd 1: Work 6 single crochets in a magic ring [6].
- Rnd 2: Work an increase in 5 stitches, single crochet in the remaining stitch [10]. (Note: Pattern specifies inc 5 times; adjust total count to fit 10 sts).
- Rnd 3 to 5: Work one single crochet in each stitch around [10].
- Rnd 6: Work a decrease, single crochet in the next 6 stitches, decrease [8].
- Rnd 7 to 20: Work one single crochet in each stitch around [8].
- Rnd 21: Work 4 decreases in succession [4].
Fasten off, leaving a long yarn tail. Stuff the arms lightly, then sew them firmly to the upper torso where the neck section begins.
Step 5: Hair Cap & Individual Strands
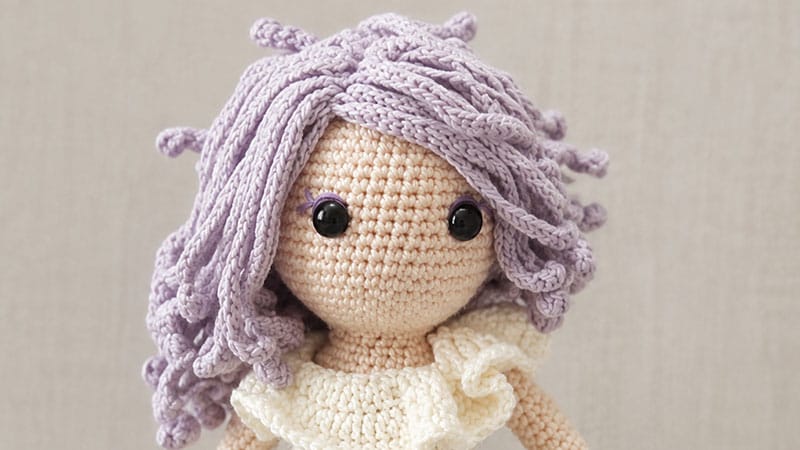
Using lilac-colored yarn, create the base hair cap and flowing hair strands.
Hair Cap Base
- Rnd 1: Work 6 single crochets in a magic ring [6].
- Rnd 2: Working in BLO, work an increase in every stitch [12].
- Rnd 3: Working in BLO, (single crochet in the next stitch, increase) repeat 6 times [18].
- Rnd 4: Working in BLO, (single crochet in the next 2 stitches, increase) repeat 6 times [24].
- Rnd 5: Working in BLO, (single crochet in the next 3 stitches, increase) repeat 6 times [30].
- Rnd 6: Working in BLO, (single crochet in the next 4 stitches, increase) repeat 6 times [36].
- Fasten off, leaving a long tail to sew the cap onto the head.
Individual Hair Strands (Make 63 Pieces)
- Attach your lilac yarn into the first BLO stitch of Round 2 on the hair cap using a slip stitch.
- Strand Formula: (Chain 41, insert your hook into the second chain from the hook and single crochet in the next 40 stitches, slip stitch into the next 2 stitches on the cap).
- Repeat this process until you have created 63 individual hair strands covering the cap.
- Sew the completed hair cap securely onto the head. Pin the hair strands around the face and head before tacking them down lightly with thread, ensuring they maintain a natural, mobile look.
Step 6: Outfit (Dress, Collar, & Skirt)
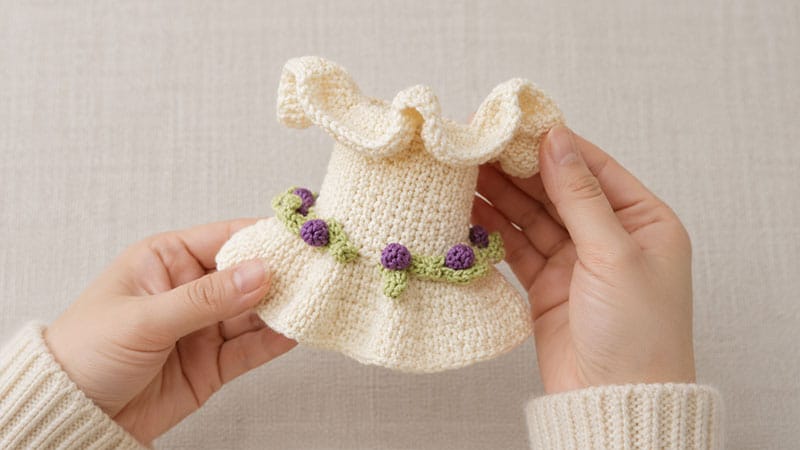
Upper Dress Section (Cream Color)
- Row 1: Chain 14. Starting from the second chain from your hook, single crochet in the next 13 stitches [13].
- Row 2 to 37: Chain 1, turn your work, and single crochet in the next 13 stitches [13].
- Bring the first and last rows together to form a seamless ring and sew the seam closed.
Collar Assembly
- Attach your cream yarn with a slip stitch to the top edge of the dress body, and work 36 single crochets evenly around the opening [36].
- Armhole Separation: Single crochet in the next 5 stitches, chain 9 while skipping 5 stitches, insert your hook into the 6th stitch to bridge the gap, single crochet in the next 14 stitches, chain 9 while skipping 5 stitches, insert your hook into the 6th stitch, and single crochet in the final 5 stitches.
- Collar Ruffle Construction:
- Rnd 1: Chain 2, turn, work a double crochet increase in each of the next 42 stitches [84].
- Rnd 2: Chain 2, turn, work (1 double crochet, 1 double crochet increase) repeatedly until the end of the round [126 dc].
- Rnd 3: Chain 2, turn, work 1 double crochet in each stitch around [126]. Fasten off.
Skirt Construction
- Attach cream yarn to the bottom edge of the dress body with a slip stitch, and work 36 single crochets evenly around [36].
- Rnd 1: Chain 2, turn, work (1 double crochet, 1 double crochet increase) around [54].
- Rnd 2: Chain 2, turn, work (double crochet in the next 2 stitches, 1 double crochet increase) around [72].
- Rnd 3: Chain 2, turn, work (double crochet in the next 3 stitches, 1 double crochet increase) around [90]. Fasten off and weave in ends.
Step 7: Decorative Dress Accents (Ivies & Bobbles)
Ivy Leaves (Green Yarn – Make 15)
- Chain 8, turn, insert your hook into the second chain from the hook and single crochet in the next 2 stitches, then work (1 half double crochet, 1 double crochet, 1 half double crochet, single crochet in the next 2 stitches) repeating across the strand 16 times. Fasten off.
Bobbles (Purple Yarn – Make 8)
- Chain 3 (the first chain forms a circular base while the remaining chains count as the initial double crochet), work a bobble stitch, then chain 7. Fasten off.
- Twist the purple bobble accents gracefully among the green ivy leaves, then sew this decorative garland securely around the belly area of the dress.
Step 8: Ears & Shoes
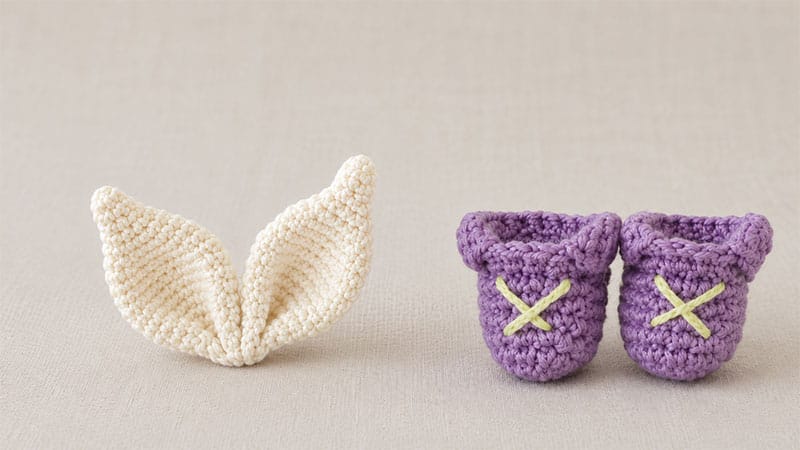
Ears (Cream Color – Make 2)
- Rnd 1: Work 6 single crochets in a magic ring [6].
- Rnd 2: Work one single crochet in each stitch around [6].
- Rnd 3: (Single crochet in the next 2 stitches, increase) repeat 2 times [8].
- Rnd 4: (Single crochet in the next 3 stitches, increase) repeat 2 times [10].
- Rnd 5: (Single crochet in the next 4 stitches, increase) repeat 2 times [12].
- Rnd 6: (Single crochet in the next stitch, increase) repeat 6 times [18].
- Rnd 7 to 8: Work one single crochet in each stitch around [18].
- Rnd 9: (Single crochet in the next 2 stitches, increase) repeat 6 times [24].
- Rnd 10: (Single crochet in the next 3 stitches, increase) repeat 6 times [30].
- Rnd 11 to 15: Work one single crochet in each stitch around [30].
- Rnd 16: (Single crochet in the next 3 stitches, decrease) repeat 6 times [24].
- Rnd 17: (Single crochet in the next 2 stitches, decrease) repeat 6 times [18].
- Rnd 18: Work one single crochet in each stitch around [18]. Fasten off, leaving a long tail. Fold the base of each ear slightly and sew the two edges together, then attach the completed ears firmly to the top of the head.
Shoes (Purple Color – Make 2)
- Rnd 1: Work 6 single crochets in a magic ring [6].
- Rnd 2: Work an increase in every stitch around [12].
- Rnd 3: (Single crochet in the next 3 stitches, increase) repeat 3 times [15].
- Rnd 4 to 6: Work one single crochet in each stitch around [15].
- Rnd 7: (Single crochet in the next 4 stitches, increase) repeat 3 times [18].
- Rnd 8: Work one single crochet in each stitch around [18].
- Rnd 9: Chain 1, turn, single crochet in the next stitch, half double crochet in the next stitch, double crochet in the next 12 stitches, half double crochet in the next stitch, single crochet in the final stitch. Fasten off cleanly.
Put the finished shoes onto your doll’s feet, and your Rubby Bunny Girl is officially complete!
