
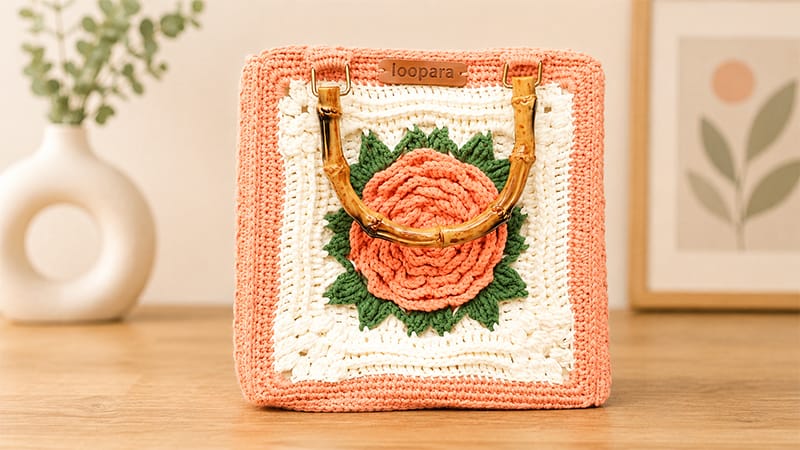
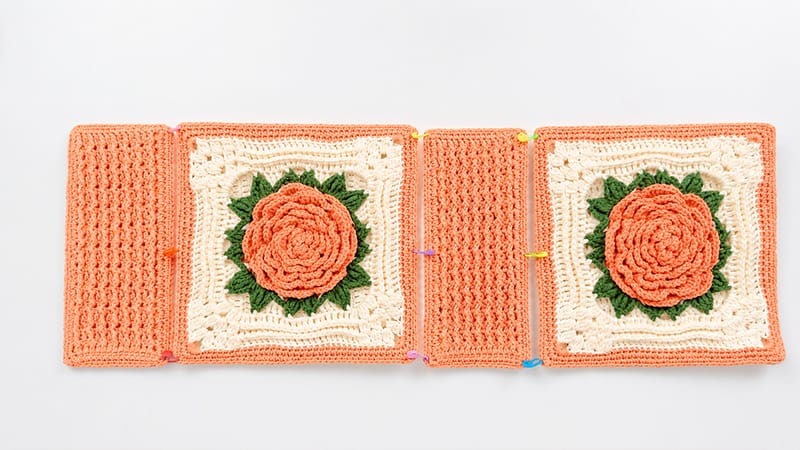
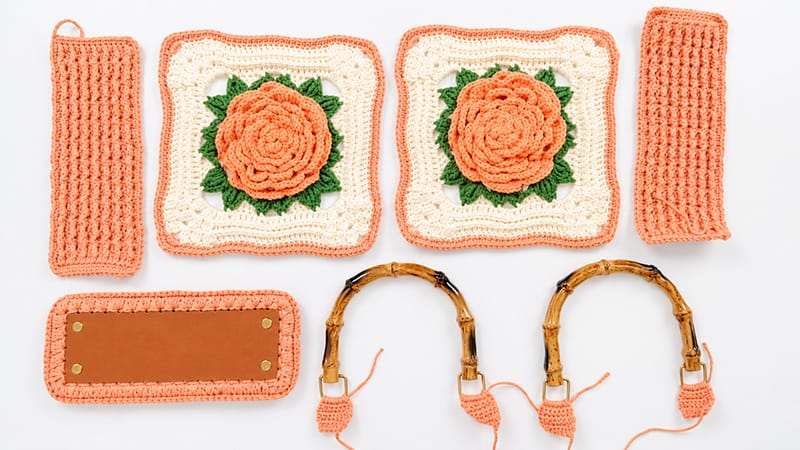
Create a sophisticated, romantic handbag by combining dimensional crochet techniques with structural support.
This project features a multi-layered rose motif that transforms into a classic textured granny square, complemented by durable side panels, a sturdy base, and elegant U-shaped bamboo handles.
Materials & Tools
Yarn
- Brand/Type: Loopara 5-ply combed cotton yarn
- Color Palette:
- Color A: Red (Color code 26) – For the rose petals
- Color B: Green (Color code 10) – For the leaves and initial square border
- Color C: Blue (Color code 45) – For the textured body of the granny square
- Color D: White (Color code 61) – For the outer border, clasps, and zipper connectors
Hardware & Notions
- Crochet Hook: 3.0 mm (or size needed to obtain gauge)
- Handles: 2 U-shaped bamboo bag handles
- Structure & Lining: Pre-punched faux leather bag bottom, plastic canvas grid panels, and coordinating lining fabric
- Closures: 1 matching zipper (approx. 30–35 cm)
- Tools: Sharp scissors, yarn needle, sewing needle, sewing thread, locking stitch markers, and positioning clips
Master Stitch Key & Abbreviations
- ch / ch-sp: Chain / Chain space
- sl st: Slip stitch
- sc: Single crochet
- hdc: Half double crochet
- dc: Double crochet
- tr: Treble crochet
- dtr: Double treble crochet
- inc: Increase (2 stitches in the same space)
- dec: Decrease (Invisible single crochet decrease preferred)
- FLO / BLO: Front loop only / Back loop only
- FPdc / BPdc: Front post double crochet / Back post double crochet
- bo (Bobble Stitch): A 4-dc cluster stitch. Yarn over, insert hook, pull up a loop, yarn over, pull through 2 loops (repeat 4 times in the same stitch until 5 loops are on the hook, yarn over, pull through all 5 loops).
- picot: Ch 3, sl st into the top of the previous stitch.
- RS / WS: Right side / Wrong side
Step-by-Step Crochet Instructions
Part 1: The Dimensional Center Rose (Make 1)
Using Color A (Red).
- Round 1: Form a magic ring. Work 6 sc into the ring. Join with a sl st to the first sc, ch 1. (6 sts)
- Round 2 [First Petal Tier – FLO]: Working in the front loops only, [sc, 4 dc] in the first stitch. Repeat from * to * 2 more times around. Join with a sl st, ch 1. (3 small petals)
- Round 3 [Foundation Base – BLO]: Working behind the petals into the remaining back loops of Round 1, [sc, ch 3] 5 times evenly spaced around. Join with a sl st, ch 1. (5 ch-3 loops)
- Round 4 [Second Petal Tier]: In each ch-3 loop around, work: [1 sc, 1 hdc, 2 dc, 1 hdc]. Join with a sl st in the space between the first hdc and dc of the round, ch 1. (5 petals)
- Round 5 [Foundation Base]: Work 6 ch-4 loops behind the current petals, securing them with an sc around the stems of the previous rounds. Note: Add one extra ch-4 loop space between the dc and hdc on the left side of the third petal to increase the base structure. Join with a sl st, ch 1. (6 ch-4 loops)
- Round 6 [Third Petal Tier]: In each ch-4 loop around, work: [1 sc, 1 hdc, 3 dc, 1 hdc]. Join with a sl st, ch 1. (6 petals)
- Round 7 [Foundation Base]: Work 7 ch-4 loops behind the petals, anchoring with an sc. Join with a sl st, ch 1. (7 ch-4 loops)
- Round 8 [Fourth Petal Tier]: In each ch-4 loop around, work: [1 sc, 1 hdc, 4 dc, 1 hdc]. Join with a sl st, ch 1. (7 petals)
- Round 9 [Foundation Base]: Work 8 ch-5 loops behind the petals, anchoring with an sc. Join with a sl st, ch 1. (8 ch-5 loops)
- Round 10 [Fifth Petal Tier]: In each ch-5 loop around, work: [1 sc, 1 hdc, 5 dc, 1 hdc]. Join with a sl st, ch 1. (8 petals)
- Round 11 [Foundation Base]: Work 8 ch-6 loops behind the petals, anchoring with an sc. Join with a sl st, ch 1. (8 ch-6 loops)
- Round 12 [Sixth Petal Tier]: In each ch-6 loop around, work: [1 sc, 1 hdc, 6 dc, 1 hdc]. Join with a sl st, ch 1. (8 petals)
- Round 13 [Foundation Base]: Work 8 ch-6 loops behind the petals, anchoring with an sc. Join with a sl st. (8 ch-6 loops)
- Round 14 [Seventh Petal Tier]: In each ch-6 loop around, work: [1 sc, 1 hdc, 7 dc, 1 hdc]. Join with a sl st, ch 1. (8 large petals)
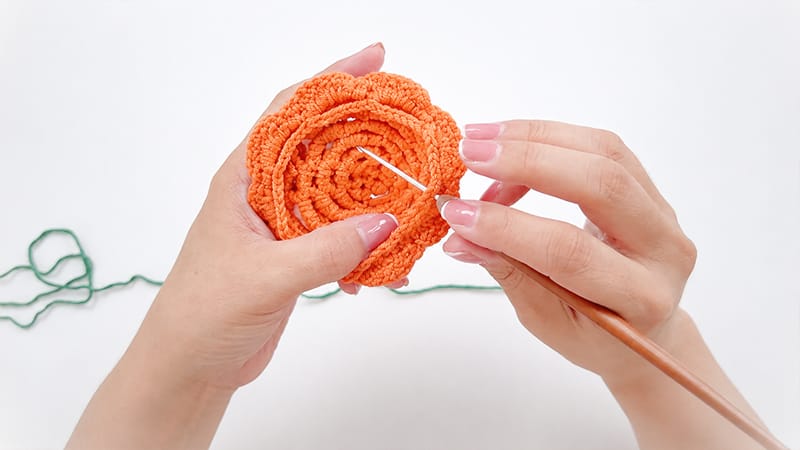
- Round 15 [Final Base Ring]: Work 8 ch-7 loops along the very back of the flower. Join with a sl st. Fasten off and weave in your ends safely.
       [Magic Ring: 6 sc]
               │
      (FLO Petals / BLO Bases)
               │
     [Tiers 1 to 7 Completed]
               │
   └── Final Base: 8 x ch-7 loops
Part 2: Foliage & Leaves
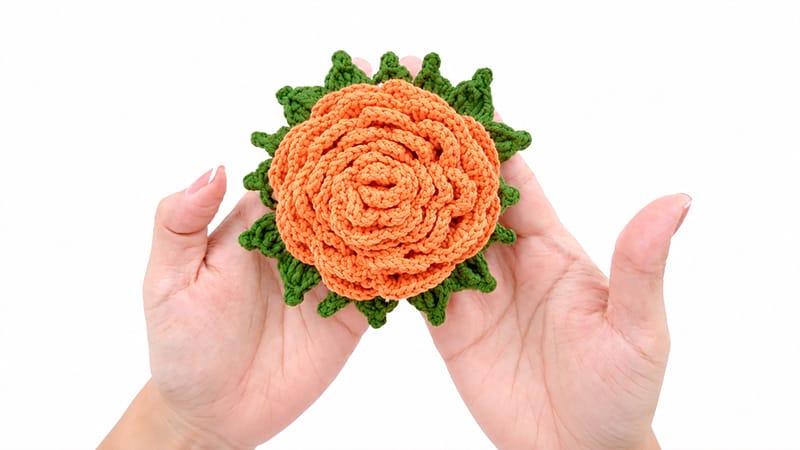
Attach Color B (Green) to the ch-7 loops at the back of the rose.
- Leaf Layout: Work the following sequence a total of 4 times around the 8 background loops to build a square framework:
- Step A: In the first loop, work [ch 2, dc, tr, dtr, picot, tr, dc, ch 2, sl st]. Repeat this exact sequence a second time within the same loop to create a twin leaf cluster.
- Step B: Move to the next loop. Work [ch 4, dc, tr, picot, ch 3, sl st] to form the first half of a split leaf, then continue with [ch 3, tr, picot, dc, ch 4, sl st] in the same stitch space to finish the cluster.
- Fasten off and secure all loose yarn tails.
Part 3: Transforming into the Granny Square
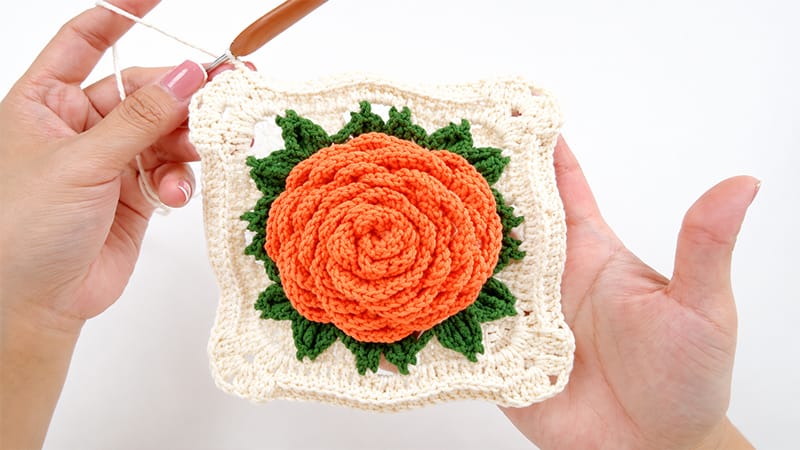
Continue with Color B (Green) for Round 1, then transition to Color C (Blue) and Color D (White).
- Round 1 (Green): Join yarn to a leaf peak. Ch 1, [(sc, ch, 3 tr, ch, sc) into the first corner gap, ch 4, sc into the side gap, ch 1, 3 tr, ch 1, sc into the next space, ch 7 for the wide corner] repeat 4 times around. Sl st to join. Fasten off Green.
- Round 2 (Blue): Join Color C. Ch 2 (does not count as a stitch), [(2 dc, ch 1, bo, ch 3, bo, ch 1, 2 dc) in the corner space, followed by 17 dc evenly along the straight edge] repeat 4 times around. Sl st to join, ch 2.
- Round 3 (Blue): [(Ch 1, bo, ch 1, bo, ch 3 in the corner, bo, ch 1, bo, ch 1) across the corner configuration, then work 21 bpdc across the previous round’s flat edge] repeat 4 times around. Sl st to join, ch 2.
- Round 4 (Blue): [(Ch 1, bo, ch 1, bo, ch 1, bo, ch 3 in the corner, bo, ch 1, bo, ch 1, bo, ch 1), then work 21 bpdc across the flat edge] repeat 4 times around. Sl st to join. Fasten off Blue.
- Round 5 (White): Join Color D. Ch 1, [work 5 sc into the ch-3 corner space, then work 33 sc in the BLO across the side] repeat 4 times around. Sl st to join, ch 1.
- Round 6 (White): [Work 2 sc, 1 sc inc in the center corner stitch, then 35 sc along the side] repeat 4 times around. Sl st to join. Fasten off, leaving a long tail for final assembly.
Part 4: Structured Side Panels (Make 2)
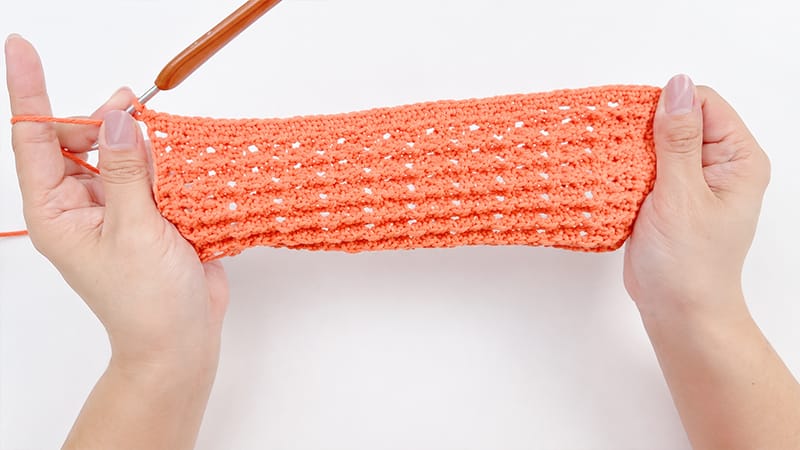
Using Color D (White).
- Row 1: Ch 16. Starting in the 2nd chain from the hook, work 15 sc. Ch 3, turn. (15 sts)
- Row 2: Work 14 dc across the row. Ch 3, turn.
- Row 3 [Ribbed Pattern]: [1 FPdc around the next post, 1 dc into the next stitch] repeat across the row 7 times. Ch 3, turn.
- Row 4 [Ribbed Pattern]: [1 BPdc around the next post, 1 dc into the next stitch] repeat across the row 7 times. Ch 3, turn.
- Rows 5–22: Alternate Rows 3 and 4 until you complete 22 rows total, finishing on the right side (RS).
- Border Rounds (Rows 6–9): Work a neat single crochet border around all four edges of the panel:
- Work sc evenly along the vertical edges (placing 2 sc into each double crochet row-end space).
- Work 15 sc across both the top and bottom foundational edges.
- Join with a sl st to the start, fasten off, and weave in ends.
Part 5: Prepared Bag Base (Make 1)
Using Color D (White) and the pre-punched leather base.
- Place stitch markers at the four corner holes of the leather base.
- Join yarn at any straight edge hole. Work 2 sc into every standard hole, and 3 sc into each marked corner hole. Join with a sl st, ch 1.
- Turn the piece so the textured, bumpy side faces you (this will be the external bottom of your bag).
- Work 108 sc in the BLO around the base perimeter to create a clean upward-turning edge. Sl st to join.
- Finish by working 1 surface slip stitch round directly through the prepunched holes for extra structural reinforcement. Fasten off.
Part 6: Handle Attachment Clasps (Make 4)

Using Color D (White).
- Row 1: Attach yarn directly around the lower bar of your U-shaped bamboo handle ring. Work 8 sc over the bar. Ch 1, turn.
- Rows 2–6: Work 8 sc across. Ch 1, turn.
- Row 7 (Shaping): Work 1 invisible dec, 4 sc, 1 invisible dec. Sl st to finish. Fasten off, leaving a 30 cm tail for sewing.
Assembly, Structuring & Lining
 ┌─────────────────────────────────────────────────────────┐
 │                  CUTTING THE MATERIALS                  │
 └────────────────────────────┬────────────────────────────┘
                              ▼
   [Plastic Canvas Grid]              [Lining Fabric]
   • Cut flush with sizes of          • Cut 1 cm wider on all
     crochet panels.                    sides for seam allowance.
1. Stabilizing with Plastic Canvas
- Lay your completed crochet main panels and side panels flat over the plastic grid boards. Trace and cut out matching shapes.
- Align the plastic grid directly behind the corresponding crochet pieces. Use positioning clips to hold the layers together securely.
- Using a crochet hook and White yarn, insert your hook through both the crochet stitches and the plastic mesh windows simultaneously. Work a border of single crochets around the perimeter to join them into single, rigid panels.
2. Tailoring and Installing the Lining
- Lay your cut lining fabric pieces over the matching plastic-backed panels. Fold the raw edges of the fabric inward by 1 cm to hide the frayed ends.
- Pin the folded fabric directly along the interior borders of your panels.
- Using a sewing needle and matching sewing thread, blind-stitch the lining down along the final row of single crochets. Ensure no stitches pierce through to the right side of the crochet work.
3. Joining the Panels Together
- Side and Main Panel Seams: Align the main granny square panels with the structured side panels using stitch markers. Join them using the mattress stitch:
- Pick up only the outer loops (half stitches) from each side, matching them one-to-one.
- Keep your yarn tension relaxed so the seams do not pull or warp the shape of the bag. Finish with a secure slip stitch and weave in the ends.
- Bottom Base Seam: Align the assembled upper body with the prepared leather base. Join them using a tight whip stitch, passing your sewing needle through both complete loops of the matching stitches. Pull firmly to ensure a flat, heavy-duty seam.
- Top Edge Finish: Connect your yarn to the top opening of the bag and work 1 continuous round of single crochet to create a clean, uniform rim.
Final Touches
Zipper Installation
- Crochet Zipper Flaps: Using Color D, ch 43. Work 40 dc across for 4 consecutive rows to make a narrow fabric strip. Repeat to make a second strip.
- Sew your zipper securely between these two crocheted strips using a close whip stitch.
- Attach the entire zipper assembly to the inner rim of the bag opening using a mattress stitch for a clean, hidden finish.
Handle Mounts
- Position the 4 handle loops symmetrically onto the exterior face of the bag opening.
- Align the bottom edge of the white clasps with the top of the white border section on the main panels.
- Thread a yarn needle with the reserved 30 cm tails and sew through all layers (crochet, grid, and lining) using a heavy-duty box stitch pattern ($X$ inside a square) for maximum strength. Knot securely inside the lining and hide the remaining yarn tails.
